Scheduling an Appointment
Appointments are scheduled in the Scheduling Module. Some facilities may only schedule surgical cases, while others may also schedule P.A.T. and Recovery Care Appointments.
While scheduling an Appointment, you have the ability to access the Demographics screen to edit patient information, add insurance policies and billing groups and verify insurance. At any time while scheduling the Appointment, you can view Reservations (a list of the Scheduling Resources you have reserved), or run an Appointment Summary (a report showing past or future appointments scheduled for this Patient). To learn more, click the appropriate topics under Appointment object Sheet Bar options heading below.
To schedule an Appointment
-
Open the Scheduling module.
-
Select a View and date for the appointment. The default View is listed on the View menuView menu. If this View is in bold font, it is the system default. If it is not, it is your personal default preference. Click here to learn how to select a different view. Click here to learn how to navigate to a specific date on the Scheduling GridScheduling Grid.
-
There are three ways to begin scheduling an appointment from the Grid. You can choose any one of these methods:
Right-click an open time slot on the Scheduling Grid and click New Appointment. The Person - Patient Selection dialog appears. OR
Click a time slot on the Scheduling Grid. From the Sheet Bar, under the Appointment heading, click New Appointment. The Person - Patient Selection dialog appears. OR
Double-click a time slot on the Scheduling Grid. The Person - Patient Selection dialog appears.
-
Select an existing patient from the Person - Patient selection dialog or click New to create a new patient record. Click here to learn how to create a new Patient record.
-
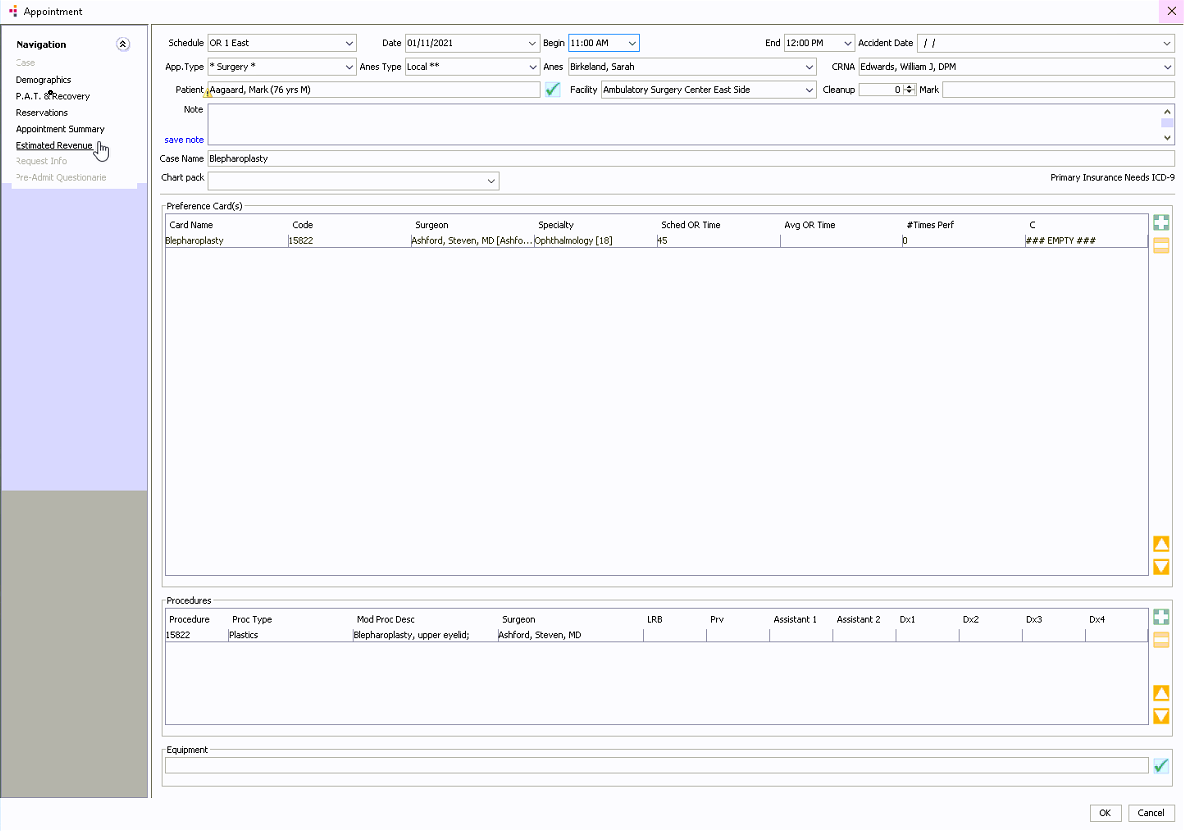
After you have selected or created a Patient record, the Appointment screenAppointment screen launches. On the Appointment screen Sheet Bar, the Case option under Navigation is automatically selected, and the Case details are shown in the right-hand pane of the screen.
-
Complete at least the required fieldsrequired fields in the Appointment screen to create a new Appointment. It is recommended that you complete as many of the fields as possible.
-
Schedule
-
Date
-
Begin
-
End
-
Appointment Type
-
Patient
-
-
The Case Details sectionCase Details section at the top of the screen displays basic patient and case information. Click herehere to learn more about these fields.
-
- ScheduleSchedule
(Required field)
The Room you clicked on the Scheduling Grid defaults into this field. Change the Room using the drop-down list.
- DateDate
(Required field)
The Time you clicked on the Scheduling Grid defaults into this field. Use the Date field to change the datechange the date of the appointment.
Use one of the following methods to populate a date field:
- Manually type a date in the field. You must use this date format: MM/DD/YYYY.
Or
- Click the drop-down in the date field to access a calendarcalendar:
- Populate the date field by clicking a date on the calendar.
- Leave the field blank by clicking None.
- Navigate to a prior or future month using the arrows to the right and left of the month name.
- Click the month name to see a list of months and select the name of the month you wish to view from the list.
- Navigate to a prior year by clicking the year and using the up/down arrows to move forward or back one year at a time.
- Populate the field with today's date by clicking Today.
- BeginBegin (Required field)
If you have selected a time on the Scheduling Grid, that time defaults into this field. Use the drop-down list to select or change the time the procedure should begin. This is not the patient's arrival time.
- EndEnd (Required field)
The end time of the time slot you clicked on the Scheduling Grid will default into this field based on the time increments of your slots. After you select an Appointment Type, the End Time of that Appointment Type will replace the time in this field if a Duration was defined for this Appointment Type in the dictionary. After you select a Preference Card for the case, you will have the opportunity to change the End Time to match the Procedure duration on the Card. You can also use the drop-down list to select or change the End Time for the appointment.
- Accident DateAccident Date
If the procedure you are scheduling is related to an accident, use this field to note the datedate of that accident. The information will flow over to billing when the case is performed.
Use one of the following methods to populate a date field:
- Manually type a date in the field. You must use this date format: MM/DD/YYYY.
Or
- Click the drop-down in the date field to access a calendarcalendar:
- Populate the date field by clicking a date on the calendar.
- Leave the field blank by clicking None.
- Navigate to a prior or future month using the arrows to the right and left of the month name.
- Click the month name to see a list of months and select the name of the month you wish to view from the list.
- Navigate to a prior year by clicking the year and using the up/down arrows to move forward or back one year at a time.
- Populate the field with today's date by clicking Today.
- Appointment TypeAppointment Type
(Required field)
Use the drop-down list in this field to note the type of appointment you are scheduling. To add new Appointment Types to the Appointment Type Dictionary, type Alt d in this field. To edit existing ones, type Alt e in the field. For complete instructions on adding/editing Appointment Types, click here.
- Anesthesia TypeAnesthesia Type
Use the drop-down list in this field to note the anesthesia type. To add new Anesthesia Types to the Dictionary, type Alt d in this field. To edit existing ones, type Alt e in the field. For complete instructions on adding/editing Anesthesia Types, click here.
- Anes (Anesthesiologist)Anes (Anesthesiologist)
Select an Anesthesiologist for the Appointment using the drop-down list.
- CRNACRNA
If a CRNA should be assigned to this case instead of an Anesthesiologist, select the CRNA from the drop-down list.
- PatientPatient
The Patient name defaults from a previous step in scheduling an appointment.
- FacilityFacility
If your Business Entity has specified a main facility in your organization table, that facility name defaults here. If you are scheduling for a different facility, select that facility from the drop-down list.
- CleanupCleanup
The cleanup time for the procedure defaults here if it was entered when the procedure was defined at the Procedure Table level. You can enter an estimated cleanup time, or change the default.
- MarkMark
This field is not used at this time.
- NoteNote
This field is used to create an Appointment Note, which is typically used to note special equipment or supplies needed for the case. If there is an Appointment Note, the Appointment will be flagged on the Grid with a paper clip icon. Users hover over the iconicon to read the note.
- Case NameCase Name
Your facility may set a preference in the Preference Editor in the Administration module for a specific name to default here. Alternatively, your facility may set this field to be free text so that you may enter your own Case Name.
- Chart
PackChart
Pack
If your facility uses Chart Pack to create paper forms, this field will automatically populate with the pack (or collection) of forms appropriate for the Appointment Type you selected. To add a Chart Pack, click the drop down arrow in this field. To remove a Chart Pack, right-click in the field and select Clear.
- ScheduleSchedule
(Required field)
-
-
If your facility schedules using Preference Cards, select one or more Preference Cards for the case. When you select a Preference Card, the fields in the Preference Card sectionPreference Card section of the Appointment screen are automatically populated with the information on the Card, the Procedure listed on the Card is populated in the Procedure section (see description that follows), and any Equipment listed on the Card populates the Equipment section (see description that follows). To learn how to select a Preference Card, click here.
-
When you select a Preference Card, certain fields in the Procedures sectionProcedures section automatically populate with the information on the Card. You can add or change information in some of these fields, or if you do not schedule by Preference Card, you can manually add a procedure(s) to the appointment fields. Click herehere to learn how to edit the fields in the Procedures section.
-
- ProcedureProcedure
The code(s) from the Card automatically populates this field. If the code does not match the Surgeon's booking sheet, click the drop-down list to change it.
- Proc
TypeProc
Type
Defaults from the Procedure Dictionary based on the procedure selected.
- Mod
Proc DescMod
Proc Desc
Sometimes, the name of the Procedure varies, depending on whether you are referencing the Surgeon's booking sheet, the CPT® code, or the code the facility uses. You can change the Procedure name in this field to match the name that works best for your needs by clicking Ctrl a in the field. Type the new name in this field. The modified description is used on many of the forms and reports printed from the system.
- SurgeonSurgeon
The Surgeon associated to the Card you chose defaults into this field. You can change the Surgeon by selecting a different one from this fields drop-down list.
- LRBLRB
Stands for Left, Right, Bilateral and refers to the area of the body on which the Procedure is to be performed. Select the appropriate option from the list.
- PrvPrv
Denotes whether the Surgeon's privileges for this Procedure are valid. For invalid privileges, a yellow caution sign indicating a conflict will appear in this field if conflict checking has been turned on for Privileges. Hover over this sign for more information.
- Assistant
1, Assistant 2Assistant
1, Assistant 2
Use these fields to designate any Assistant Surgeons. A drop-down list tied to the Physician Dictionary is used to select the assistant for the case.
- Dx1,
Dx2, Dx3, Dx4Dx1,
Dx2, Dx3, Dx4
Use these fields to select the diagnosis or diagnoses for the case. This drop-down listdrop-down list includes both ICD-9 and ICD-10 codes. The primary insurance company's preference for ICD codes is noted above the Preference Card sectionabove the Preference Card section of the Appointment screen.

- ProcedureProcedure

-
-
If there is Equipment specified for the Procedure on the Preference Card, it defaults into the Equipment sectionEquipment section. You can add additional Equipment in this section as long as that Equipment has been designated as a Scheduling Resource in the appropriate dictionary. Click herehere to learn how to add Equipment to the appointment.
-
- Click the check mark icon. The Select equipment dialogSelect equipment dialog
appears.
- Click the plus sign icon and then select Equipment from the Equipment drop-down list.
- Type number of units in the Quantity field for the Equipment you entered.
- To change the position of a piece of Equipment, select it and move it using the up and down arrows.
- When you have finished adding or editing the equipment click Close to save the changes.
- Click the check mark icon. The Select equipment dialogSelect equipment dialog
appears.

-
-
If you wish to edit Patient demographic information, click Demographics from the Sheet Bar. The Demographics screen is primarily used during scheduling and registration to enter or edit the patient's personal and insurance information and to verify insurance coverage. You can also post a co-pay/deposit in the Demographics module. The Demographics screenDemographics screen launches when you click Demographics from the Appointment screen Sheet Bar. Click here to learn how to edit the Demographics screen.
-
Click OK on the Appointment screen to schedule the Appointment.
-
If there are any Conflicts, an alert windowalert window will appear indicating what those Conflicts are. Conflicts in Suggested fields will not prevent you from saving the Appointment. If there are any Conflicts in Mandatory fields, the Continue Save button on the alert window will be disabled, and you will not be able to save the Appointment until those Conflicts are corrected. Click here to learn more about Conflict Checking.
Appointment screen Sheet Bar options
The following Sheet Bar optionsSheet Bar options on the Appointment screen allow you to access all functionality related to scheduling an appointment. Click the links for detailed instructions for using each option.

- Case
- Demographics
- P.A.T. & Recovery
- Reservations
- Appointment Summary
- Estimated Revenue (Select this topic if you are working on AmkaiOffice Version 3.17x or earlier.)
- Estimated Revenue (Select this topic if you are working on AmkaiOffice Version 3.18x or later.)
- Request InfoRequest Info
Request info will only be active if your facility has purchased AmkaiLink, and the appointment you have accessed was created through the physician portal. The system will display a PDF document showing the original request details sent through the portal for the appointment.
- Pre-Admit QuestionnairePre-Admit Questionnaire (For AmkaiOffice 4.5.0 and later)
If a Pre-Admit Questionnaire has been added to the record, this option will be enabled. Click Pre-Admit Questionnaire to open and view the attachment. If the attachment is not a PDF, the system will display a message offering the option to view the attachment from CDM or Document Central.
Related Topics