The Scheduling Grid
You can view, schedule and change Appointments in the Scheduling module on the Scheduling GridScheduling Grid.

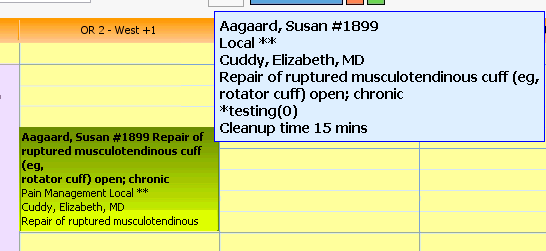
The Grid is laid out like a calendar with rows labeled with increments of time and columns typically labeled with Rooms your facility uses for scheduling appointments. Appointments and Templates for the current Business Entity display on the Scheduling Grid, but you can choose to display Appointments and Templates for other entities within the same Business Group using filters available within the module. You can place the cursor over an Appointment to reveal a hover windowhover window that shows more detail about the Appointment.

Your facility must set up Views (at least one) of the Scheduling Grid in order to begin scheduling appointments. Columns are typically labeled by room such as OR 1, OR 2 or Endo/GI Room, but can be set up according to any scheduling resource (rooms, providers, or equipment). Views can be set up with different room configurations or with different time increments. For example, you may schedule appointments in your operating rooms in 15 minute increments but prefer to schedule procedures in your Endo/GI room in 20 minute increments. You can set up views that are specific to the room type, so the appointments are managed based on the time increments.
Video Demo
Click the following link to view a video tour of the Scheduling Grid. The video demonstrates how the features of the grid work, navigating the grid and filtering the appointments that display on the grid.
Navigating the Scheduling Grid
Tools for navigating the Schedule are located on the menu barmenu bar at the top of the Grid.

- Click the single arrows to the right and left of the Today button to move forward or backward one work day at a time. Work days are defined in setup and can be specific to the View, so if you are on Friday and you move forward one day, the Grid will move to the next work day. Typically work days will be Monday through Friday. Click the double arrows to move forward or backward by one week at a time.
- Click the Today button to return to today's date.
- Click herehere to learn how to select a different date.
Use one of the following methods to populate a date field:
- Manually type a date in the field. You must use this date format: MM/DD/YYYY.
Or
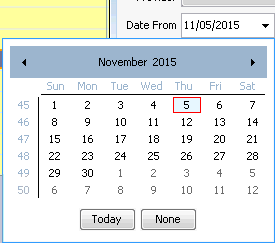
- Click the drop-down in the date field to access a calendarcalendar:

- Populate the date field by clicking a date on the calendar.
- Leave the field blank by clicking None.
- Navigate to a prior or future month using the arrows to the right and left of the month name.
- Click the month name to see a list of months and select the name of the month you wish to view from the list.
- Navigate to a prior year by clicking the year and using the up/down arrows to move forward or back one year at a time.
- Populate the field with today's date by clicking Today.
- To view one day's schedule, click the Daily button at the far right of the menu bar. This is the default viewdefault view and is the one typically used to schedule Appointments.

- To view the schedule for the entire work week grouped by Scheduling Resourcegrouped by Scheduling Resource, click the Weekly button.

- To view the schedule for the entire work week grouped by days of the weekgrouped by days of the week, click the Weekly drop-down list to select Weekly by Day. Appointment details will not show in this view: only hover information is available.

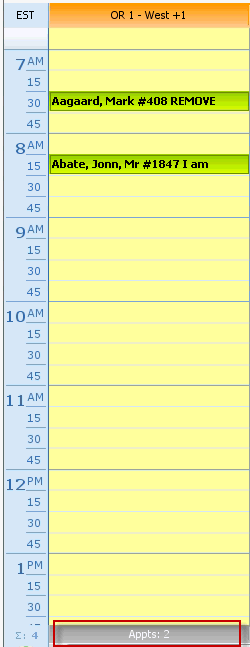
- A fieldfield at the bottom of each column shows the total number of Appointments booked for that Scheduling Resource.

- Click herehere to learn how to change the column width.
Note: To adjust the width of the columns on the schedule grid move the cursor to the top of a column's vertical grid line between rooms. When the system displays a double arrow icon click and drag the column to the new width. You can set preferences for column width and other aspects of the Scheduling Grid display in the Preference Editor. See Setting Scheduling Module Preferences.
- After the Pre-Admit Questionnaire is imported into AmkaiOffice, a "clip board" icon appears on the Schedule Grid for the case. (For AmkaiOffice 4.5.0 and later)

Filtering the Appointments that display on the Scheduling Grid
Tools for filtering the types of Appointments that show on the Grid are located on the menu barmenu bar at the top of the Grid.

- By default, cancelled Appointments do not show on the Grid. Select the Show Cancelled check box to display both scheduled and cancelled appointments. Cancelled appointments will display with a red X over them.
- Click the Filters button on the menu bar to access a dialogdialog that allows you to select multiple filter criteria to determine which types of appointments show on the Grid.

- When you are viewing today's date on the Grid, three colored blocks appear to the right of the Filters button. Hover over the buttonsbuttons to reveal the total number of appointments scheduled for today and the number of appointments currently in each of three statuses: Not yet arrived, At the facility, or Discharged. These buttons are derived from the Arrival/Departure status of the patient, which is updated either from the right-click menu in the Scheduling module, or from the CDM module. As patients’ records are updated by the nursing staff upon discharge, the status of the appointment on the scheduling grid will also be updated to Discharged.

- To view any electronic appointments requests from physicians, click the blue text to the left of the Daily button. The text will indicate whether any requests have been received. The Appointment Requests dialog appears. See Appointment Requests to learn how to process these requests. Physicians must purchase the electronic appointment request feature separately. This feature is an add-on option associated with remote scheduling though AmkaiLink. Appointments will only be displayed here if your organization uses AmkaiLink.
