Appointment Requests (from AmkaiLink)
The Appointment Request tool is an optional feature available to surgeon's practices which allows them to send appointment requests electronically from AmkaiLink to your facility. Your facility can view, deny and fulfill these appointment requests from the Scheduling module in AmkaiOffice.
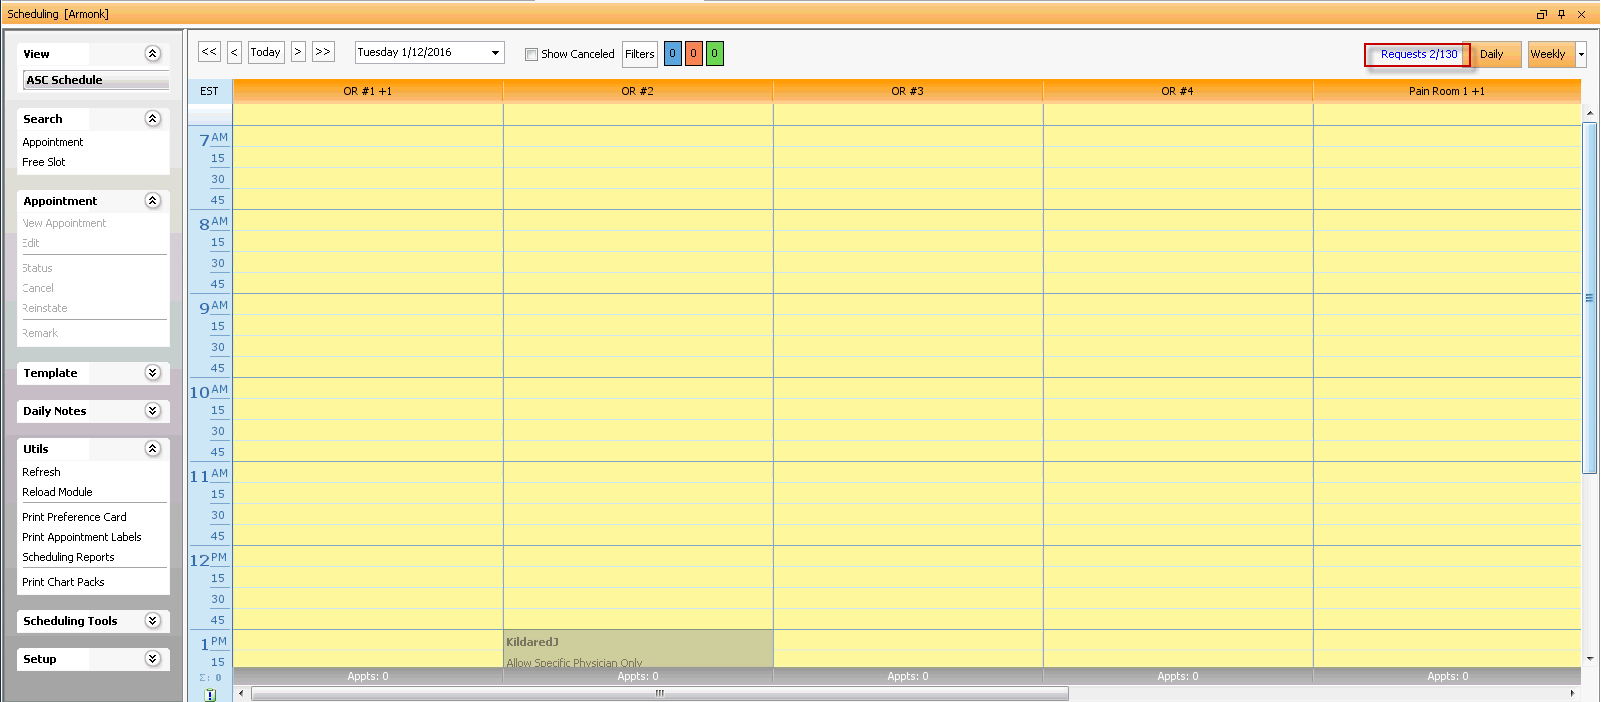
If your facility has received any Appointment Requests from providers, there will be a Requests buttonRequests button visible in the upper right of the Scheduling Grid. The numbers to the right of the word Requests indicate how many requests have been received and how many of those are still pending, meaning the requested appointments have not yet been scheduled or denied. (e.g. "Requests 2/130" means there are 2 pending requests for today out of a total of 130 pending requests received.)
Click here to view a video demonstrating how to use AmkaiLink.
To view electronic Appointment Requests received from providers
- Open the Scheduling module.
- Do one of the following:
- Click Requests in the upper right of the Scheduling Grid. Or,
- From the Scheduling Tools headingScheduling Tools heading on the Sheet Bar, select Appointment Requests.

- The Appointment Requests dialogAppointment Requests dialog appears. It is open by default to the Filters tab. All pending appointment requests are listed in the Appointment Requests table. You can sort the list by the Req Date column. To expand the table to view the full text in each column, click the orange and white arrow at the bottom of the dialog. To return to the previous view, click Refresh.
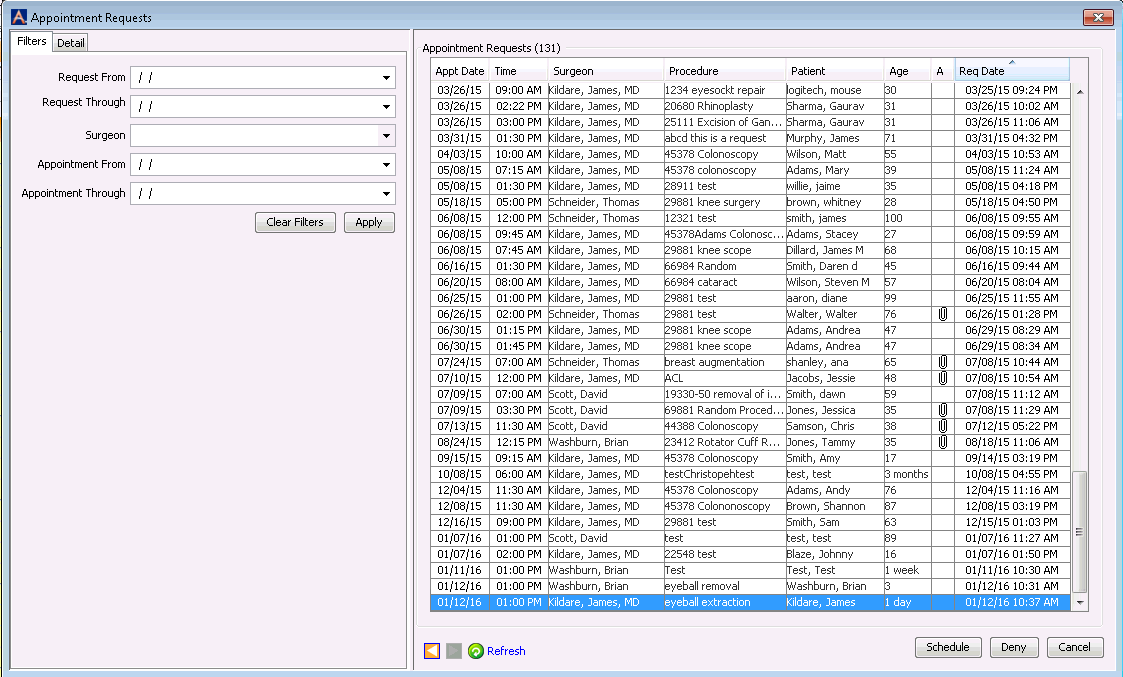
- If you do not see the request you seek, you can narrow the list of appointment requests using the following filters:
- Request From /Request ThroughRequest From /Request Through
Enter a date range for the system to search for requests received and click Apply. The system will return a list of requests received from the From date to the Through date. Select None from the drop down calendar to clear the field or click Clear Filters to clear all fields.
- SurgeonSurgeon
Select the surgeon whose request(s) you want to view from the drop down menu and click Apply. To clear the field, right-click and select Clear or click Clear Filters to clear all fields.
- Appointment From /Appointment ThroughAppointment From /Appointment Through
Enter a date range that covers the dates of Appointments requested. For example, if you want to begin scheduling appointments for the next week, you would enter tomorrow's date in Appointment From and a date two weeks from tomorrow in Appointment Through. Click Apply to process the query. Select None from the drop down calendar to clear the field, or click Clear Filters to clear all fields.
- Request From /Request ThroughRequest From /Request Through
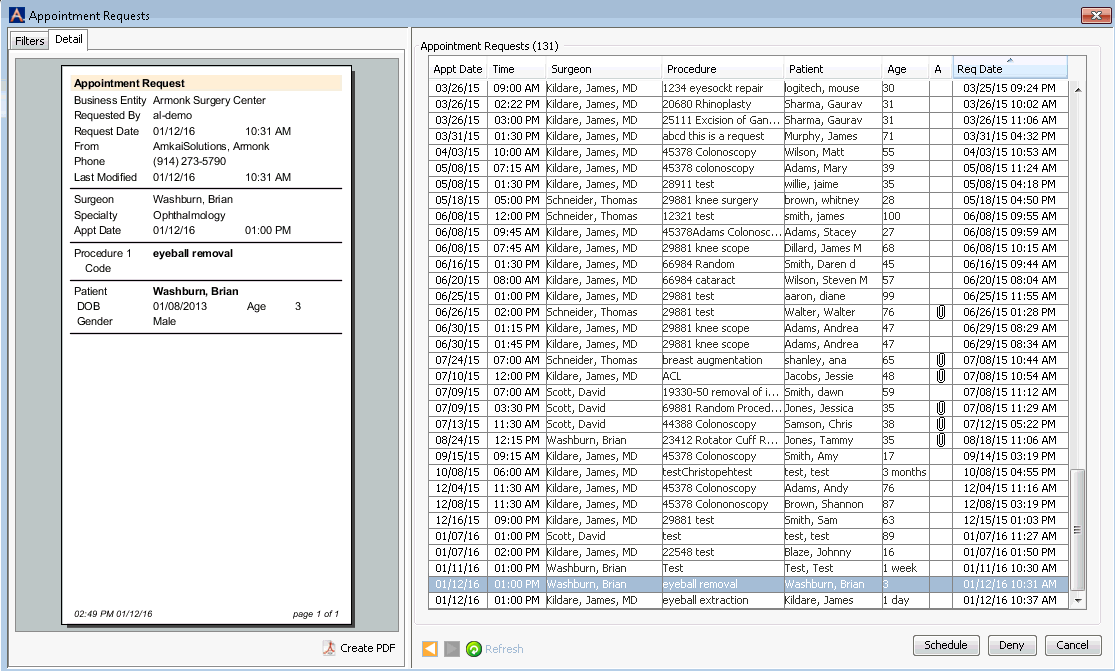
- To view the details of an appointment request, select it from the table. The Detail tabDetail tab populates with the information entered by the provider's office.
To deny an electronic Appointment Request
- To deny a request, select it from the table and click Deny. A message appears requesting a reason for the denial.
- Type the reason for the denial in the free text field in the message dialog, and click OK. Your message will be sent electronically to the AmkaiLink schedule where the physician’s office will be able to view the reason for the denial. The appointment request will then drop off of the pending requests list.
To schedule an appointment requested electronically
- Select the request from the table and click Schedule. The Scheduling Grid will display the details of the appointment request in the left-hand paneleft-hand pane.
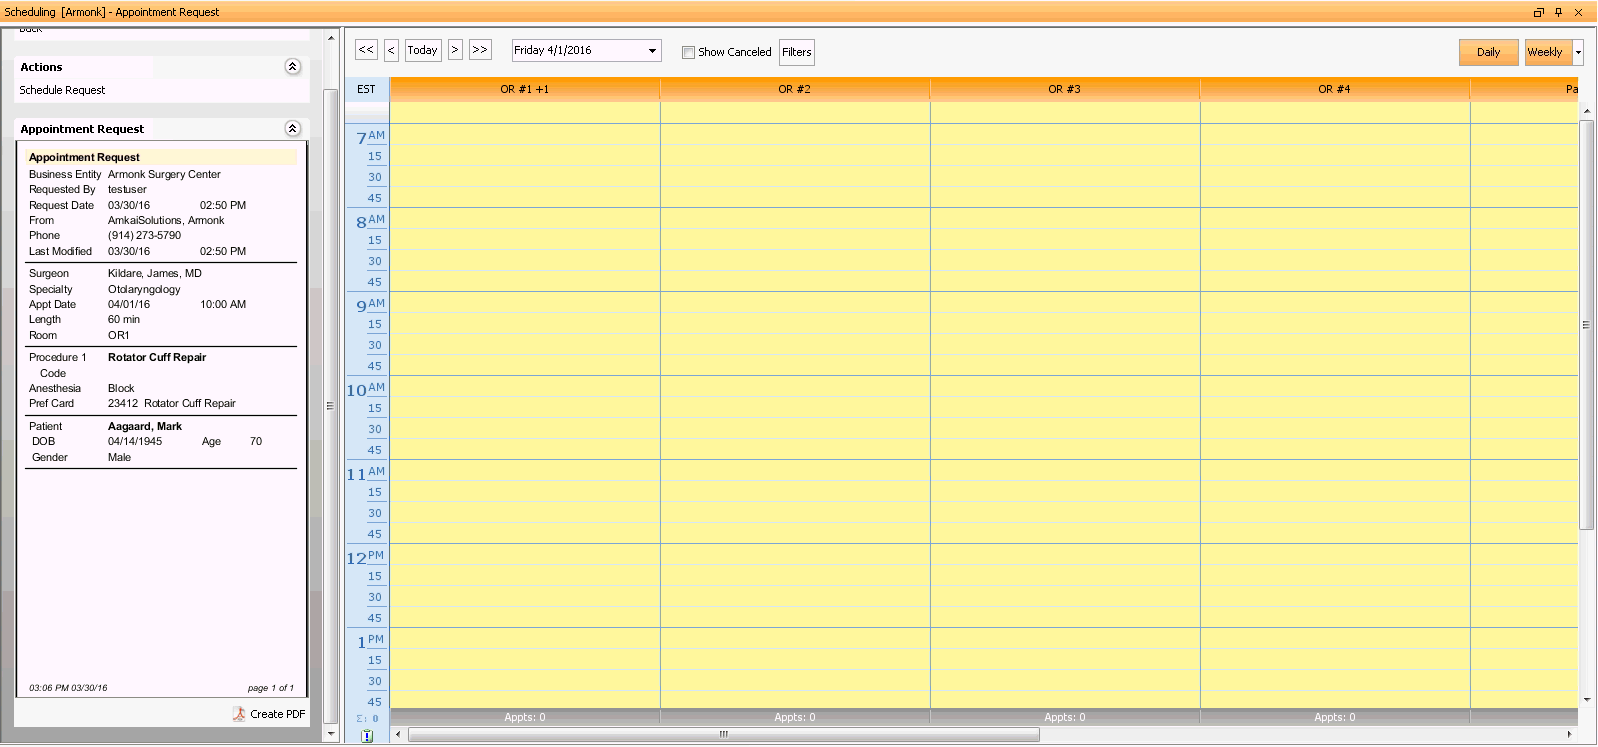
- The physician’s office’s request will include the requested schedule time and room. If the requested room and time are acceptable, right-click in the appropriate slot on the Grid (or a different slot if the requested date/time/room are not available) to schedule the appointment and select Schedule Request.
Note: When the appointment is scheduled for a different room/date/time than requested, a notification will be included in the appointment on AmkaiLink to alert the physician’s office that there is a change to the appointment.
- The Appointment Request Pre-Selection dialogAppointment Request Pre-Selection dialog appears. The system has checked several data points to see if the person/patient is in the AmkaiOffice database and displays any matches in this dialog. The system also displays results of its attempts to match any procedure(s) submitted by the physician's office.
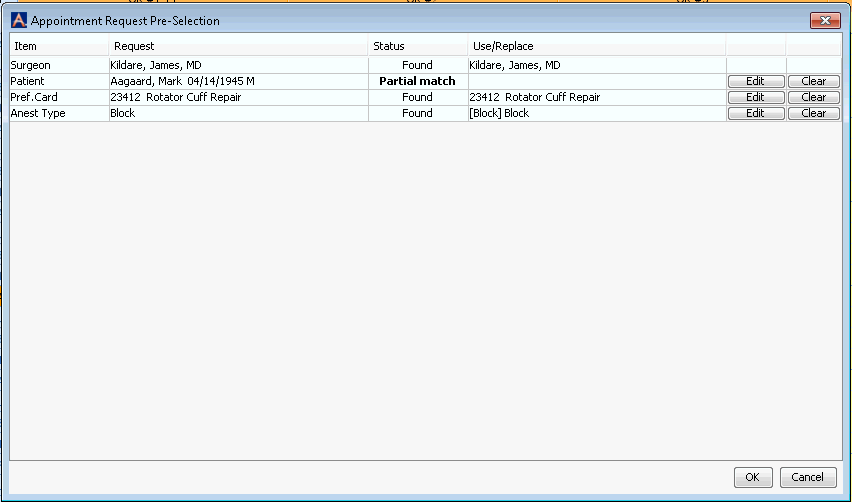
- The Status column indicates the type of match found:
- Found indicates an exact match. Click OK to begin scheduling the appointment.
- Not Found indicates no match on any of the data points checked.
- Partial Match indicates a match on some, but not all of the data points. Click the Edit button to select or add the correct Person or Procedure and follow the steps in the following links:
-
- PersonPerson
- After you click Edit, the Select Patient dialog appears. The dialog displays a list of accounts that are partial matches.
-
- If the correct Person is listed, highlight the name and click OK.
- If the correct Person is not listed, click Search to search the MPI. If you find the correct Person, select him or her and click OK. The Status on the Appointment Request Pre-selection dialog changes to Changed.
- If you do not find the correct person in the MPI, click Cancel to return to the Appointment Request Pre-selection dialog. The status changes to Changed. Click Clear and the status changes to Not Found.
- Click OK to begin scheduling the appointment.
- ProcedureProcedure
- After you click Edit,
the Dictionary Item
selector displays. You
can search for the procedure by Name or Quick code.
- If the procedure code is found in the dictionary, select it and click OK to return to the Appointment Request Pre-Selection dialog.
- If the procedure does not display in the list of active procedures, click Activate to search the list of inactive procedures. If the procedure is in the inactive list, click on the procedure to active it and then click OK to return to the Appointment Request Pre-Selection screen. The Status on the Appointment Request Pre-selection dialog changes to Changed. Additional information may need to be added to the new procedure prior to billing.
- Click OK to begin scheduling the appointment.
- After you click Edit,
the Dictionary Item
selector displays. You
can search for the procedure by Name or Quick code.
- PersonPerson
- The Appointment screenAppointment screen appears with the details of the provider's request shown in the left-hand pane. The screen is open by default to the patient's Demographics information. Discreet information included by the provider in the appointment request is populated in the Appointment screen. Insurance information will need to be entered in the Insurance Policy screen based on the data provided by the office. If attachments of the patients Insurance Cards were sent with the appointment request they can be opened in the Insurance Policy screen to be sure that the correct Insurance Carrier, Plan and Claim office are selected from the AmkaiOffice dictionaries or new ones added if necessary.
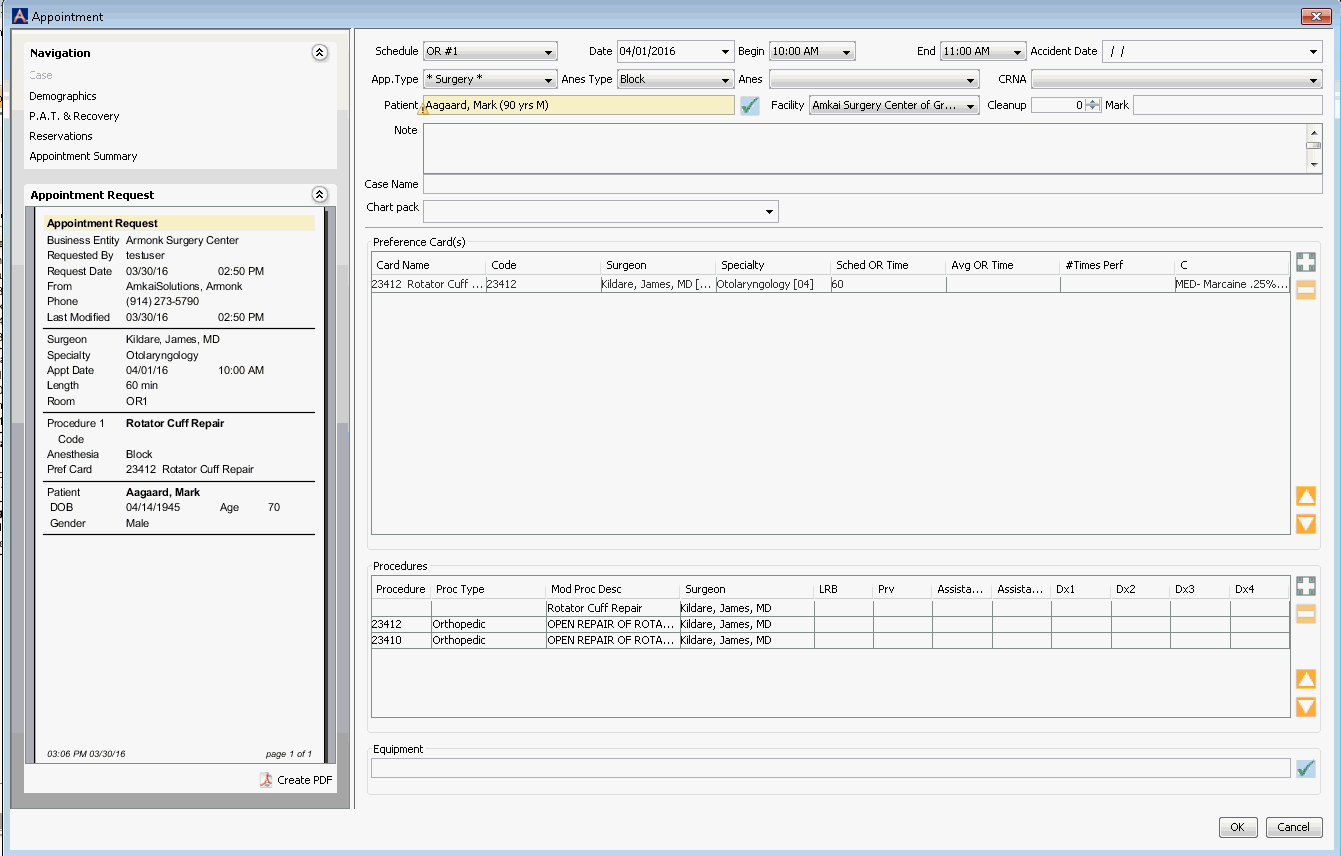
- Use the Sheet Bar options in the upper left of the Appointment screen to complete the remaining screens required to schedule the appointment. Click here for more information on scheduling an appointment.
Note: The appointment will always remain with the appointment, even after it is scheduled. The request will also be searchable in the Documents Central module, along with all scanned documents that came over with the appointment request.
Related Topics