Selecting a Preference Card
When scheduling an Appointment, you must either select a Preference Card or select a Procedure on the Case Details screen. To learn how to complete the Case Details screen, click here. To learn how to schedule an appointment from start to finish, click here.
To select a Preference Card
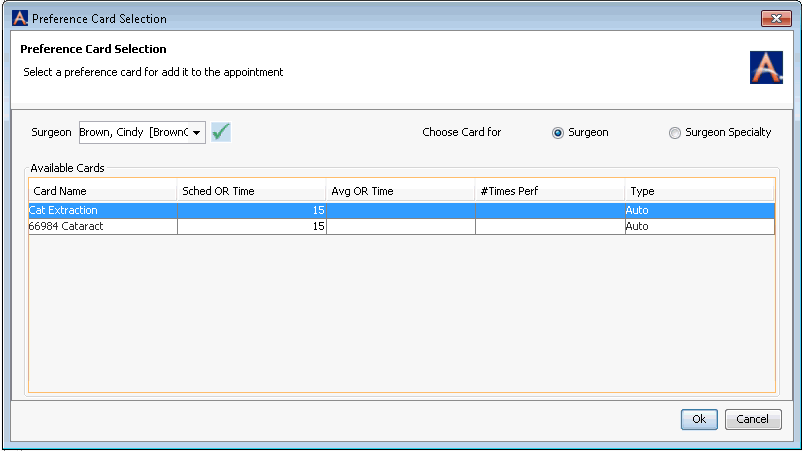
From the Appointment Screen, in the Preference Card sectionPreference Card section, click the plus sign icon to select a Preference Card. The Preference Card Selection dialogPreference Card Selection dialog appears.


Select one of the following radio buttons:
Choose Card for SurgeonChoose Card for Surgeon - If you select this radio button, proceed with step 3.
Selecting this radio button displays a list of all Preference Cards for every surgeon in the Business Entity.
Choose Card for Surgeon SpecialityChoose Card for Surgeon Speciality - If you select this radio button, skip to step 7.
Selecting this radio button displays a list of Preference Cards defined by Surgeon Speciality. These cards are not specific to a particular Surgeon, and can be used for any physician.
- If you select Choose Card for Surgeon, the Available Cards list is populated with a list of all Preference Cards that have been created for all Surgeons belonging to the Business Entity.
- If you click the Surgeon drop-down list, a list appears showing all Surgeons belonging to the Business Entity.
Select the Surgeon for the case you are scheduling to view a listlist of available Preference Cards for this Surgeon.

- To assign
one of these Cards to the case, select it from the list of Available Cards
and click OK.
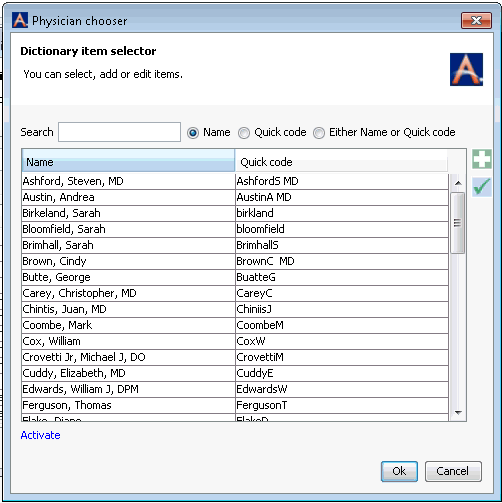
If you click the check mark icon, the Physician chooser dialogPhysician chooser dialog appears. Use this dialog to select, add, or edit items from the Physician dictionary. Click here for more information.

- There may be multiple Procedures with the same name, but different Codes. A Preference Card with Auto listed in the Type field indicates that all of the procedures on the card will automatically be added to the appointment when the card is selected.. A Preference Card with User Select listed in the Type field represents a Procedure with multiple codes. You will be prompted at scheduling to select the code(s) you want to add to the appointment.
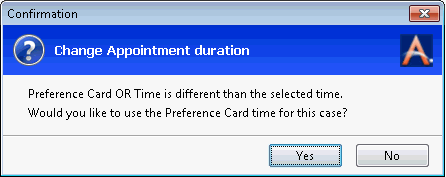
If the Preference Card OR Time (shown in the Sched OR Time field on the Preference Card Selection dialog) is different from the span of time you have selected for the Appointment, an error messageerror message will appear. To use the Preference Card OR time, click Yes, or click No to use the scheduled time instead.

- The Appointment screen reappears.
- The Preference
Card section of the Appointment screen will now show the Preference Card
you have selected for this case.
- It is recommended that you verify the Code listed for the Card you have chosen matches the Code for the Procedure on the Surgeon's booking sheet. If it does not match, go to the Procedures section of the Appointment screen and select the Procedure with the correct Code, then remove the Preference Card for the incorrect Procedure by selecting it and clicking the minus sign icon.
- If you are working in AmkaiOffice Version 3.19 or later, the Avg OR Time field will display the average OR time for the last 10 performed cases for which this card was used. If the card has not been used for 10 performed cases, the field will be blank. If you are working on an earlier version of AmkaiOffice, the field will be blank.
- If you are working in AmkaiOffice Version 3.19 or later, #Times Perf field will display the total number of times this card has been used in performed cases. If you are working on an earlier version of AmkaiOffice, the field will be blank.
- The Procedure on the Card populates the Procedures section of the Appointment screen.
- Any Equipment listed on the Preference Card populates in the Equipment section of the Appointment screen.
- The Preference
Card section of the Appointment screen will now show the Preference Card
you have selected for this case.
If more than one Procedure is to be performed during this Appointment, repeat steps 2 - 7 to select a Preference Card for each additional Procedure. If you only print the card for the primary procedure, make sure that card is listed first in the dialog. To change the order of the Preference Cards select a Card and click the up or down arrow in the Preference Card sectionPreference Card section.

- To remove a Preference Card selection, highlight the Card and click the minus sign icon.