Charge
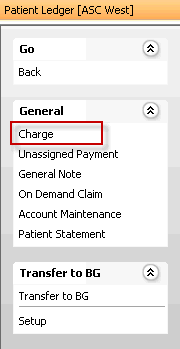
The General > Charge Sheet Bar option on the Patient Ledger screen in the Financial Management module launches the Charge Entry Screen which is used to post charges to a patient's account.
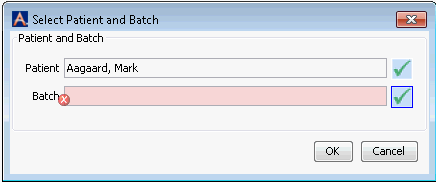
You can also launch this screen by selecting Entry Screens > Charge Entry from the Financial Management Sheet Bar. You will then be prompted to select a patient and a batchselect a patient and a batch.
Click the  to select a Patient and a Batch
to post Charges to. The Charge Entry screen will then launch.
While posting charges, you can also post any payments or write-offs on the same screen.
Quick Start Guides
Click here to view a video demonstrating how to post a charge to the patient ledger.
Click here to view a diagram covering the basic steps required to post a charge.
Prerequisites for posting charges to a patient's account
Before you can post charges to an account, the Appointment Status field in the CDM (Clinical Documentation Management) module in AmkaiOffice must be updated Performed or Partially Performed, Billable.
To post charges to a patient's account
- Open the Financial Management module.
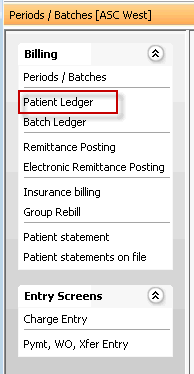
- Under the Billing heading on the Sheet Bar, select the Patient
LedgerPatient
Ledger. The Patient
Ledger screenPatient
Ledger screen appears. From this screen:
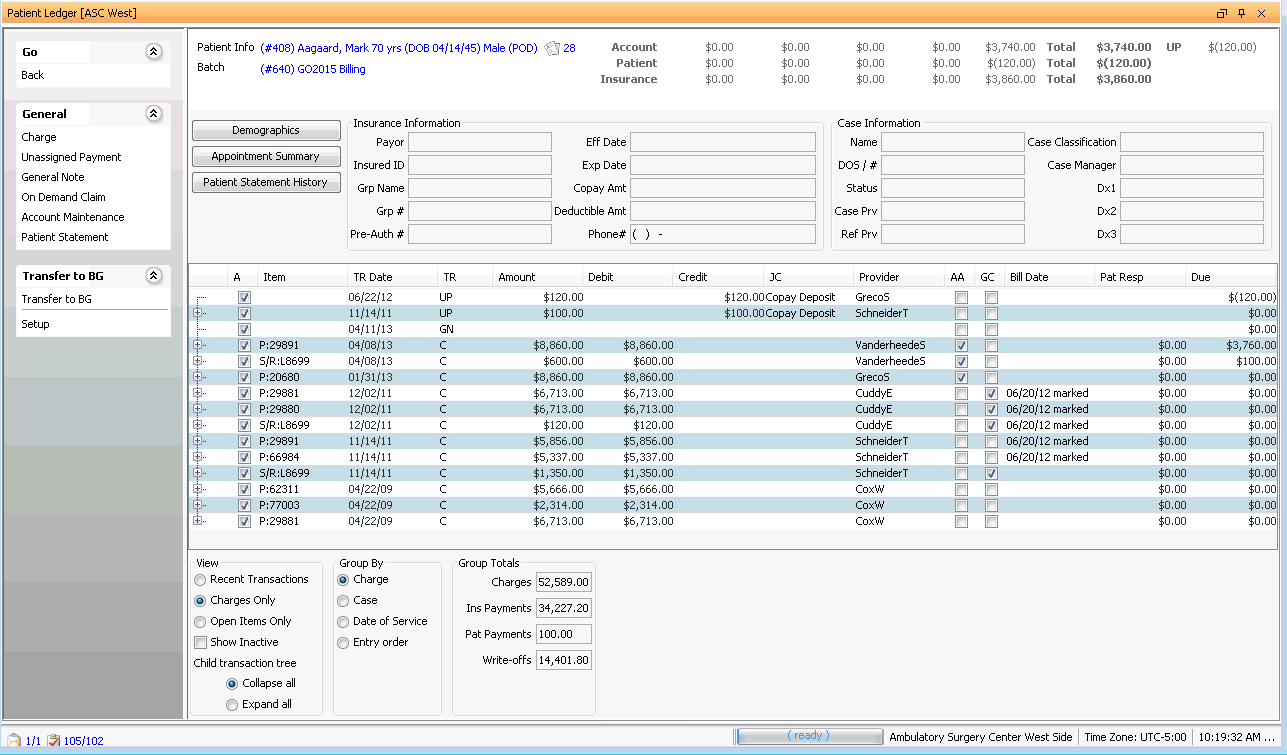
- Select a patient and the batch to post charges to:
- Click the patient information highlighted in blue in the upper left of the Patient Ledger to select a patient record. You are then returned to the Patient Ledger screen.
- Click the batch name underneath the patient information to select a different batch or create a new one.
- Select General
> ChargeGeneral
> Charge from the Sheet Bar. The Charge
Entry screenCharge
Entry screen appears.
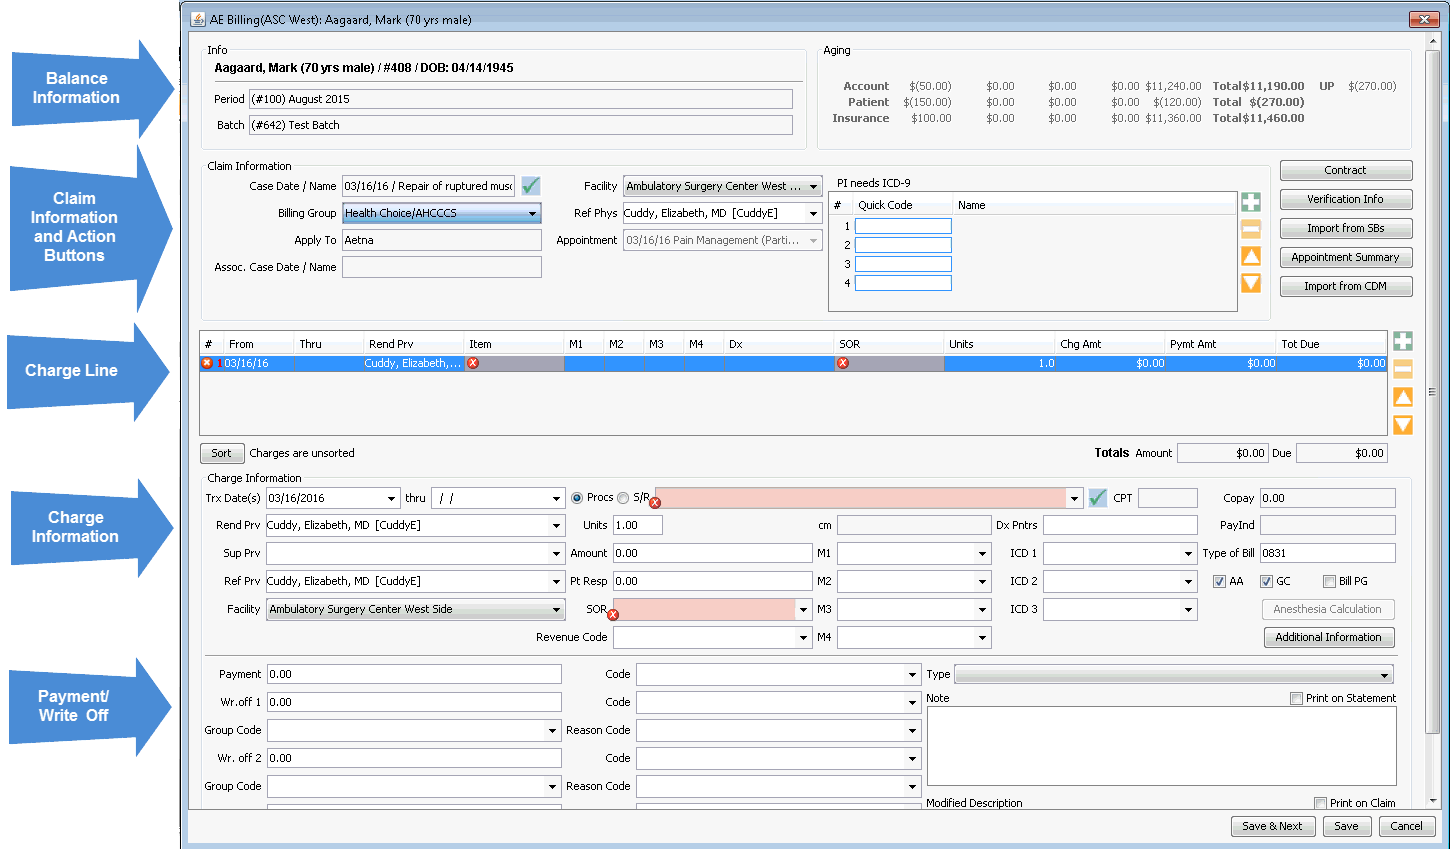
- The Balance
InformationBalance
Information section on the Charge Entry
screen is read-only. Click herehere
to learn more about all the fields in this section.
-
The patient's account number, name, age, date of birth and sex are displayed here.
-
Displays the Period you will be posting charges to
-
Displays the Batch you will be posting charges to. If you need to post the charges to a different batch, return to the Patient Ledger screen to select a different batch create a new one. Click here to learn how.
Aging informationAging information
There are five columns within this section which represent aging amounts due (from left to right): 0-30, 31-60, 61-90, 91-120, and 120+ days based on the transaction dates of charges posted to the account. Point your mouse to an amount to see a message indicating how aged the amount is.
Account: Displays the total balance for the entire account.
Patient: Displays the portion of the balance that is assigned to the patient.
Insurance: Displays the portion of the balance that is assigned to an insurance carrier on the patient’s account.
-
UP: Displays the total of any Unassigned Payments posted to the patient ledger that have not been associated to a charge. If this number is greater than 0, then there is money that can still be allocated to charges. If the charges have reached a 0 balance, then the patient could be owed a refund.
-

In the Claim Information and Action Buttons sectionClaim Information and Action Buttons section, most of the information defaults in from other areas. Typically, users will need to update the following fields:

To select a case other than the most recent one, click
 next to the Case
Date/Name field.
 Edit or add any post-operative DX CodesDX Codes, if they are different from the pre-operative codes. If you are working on AmkaiOffice Version 3.16, you may enter a total of 9 codes. If, however, you are working on Version 3.17b or later, you may add up to 18 codes.
Any pre-operative diagnosis codes entered in Scheduling appear in this section. You can enter any post-operative diagnosis codes in the drop-down lists here. Text above the diagnosis entry box indicates whether the Primary Insurance needs ICD-9 or ICD-10 codes.
To add a diagnosis code, click the plus sign icon and select the code from the drop down list or type in the code.
To remove a code, click it and then click the minus sign icon.
To move a code up or down the list, select it and use the up or down arrow.
If the Appointment field is highlighted in red, go to the CDM module and set the Appointment Status field to Performed or Partially Performed, Billable.
Click the Import from CDM button to pull in any charges generated in that module.
When Quality Indicator Codes (G Codes) are imported from CDM, the system will automatically associate the diagnosis code A from the first billed procedure to the quality procedures.
Time & Material Billing must be enabled on AmkaiOffice for staff times/supplies to pull over from the CDM module. See note below.
Click herehere below to learn more about the fields and buttons in this section.
Claim Information |
Action Buttons |
|
|
Click the plus sign icon next to the Charge Line sectionCharge Line section to add a new charge. The fields in the Charge Line are read-only. In the Charge Information section, you will enter the details of the new charge. After you complete the Charge Information section, the fields in the Charge Line section populate with data you added. You can click the Sort button to sort the list of charges so that those with the highest rates of reimbursement display first.

To add/edit information for a new charge or an existing charge, highlight the charge in the Charge Line section. In the Charge Information SectionCharge Information Section, complete or edit the fields as described in following links. Mandatory fields are marked with a red X on the screen.

Trx Date(s)Trx Date(s) (Mandatory)
The transaction from and through dates associated to the charge default here (usually equal to the date of service). However, you can enter a different date. If the from and through dates are the same you are only required to enter the from date.
- Rend
PrvRend
Prv (Mandatory)
Identify the rendering provider for this charge. This field will default to the case provider identified on the case screen in Demographics. You have the option to edit this field using the drop down arrow.
- Procs
or S/RProcs
or S/R (Mandatory)
Select either the Procs (procedure) or S/R (supply/resource) radio button to indicate what the charge you are posting is for. If you select Procs, active procedure codes (as entered in the Procedure dictionary) will be available to select from the drop-down list.
If you select S/R, supplies/resources that are marked as Billable are available to select from the drop-down list. Click Alt + D to access either the procedure or supply/resource dictionary to add or activate items.
- SORSOR
(Mandatory)
(Source of Revenue):Use the drop down menu to select the source of revenue for this charge. SOR can be defaulted in the procedure dictionary. SOR are often used to apply discounts to second and additional procedures.
- SORSOR
(Mandatory)
Note: You can bill both by Procedure (flat rate by Procedure) and for Time & Materials for the same case, if needed. Before you can post charges (bill) for supplies/resources, Time and Material Billing must be enabled in the System Administration module. See Time & Material Billing. Fees are associated to Procedures in the Fee Schedule in the System Administration module. (See Fee Schedule).
Click herehere below to learn more about all the fields in this section, including the non-mandatory ones.
|
|
Repeat these steps for each additional charge to be posted to the patient's account.
Click Save to post the charges to the patient ledger. Click Save & Next to post the charges and select a new patient from the Master Person Index.
A pop-up message will alert you to any unallocated payments on the account. Click OK on this message to allocate the payment(s). Click here to learn how to post an unallocated payment.
If you wish to post a payment or write off at this time, you can do so in the Payment/Write Off section. Click herehere to learn how.
To post a payment from the Charge Entry Screen
- Scroll to the bottom of the screen to the
Payment/Write off
section. Click herehere
to see a screen shot.

- Payment: Enter any payment amount received at the time of the charge in this free text field.
- Code: Select or modify the journal code to be used. Use the Alt + E or Alt +D hot keys to modify or add items to the Journal Code Dictionary if needed. This code is mandatory if a Payment amount is entered.
- Type: Enter the type of payment received (Card, Check, Cash, and EFT). This is a mandatory field if a payment is entered.
- Check # / Routing #: If the payment type selected is Check, the system will open two additional fields on the screen. Enter the check number and routing number, if desired, for the transactions to be posted. NOTE: If you are working with a check that includes payments for several accounts the system will hold the check number as you select each new account to post payments to. Once all of the accounts have been paid for that check, remember to clear the field and enter the new check number for the next check being posted. Also, keep in mind when entering the check number that the system offers several reports that will provide the option to search for accounts that have been referenced on a specific check number. Users should be consistent in how the check numbers are entered to aid in searching by check number.
- Card: If the payment type selected is Card, the system will open a field for the user to enter the credit card number to be referenced for the payment. It is recommended for security reasons that you enter only the last four digits.
- Checking Account #/Routing #: if the type of payment selected is EFT, the system will open two fields for the user to enter the checking account # and routing number to be referenced for the transactions.
- Wr. Off 1(Write off 1): You can enter a write-off at this time in this field. A write-off amount might already be defaulted depending on the associated contract or the source of revenue indicated for this charge.
- Code: Select or modify the journal code to be used. Use the Alt + E or Alt +D hot keys to modify or add items to the Journal Code Dictionary if needed. This code will be mandatory if a Write- off 1 amount is entered.
- Group Code: Use the drop down menu to select the appropriate group code for the associated write off. If a reason code has been entered, the group code will become a mandatory field. Use the Alt + E or Alt +D hot keys to modify or add items to the Denial Group Code dictionary. For clients submitting claims in the x12 format these codes are required for claims to process successfully.
- Scroll to the bottom of the screen to the
Payment/Write off
section. Click herehere
to see a screen shot.
Note: Group and reason codes are required for processing electronic claims that include write offs. It is recommended that you enter these codes when you enter write off information.
- Reason Code: Use the drop-down menu to select the appropriate reason code for the associated write off. If a group code has been entered the reason code will become a mandatory field. Use the Alt + E or Alt +D hot keys to modify or add items to the Denial Reason Code dictionary. For clients submitting claims in the x12 format these codes are required for claims to process successfully.
- Wr. Off 2 (Write off 2): You can enter a second write-off at this time. A write-off amount might already be defaulted depending on the associated contract or the source of revenue indicated for this charge.
- Code: select or modify the journal code to be used. Use the Alt + E or Alt +D hot keys to modify or add items to the Journal Code Dictionary if needed. This code will be mandatory if a Write- off 2 amount is entered.
- Group Code: Use the drop down menu to select the appropriate group code for the associated write off. If a reason code has been entered the group code will become a mandatory field. Use the Alt + E or Alt +D hot keys to modify or add items to the Denial Group Code dictionary. For clients submitting claims in the x12 format these codes are required for claims to process successfully.
- Reason Code: Use the drop down menu to select the appropriate reason code for the associated write off. If a group code has been entered the reason code will become a mandatory field. Use the Alt + E or Alt +D hot keys to modify or add items to the Denial Reason Code dictionary. For clients submitting claims in the x12 format these codes are required for claims to process successfully.
- Note: You can add a free text a note associated to this charge line.
- Print on Statement: Check this box if you would like the above note to be printed on the patient statement. By leaving this check box unchecked, the note will continue to be an internal note only.
- Print on Claim: Check this box if you would like the above note to be printed on the claim form. By leaving this check box unchecked, the note will continue to be an internal note only.
- Click Save to post the payment or write off.
Related Topics