Supplies/Resources, PAT/Follow-up
In the CDM module you can reconcile Supplies, Resources, and Trays for a case for billing, costing and inventory purposes. For example, you can indicate the quantity of items used in the case, deplete your inventory of items used, or indicate which items were wasted or defective. This topic addresses updating the Supplies/Resources log from the PAT/Follow-up > Supplies/Resources Sheet Bar option.
To reconcile supplies and resources, the case status must be set to one of the following: Performed, Partially Performed/Billable, Partially Performed/Not Billable, or In Progress. Supplies/Resources/Trays will not be allowed to be updated if the case status is set to Pending or Cancelled.
For information on integration with AmkaiCharts, SIS Charts, and/or SIS Advanced and workflow issues in the CDM module, see About the CDM module.
To reconcile Supplies/Resources/Trays
- Launch the CDM module. You will be prompted to select a patient and case. Click herehere for more information, including instructions for selecting a patient and a case. The PAT/Follow-up appointment will not be shown in the Case Selection Dialog. Select the main case to which the PAT/Follow-up appointment is associated. The module opens to the Case > General screenCase > General screen..
- When you first open the CDM module, the Person -Patient selection dialog appears, prompting you to select a patient. Click here to learn how to select a patient record.
- After you select a patient, the
CDM Case Selection dialog
CDM Case Selection dialog appears, prompting you
to select a case. Highlight a case from the dialog and do one of the
following:
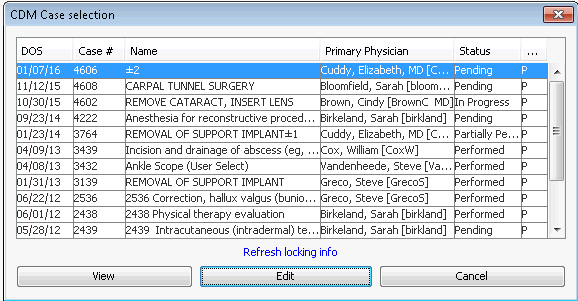
- Click View to see, but not edit case information. Or,
- Click Edit to update/edit case information.
Note: Only one user at a time can edit a case, but multiple users can view it at once. If you open a case someone else is already editing, a system prompt will indicate you are in View Only mode and let you know who has the case open for editing and for how long. Click the Refresh Locking Info button to see if the case has been released for editing.
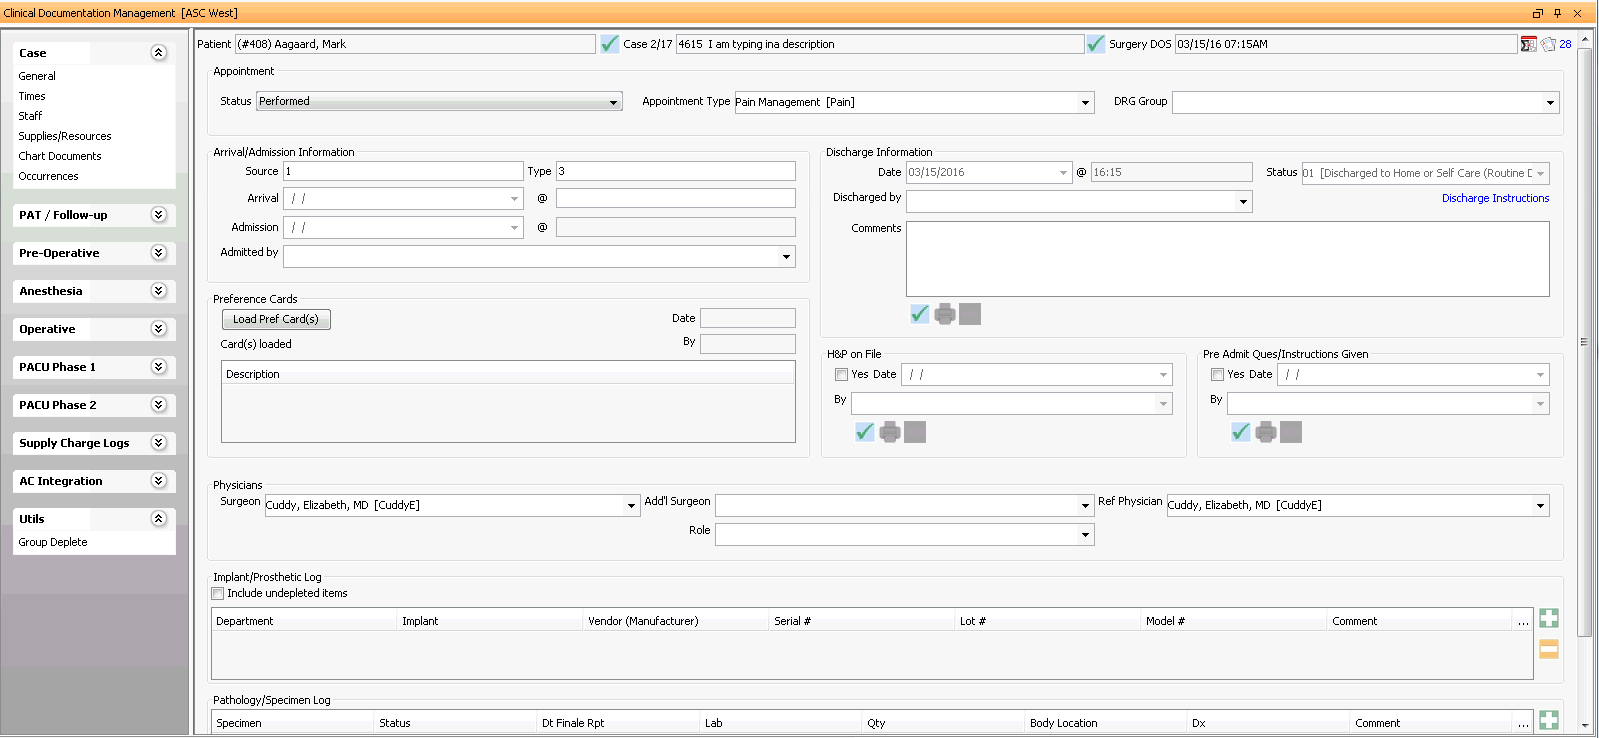
- To pull all supplies, etc. listed on the Preference card(s) into this section, click the Load Pref Card(s) button on the middle area of the Case > General screen. You can only click this button once, and the system will populate the date and your name when you click the button.
 If you click the Load Pref Card(s) button, and no supplies are loaded, it's possible the appointment was not scheduled using a preference card. To avoid having to input supplies manually, you can click Save and go back to Scheduling to associate a preference card to the case (see Selecting a Preference Card). You would then need to return to the CDM module and click the Load Pref Card(s) button again.
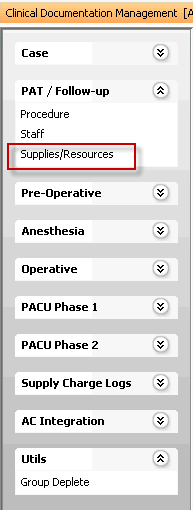
- From the CDM module Sheet BarSheet Bar, select Supplies/Resources under the PAT/Follow-up heading. The Supplies/Resources/Trays logSupplies/Resources/Trays log displays at the bottom of the screen.

- The patient information sectionpatient information section at the top of the screen auto-populates from the Scheduling module. Click the links below for more information about these fields:

- PatientPatient
To select a different patient, click the check mark icon. The Person -Patient selection dialog appears. Click here to learn how to use this dialog to select a patient.
- CaseCase
To select a different case, click the check mark icon. The CDM Case selection dialogCDM Case selection dialog appears. Select a case and click Edit to open the case for editing, or click View if you do not wish to edit the case.

- Surgery
DOSSurgery
DOS
The Surgery Date of Service defaults in from the Scheduling module. Read-only field.
- Appointment
SummaryAppointment
Summary
To view an appointment summary, click the calendar icon to the far right of patient information section (circled in red) to launch the Appointment Summary dialog. Click here to learn how to use this dialog.

- RemarkRemark
To view or create a remark, click the icon (circled below) in the far right of the patient information section. Click here to learn how to use the dialog that appears. The number to the right of the icon indicates how many remarks exist on this account.

- The PAT/Follow-up visits sectionPAT/Follow-up visits section auto-populates from the Scheduling module. Click the links below for more information about the fields in this section:

- Begin/End
DateBegin/End
Date
Defaults in from the Scheduling module as the date of the appointment.
- Begin/End
TimeBegin/End
Time
Defaults in from Scheduling. The begin time cannot be edited here.
- FacilityFacility
Defaults in from Scheduling.
- RoomRoom
Defaults in from the Scheduling module.
- StatusStatus
Update the appointment status using the drop down menu. To update/edit Procedures information, the PAT appointment status must be set to one of the following: Performed, Partially Performed/Billable, Partially Performed/Not Billable, or In Progress.
After updating the status to one of the above, click Save to enable the ability to add Procedures.
- In the Supplies/Resources/Trays section of the screen, select a Batch to record charges for billable items used in the case. Click the No Batch button to launch the Select Batch dialog. Click here to learn how to select a batch or create a new one using this dialog.
- Include undepleted items: Select this check box when you wish to see items that had been added to the case, depleted, and then later returned to stock. Selecting this option can help with reconciliation of supplies/resources and help determine which items may no longer need to be included on the Preference Card.
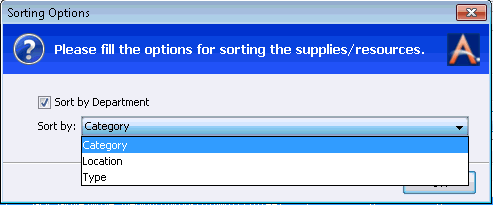
- You can sort the list of items by clicking the Sort button. The Sorting Options dialogSorting Options dialog appears. Select the Sort by Department check box to group supplies by Department. With the items grouped by Department, you can select to sort by Category, Location, or Type. The sort criteria will be applied within the Department groupings. You can also deselect Sort by Department and select one of the other criteria to sort all items.
- To narrow the list to show only Supplies/Resources (no Trays), click the Supplies/Resources radio button. To view only Trays, click the Trays radio button.
- To reconcile Supplies/Resources for the case, you will need to update some of the fields listed below. Some of the fields auto populate based on information entered elsewhere and either cannot be edited here or do not need to be edited here. If you are viewing a Tray, click the plus sign on the same line as the Tray to display a list of individual items on the Tray, so you can reconcile them. You can add a line for an additional Supply/Resource by clicking the plus sign icon, or remove a Supply/Resource by selecting it from the Supplies/Resources/Trays table and clicking the minus sign icon. Click the links for more information about each field:
-
- Do not
billDo not
bill
If, for some reason, you will not be billing for a billable item, select this check box to prevent this item from inclusion when you apply charges to the account.
- DepartmentDepartment
The Department pulls from the preference card and cannot be edited here.
- DateDate
The Date is auto populated for equipment as the Date of Service. The Date for other supplies/resources will auto populate with today's date when you click Save.
- CategoryCategory
Supplies/resources are assigned to a Category when they are added to your inventory, and that designation auto populates here.
- Supply ResourceSupply Resource
The Supply Resource pulls from the preference card. Click the item to access the detail dialog to enter serial numbers or expiration dates.
- PulledPulled
Pulled designation includes items that are either in Pulled or Hold status on the preference card. For example, if clinical staff pulled 2 of an item, and one of those is in Hold status, both items are counted in the Pulled column.
- UsedUsed
The system will assume any item marked as Open is used. Manually update the Used quantity if it is different.
- DefectDefect
Manually type in the quantity of this item that was found to be defective.
- WasteWaste
Manually type in the quantity of this item that was wasted.
- LocationLocation
A default location is associated to the item when it is added into stock. If multiple locations have been associated to the item, you can select a different location if necessary. Depletion will remove the item from the location listed here.
- TotalTotal
Total defaults to total pulled items. This field auto populates when you update the Used, Defect, and Waste fields.
- Billable/BilledBillable/Billed
Supplies/resources are designated as Billable when they are added to your inventory, and that designation auto populates here. You cannot change the status in this column.
*For surgical hospitals using AmkaiOffice Version 3.17a and later, this table includes a Used Date field.
- Do not
billDo not
bill
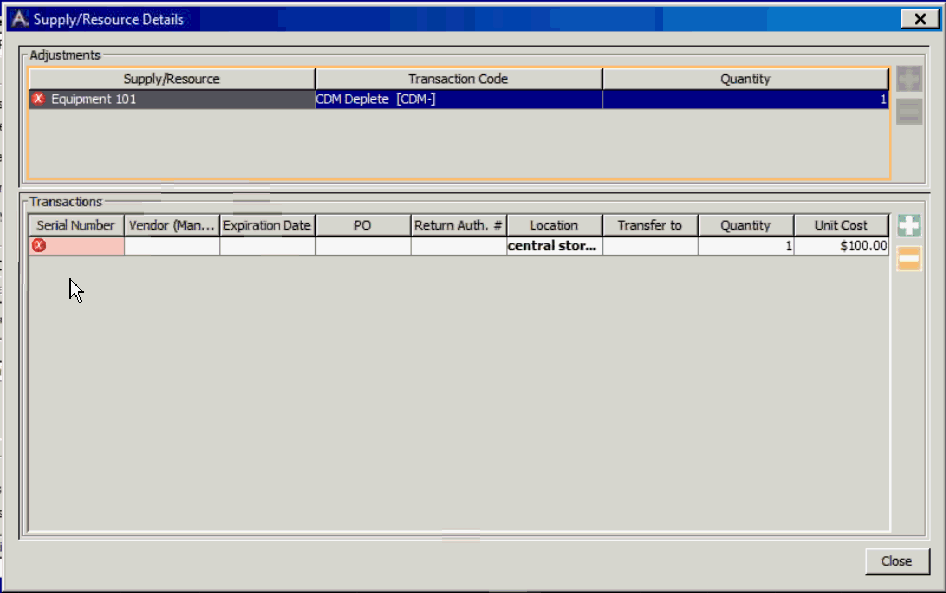
- Any items highlighted in yellow have errors associated with them. To see a description of the error, hover over the highlighted area. To fix the error, right-click the field and select Details. The Supply Resource Details dialogSupply Resource Details dialog appears. Correct the highlighted fields on this dialog. Click here to learn how to edit the fields on this dialog.
- You can click the Deplete Inventory button on the Case > General screen to remove items used in this case and wasted items from your stock. Other options for depleting your inventory include Group Deplete and Auto Deplete.
- If you choose to deplete inventory at this time only for this specific case, navigate to the Case > General screen click the Deplete Inventory button. A prompt will appear asking you to confirm whether you wish to deplete all supplies/resources for this case. Click Yes to deplete your inventory.
- If items were successfully updated in inventory, a confirmation message will appear asking if you wish to view the depletion report. Click Yes to run the report. Items that were successfully updated in inventory will be displayed on the Inventory Depletion/Return Report.
- Items that the system could not successfully deplete from inventory will be displayed on the CDM Depletion Error Report. Errors can result from any of these issuesthese issues.
-
- Serial Number(s) are needed for the item(s).
- Expiration Date(s) are needed for the item(s).
- There is not enough stock in the selected location.
- Item is no longer active.
- Location is no longer active.
-
- After correcting any errors, click Deplete Inventory again. Once all items have been updated/depleted in inventory, the Deplete Inventory button inactivates. If additional supplies/resources that require an update to inventory are later added to case, the button reactivates, so you can deplete any of those new items from inventory.
- Each time the Deplete Inventory button is clicked, the information in the Update/Deplete By/Date changes to reflect the last user and date the deplete was run by.
- The Restore Inventory is not currently functional. It is a placeholder for a future enhancement.
- The Create Charge button above the Supply Log is available to generate charges for supplies, but it is not the recommended procedure. Charges should be generated for a case in the Financial Management module to ensure all billable supplies and Quality Indicator Codes are considered when the charges are posted.
- When you are finished updating the Supply Log, click one of the following buttons:
- SaveSave
Click to save your changes to the patient's account and remain in this account in the CDM.
- Save & NextSave & Next
Click to save your changes to the current record and search for the next patient whose record you wish to update in the CDM.
- SaveSave