Configuration
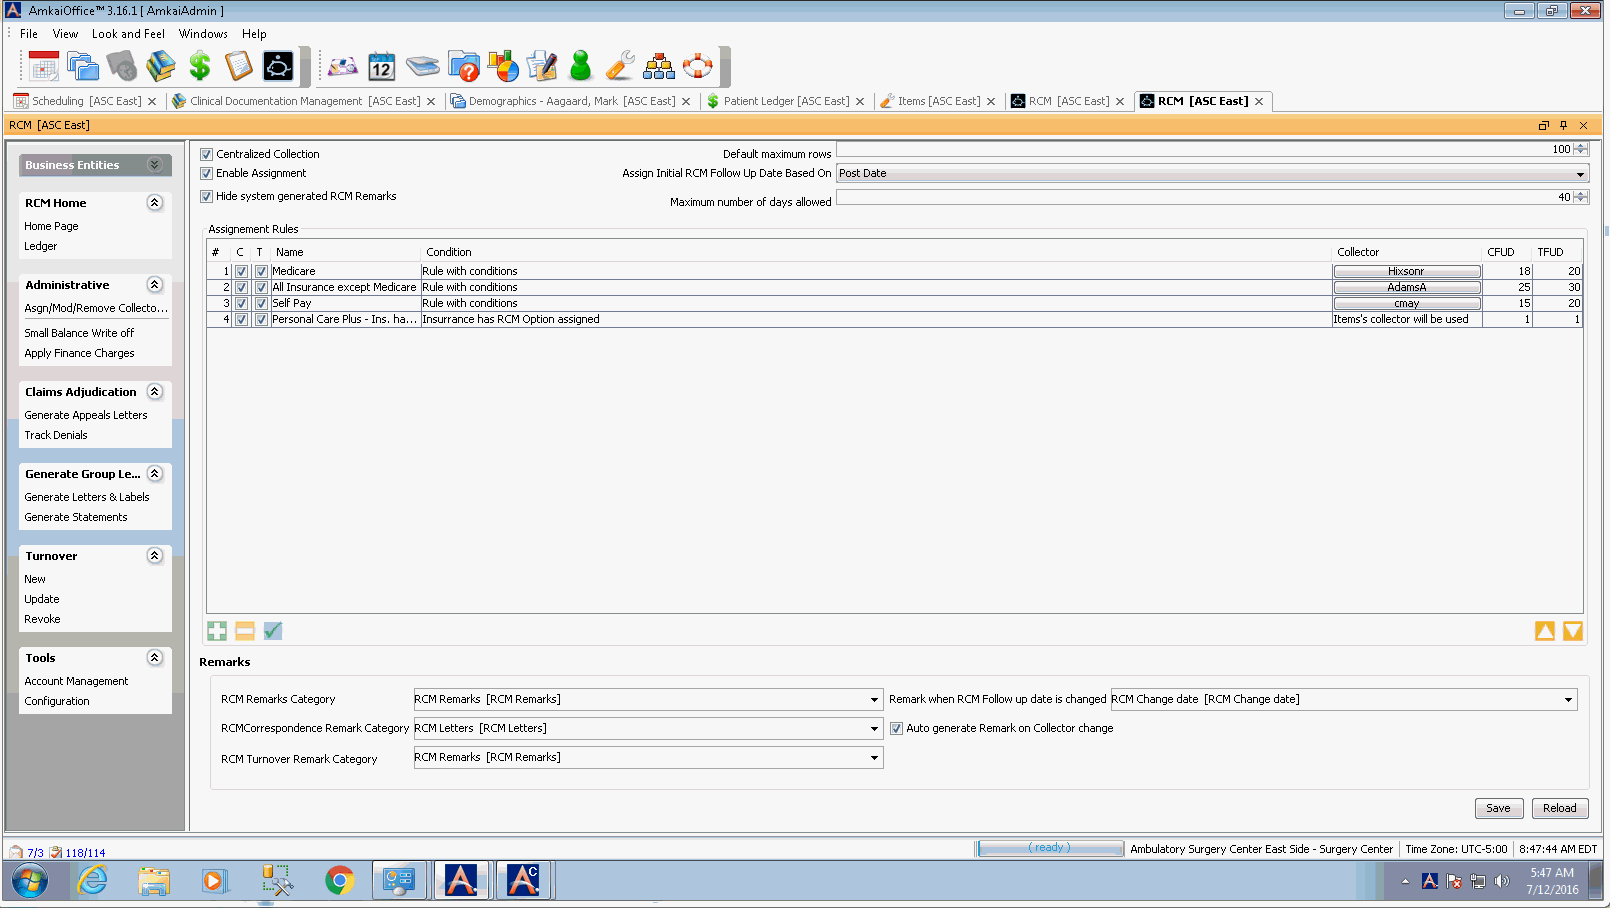
The Tools > Configuration Sheet Bar option from the RCM Home Page is used to configure the RCM module to automatically assign an initial follow-up date (known as the RCM Follow-up Date) and a collector to all charges posted in the system.
You can choose to have the system set the RCM Follow-up Date from either the Transaction Date (Date of Service) or Posting Date (date the transaction was posted to the Patient Ledger).
To assign a collector/RCM Follow-up Date to individual accounts, see the options available from the Tools > Account Management Sheet Bar option. See About Account Management.
To configure RCM to automatically assign a collector and RCM Follow-up Date
From the RCM Home Page Sheet BarRCM Home Page Sheet Bar, select Tools > Configuration. The RCM Configuration pageRCM Configuration page appears.


If your database contains more than one Business Entity, and you would like to do centralized collections, select the Centralized Collections check box in the upper right of the page. When users access the RCM Home Page, it will display with the name of the Business Entity the charge was created in.
Select the Enable Assignment check box to turn on the automatic assignment of the collector and RCM Follow-up Date to charges. The collector assignment is made at time of charge and at the time of transfer of responsibility for payment to the next role. You will perform further configurations to the RCM Follow-up Date and in the collector assignment in the steps below.
Select the Hide system generated RCM Remarks check box to hide the system Remarks automatically generated when an action is taken by a collector. Only Remarks added manually by users will be displayed as the default. Users can elect to view system-generated remarks from the RCM Ledger even if these remarks are hidden by default.
Use the up and down arrows at the Default Maximum Rows field to set the number of results displayed by default in searches in RCM. Users can choose to view more or fewer rows when performing searches.
In the Assign Initial RCM Follow Up date Based On field select a date option from the drop down menu. The option you select will then be used to determine the starting point for assignment of the RCM Follow-up Date:
Transaction Date: Date of service, or
Post Date: Date the charge is entered into the system
In the Maximum number of days allowed field, enter a value that represents the maximum number of days a collector may advance the follow up date for a transaction.
 It is recommended that you set the Maximum number of
days allowed to between 45 and 60
to ensure that all accounts in the RCM queue are followed up on at least
once every 45 to 60 days. You can also leave the default 0 days which
will allow the collector unlimited control of when then next action date
should bring the transaction to the queue.
- In the Assignment
Rules sectionAssignment
Rules section,
you can define how collectors
will be assigned to charges. You can create multiple rules to meet
your facility's collection needs. For example, you may want all accounts
for which Aetna Insurance is the responsible party to be handled by
one collector, but for other accounts, you may want to assign collectors
by patient or by provider. Click here
to learn how to create these rules.

- Configure RCM Remarks by selecting options from the following fields:
- RCM Remarks Category: Select a default category for RCM-generated Remarks (remarks automatically generated when collectors perform collections activities on an account). The options available come from the Remark Category Dictionary.
- RCM Correspondence Remark Category: Select a default category that will be referenced when letters are generated from RCM.
- RCM Turnover Remark Category: Select a Remark Category to be used by the system when accounts are turned over to inside or outside collections organizations, or when the turnover has been updated or revoked.
- Remarks when RCM Follow up date is changed: Select a Remark to be used by the system when the RCM follow up date is changed. Example: “RCM Date has been changed.”
- Auto generate Remark on Collector change: Check this box to indicate that the system should file a remark in the RCM Remark screen when the collector is changed when the amount due has been transferred to a new role.
- Save: When you make a change, click Save to commit the changes. Configuration settings can be modified at any time; however, changes will only impact new charges posted as of the date of the change.
- Reload: When changes are made at the configuration level after saving, click Reload to ensure the charges are applied. Close RCM and reopen it to refresh the module.
Related Topics