Replacing items on multiple preference cards
Items can be replaced on multiple Preference Cards at once in the Preference Card module.
Note: If a card has been used to schedule appointments and you subsequently change the Equipment on the card, you must manually modify the appointment to reflect the change to the equipment, because the equipment is associated to the case when the card is added.
 If you have trouble with these steps,
see Troubleshooting Tips below.
To remove items from multiples preference cards
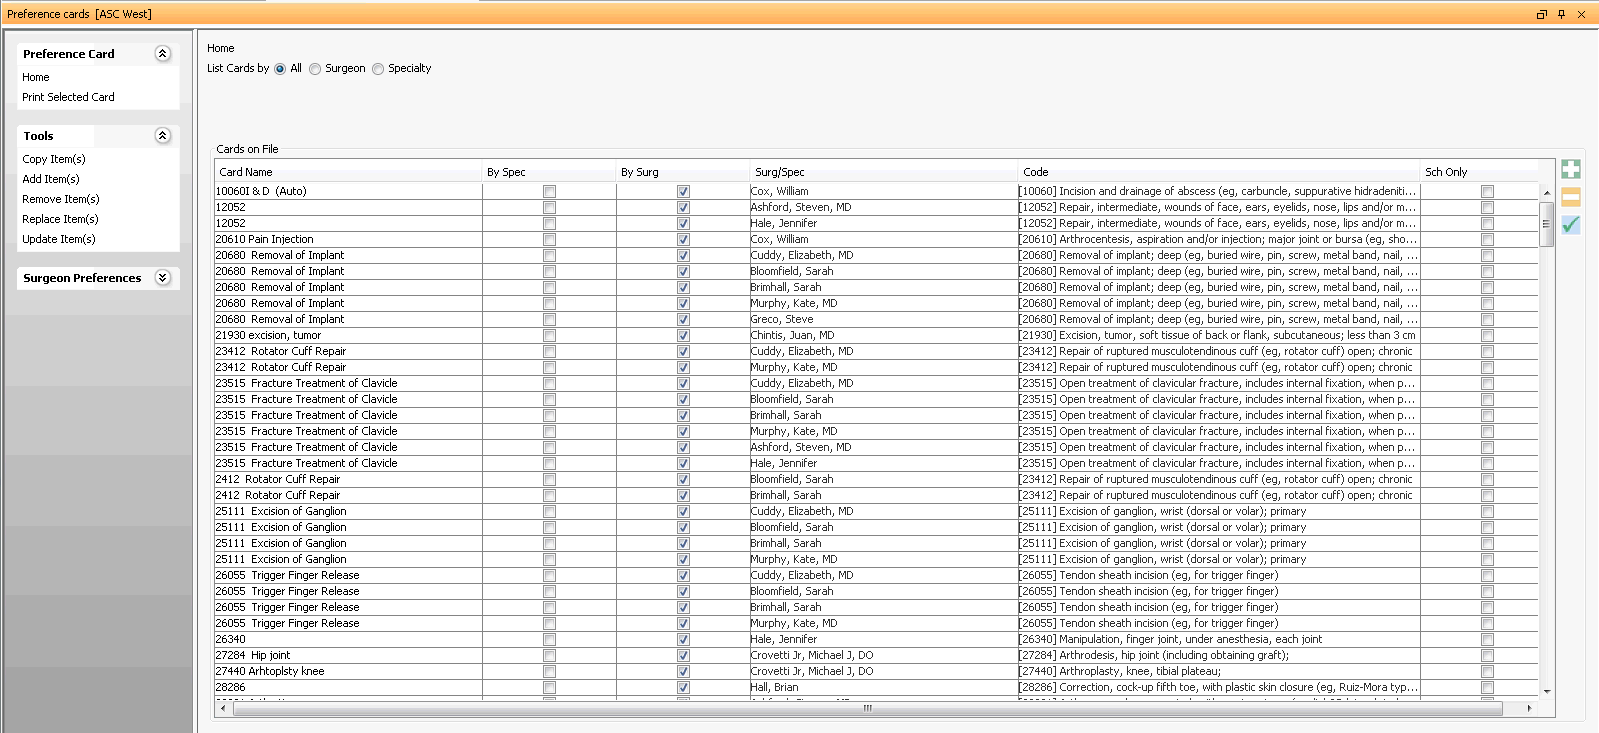
- Launch the Preference Card module. The module opens to the Home
pageHome
page.

- Under Tools on the Sheet
Bar, click Replace Items.
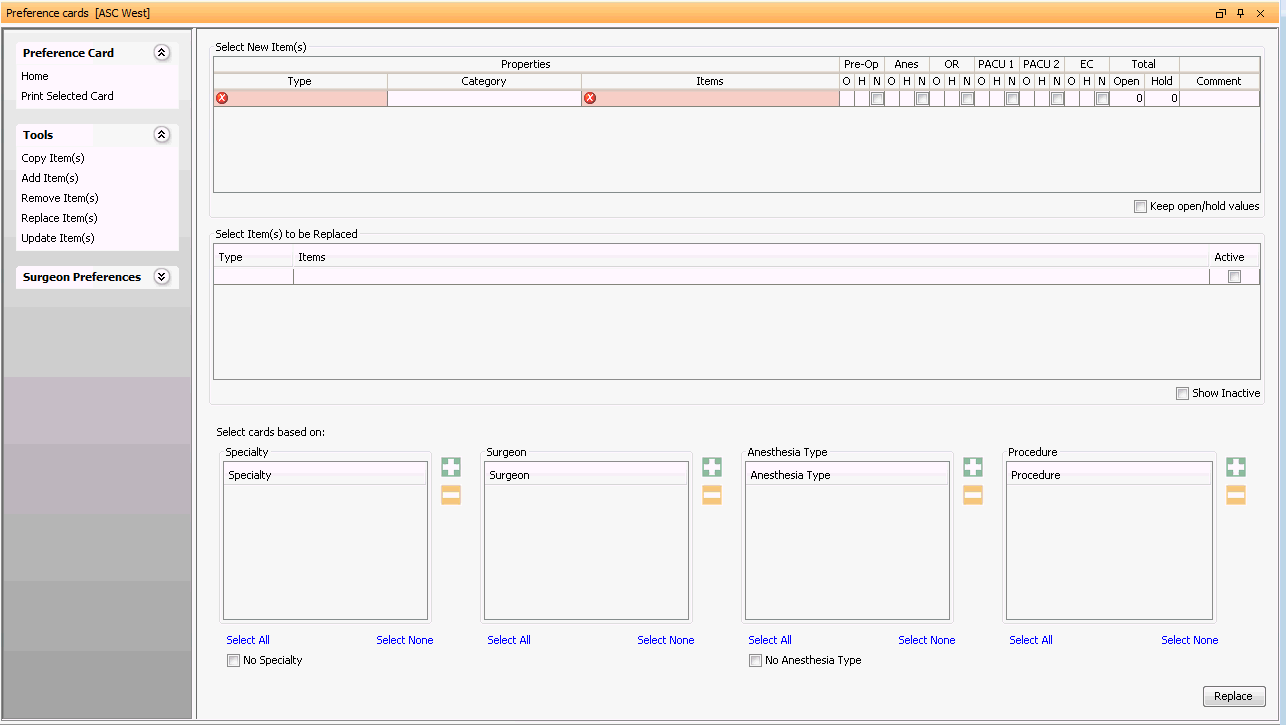
The Replace
Items screenReplace
Items screen displays.

- In the Select New item(s) section, add the new item(s) that will replace the existing item(s). Complete all relevant fields:
- TypeType
Select the type of item to be pulled to the preference card.
- Resource: If you choose this option, both the Category and Items fields will be active. When you select an item, its supply category automatically populates in the Category field.
Tray: If you choose this option, the Category field will be inactive. The Items field will be active, and trays (instead of individual items) will be available to select from the drop-down list.
- CategoryCategory
If the Type is Resource, choose from one of the following options for selecting a Category:
Select the Category first. The selections in the Items field will then be limited to only supply resources with this Category attached.
Choose the Item first. The Category field will then auto-fill with the Category assigned to that Item.
-
This field’s search ability is based on three (3) factors:
If you select Resource as the Type, the Items field drop down menu will include active entries from the Supplies Resource dictionary. Right-click in the Items field to change the search option, view the list of available items or clear the field.
If Tray is the Type, the Items field drop down menu will include active entries from the Tray dictionary.
When you select a Category, the Items field drop down menu only shows Supply Resource dictionary entries assigned to that Category.
The system will warn you if you select the same item twice to be added to the card.
You can select an item by entering the item's quick code or searching for the item in the list.
Right-click in the Items field to change the search option, view the list of available items or clear the field.
- Columns
labeled: Pre Op, Anes, OR, PACU I,
PACU II, EC (Extended Care)Columns
labeled: Pre Op, Anes, OR, PACU I,
PACU II, EC (Extended Care)
Enter the number of the selected supply resource to be used in each department in the appropriate column as listed below and hit Enter.
- Open
(O)Open
(O)
This numeric field indicates how many of a specific item should be “open” and ready for use in the various departments. Items marked as Open will pull into CDM as “Used.”
- Hold
(H)Hold
(H)
This numeric field indicates how many of a specific item should be "on hold" or “waiting” for use in case it is needed. Items marked Hold will pull into CDM with “Used” = 0.
Not Decided (N)Not Decided (N)
When the Preference Card is loaded into the CDM, items in this column will not appear under Supplies/Resources. You can decide when you print the Preference Card whether these items should be included in the print out.
When the scheduler attaches the card to an appointment, equipment marked Not Decided will show on the Appointment Screen, but with a quantity of 0. There is no place to display supplies on the Appointment Screen.
- Open
(O)Open
(O)
- TotalTotal
Read-only field populated by the system based on the number of units of the supply referenced for Hold/Open/Not Decided for all departments.
- CommentComment
Free text field to enter notes for the selected item. The information entered here will print on the preference cards next to that item.
- If you wish to keep the same open/hold numbers for the new item as was indicated for the item you are replacing, click the Keep open/hold values check box and do not enter any quantity in any of the departments. The system will simply replace the name of the old item with the name of the new item but keep the open and hold values.
- Under Select Items to be Replaced, add item(s) to be replaced on the preference cards. Complete all relevant fields:
- TypeType
Select the type of item to be pulled to the preference card.
- Resource: If you choose this option, the Items field will be active. You can select items from the drop-down list.
Tray: If you choose this option, the Items field will be active, and trays (instead of individual items) will be available to select from the drop-down list.
-
This field’s search ability is based on three (3) factors:
If you select Resource as the Type, the Items field drop down menu will include active entries from the Supplies Resource dictionary.
If Tray is the Type, the Items field drop down menu will include active entries from the Tray dictionary.
The system will warn you if you select the same item twice to be added to the card.
You can select an item by entering the item's quick code or searching for the item in the list.
Right-click in the Items field to change the search by option, view the list, or clear the field.
-
Field where you can see whether this item is still active in the database. Only active items will show in the item drop down. If you wish to remove an inactive item, check Show Inactive.
- TypeType
- Once all items have been entered into the select items headings, select which cards to apply these changes to. Note: If all of the options are left blank all cards will be included in the selection queue for items to be replaced. Users only need to make selections in the filter boxes if they wish to replace items from specific cards
- You can select multiple cards based on the following filter criteria (Note: multiple selection types can be used at once):
- Specialty: To
select cards based on specialtyTo
select cards based on specialty
- To add a specialty to the selection criteria, click the plus sign icon to open the specialty dictionary.
- To delete a specialty from the selection criteria, click the minus sign icon.
- To include all specialty cards, click Select All.
- To select only cards that do not have an associated specialty, check No Specialty.
- To remove the specialties previously chosen from the selection criteria, click Select None.
- Surgeon: To
select cards based on surgeonTo
select cards based on surgeon
- To add a surgeon to the selection criteria, click the plus sign icon to open the physician dictionary.
- To delete a physician, click the minus sign icon.
- To include all surgeon cards, click Select All.
- To remove the surgeons previously chosen, click Select None.
- Anesthesia Type: To
select cards based on anesthesia typeTo
select cards based on anesthesia type
- To add an anesthesia type to the selection criteria, click the plus sign icon to open the anesthesia type dictionary.
- To delete an anesthesia type, click the minus sign icon.
- To include cards with all anesthesia types, click Select All.
- To remove the anesthesia type previously chosen, click Select None.
- To include all cards with no selected Anesthesia Type, check No Anesthesia Type
- Procedure: To
select cards based on procedureTo
select cards based on procedure
- To add a procedure to the selection criteria, click the plus sign icon to open the procedure dictionary.
- To delete a procedure, click the minus sign icon.
- To include cards with all procedures, click Select All.
- To remove the procedures previously chosen, click Select None.
- Once filters have been set click Replace.
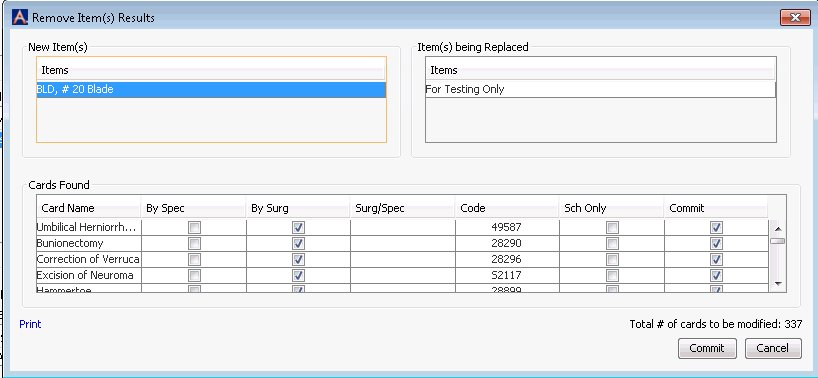
- The Remove
Item(s) Result dialogRemove
Item(s) Result dialog
appears. You can make further modifications to your card replacements
here:

Verify the list of item(s) being removed from all cards is correct.
The Cards Found section of the dialog shows a list of all cards that meet the filter criteria you selected in step 6. If you wish to exclude any of these cards from the removal of items, you can deselect the check box in the Commit column. Items will only be removed from cards with a check mark in the Commit column.
- To remove the listed items from the selected cards and replace with the new item(s), click Commit.
- A prompt will appear with a tally indicating how many cards were selected to be modified and how many cards were skipped. A card will be skipped if the item(s) to be replaced did not exist on the card selected.
 Troubleshooting Tips:
- If in Steps 3 & 5, you do not find an item you wish to add in the drop down menu, check the Supply Resource dictionary, as that item may be inactive or may have been checked Do not include on Pref Cards.
- In Step 7, only Specialties and Surgeons with existing Preference Cards will be available to add to the filter criteria . To learn how to add new Cards, see Building a Preference Card.
- Only Anesthesia Types and Procedures that are active in their respective dictionaries will be available to add to the filter criteria in Step 7.
Related Topics