Electronic Remittance Advice Posting (ERP) V. 3.19 and Later
The Electronic Remittance Posting Sheet Bar optionElectronic Remittance Posting Sheet Bar option in the Financial Management module enables you to post payments from an electronic remittance advice (ERA). This topic reflects new functionality introduced with AmkaiOffice V. 3.19. If you are working on an earlier version, see Electronic Remittance Advice Posting V. 3.16 - 3.18.
An ERA is an electronic version of a payment explanation sent by insurance carriers to providers which provides details about claims payment, along with the required explanations of any denied claims. The industry standard for sending ERA data is the HIPAA X12N 835 standard.
Using ERA posting, your facility may be able to save time and money by reducing manual posting of claim payments and reconciling patient accounts.
Adding New Insurance Carriers
If your facility is new to the ERA posting feature, your Amkai representative will assist you in setup and configuration steps (see Implementing ERA Posting V. 3.19), but after ERA posting is set up at your facility, you may occasionally need to set up new insurance carriers, if they require a unique posting of the 835 ERA. These should be set up in the Electronic Remittance Dictionary.
You do not need to set up a posting configuration per carrier, you only need to create multiple configurations if you want different rules to be applied to different payors. (Example: if you want to post write-offs for payments received from Medicare, but not if the payment is from Blue Cross, you would create two posting configuration set ups to accommodate the different rules.)
To learn how to set up a posting configuration, see Electronic Remittance Posting Dictionary v. 3.19 or later.
Using the ERA Posting Feature
Click here for a video demo.
- Open the Financial Management module.
Note: It is recommended that you open a new Batch for each ERA you will be posting, so you can easily balance the batch to the information posted by the system along with any manual posting needed.
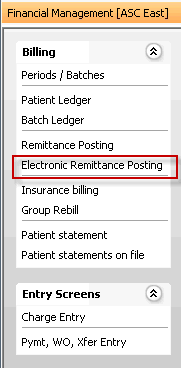
- From the Financial Management Sheet Bar, select Electronic
Remittance Posting to
access the ERA
WizardERA
Wizard
(Screen
1).
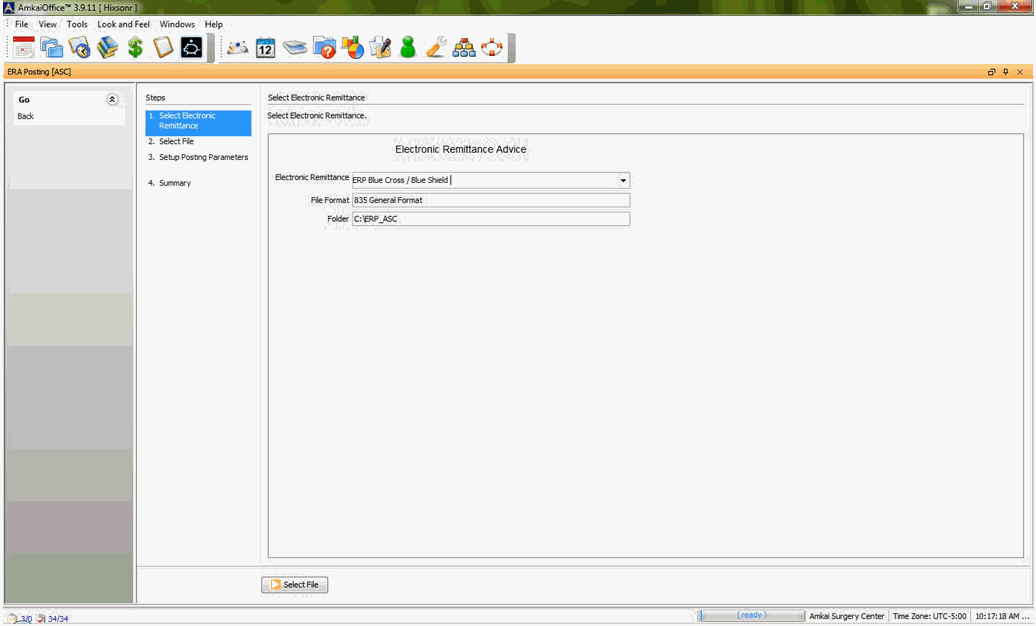
- Use the drop down arrow in the Electronic Remittance field to select the Electronic Remittance type you will be posting. The options displayed are pulled from the active items in the Electronic Remittance Posting Dictionary. This is a mandatory field. The File Format and Folder fields will default as read-only fields based on the set up for the selected ERA Kind.
- Click Select File. The
Select File
screenSelect File
screen (Screen 2) appears.
Note: Only one user at a time can use the ERA Posting feature. If you attempt to select a file while another user is already using this feature, you will receive a warning message. To see how long the original user has been logged in, click Details on the warning message.
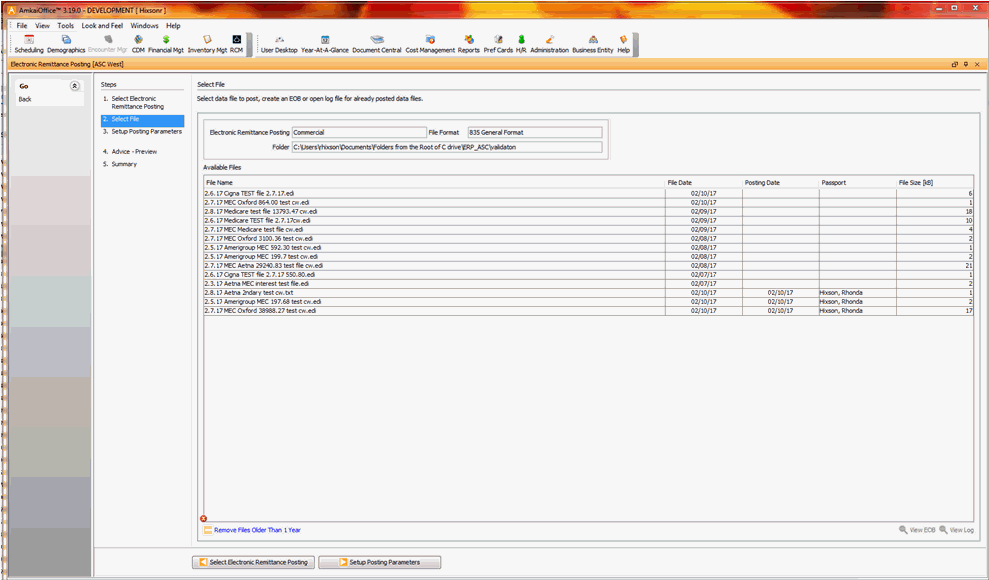
- On the Select File Screen, highlight the file that is to be posted
from the Available
Files list Available
Files list, create an EOB (click View
EOBView
EOB) or open a log file (click View
LogView
Log) for an EOB that has been posted.
View Log: After a file has been posted, View Log will become active. The saved log file will be displayed on screen.
View EOB: To view the EOB on screen, highlight the file from the list and click View EOB.
This file is only created once and is date stamped. If View EOB is clicked for the same file a second time, it will open the existing file with the previously stamped date.
To create a file with a new stamped date, the .txt file must be deleted from the ERP Folder Path file folder.
The system will normalize the 835 file so that is can be viewed in a format that is more user-friendly. The data displayed here may not exactly match the paper remittance format, but all of the data will be displayed that is included in the paper format.
The 835 files displayed as Available Files will have been downloaded from your clearing house or other source and placed in the ERA Folder(s) on your network.
- Available files without posting dates will be displayed at
the top of the grid. Click herehere
to learn about the fields in the grid.
- File Name: As assigned by the sending source or renamed by the user.
File Date: Date associated to the file when downloaded
Posting Date: The date the file was posted in the AmkaiOffice system. The field will be blank until the file is posted.
Passport: The Passport of the user that posted the file if it has been posted.
File size [KB]: The size of the file.
- Remove Files Older than 1 Year: Files may be removed from the grid if they are older than 1 year based on the File Date. You must have Delete privileges to use this feature.
- To go back to the previous page to select a file, click Select Electronic Remittance.
- Once you have selected a file from the Available Files list, click Setup Posting Parameters to move to the next page in the ERA posting process.
- Most of the fields on the Setup Posting
Parameters screenSetup Posting
Parameters screen (Screen 3) default in from settings entered
in the Electronic Remittance Posting Dictionary for the selected type,
but you can modify these fields on this screen as needed.
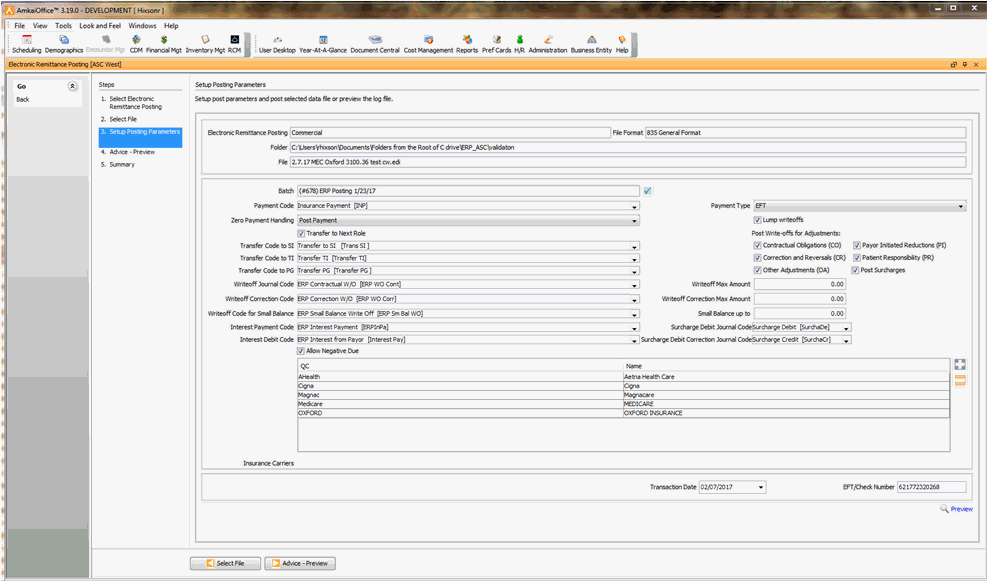
- You can preview log files prior to posting from this screen by clicking Preview (bottom left of the screen).
- The system will display as read-only the Electronic Remittance type selected on screen 1, the file format, folder path, and file name selected on screen 2.
- Click herehere
for more information on the fields this screen shares in common
with the Electronic Remittance Posting Dictionary.
Payment Code: Select or create a Payment journal code for use when posting payments for this ERA Carrier. Use the Alt + E key to jump to the Journal Code Dictionary if you need to add a new code. (example: ERP BC Payment)
Payment Type: Select from the drop down the form of payment that will generally be received, Card, Cash, Check or EFT.
Zero Payment Handling: If a transaction on the ERP has a zero payment, the optionoption you check here will determine what the system will do with the transaction.
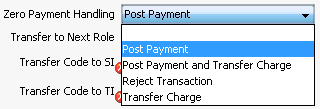
Note: The system will default to reject all write-offs associated to a zero payment, regardless of the payment posting option selected.
Transfer to Next Role: If you would like the system to automatically transfer any balance due to the next responsible party in the Billing Group when payments are posted, select Yes (default). If you do not wish to auto transfer select No. If you select No, users will be required to review all transactions and manually transfer the balance to the next responsible party if needed.
Note: The Transfer to Next Role setting does not apply to the Zero Payment transactions. The setting to transfer charges with zero payment is handled by the designated drop-down option, "Zero Payment Handling."
- Transfer Code to SI: Select or create a Transfer Code for use when a balance due is transferred to the Secondary Insurance. (example: ERP Transfer to SI)
- Transfer Code to TI: Select or create a Transfer Code for use when a balance due it transferred to the Tertiary Insurance. (example: ERP Transfer to TI)
Transfer Code to PG: Select or create a Transfer Code for use when a balance due it transferred to the Primary Guarantor. (example: ERP Transfer to PG)
Lump Write-off: This setting combines adjustments with the same group/reason code into one line item on the patient ledger.
Post Write-offs for Adjustments: Check off the box(s) if you would like the system to post adjustments to any of the group codes group codes displayed.
Contractual Obligation (CO)
Corrections and Reversals (CR)
Other Adjustments (OA)
Payor Initiated Reduction (PI)
Post Adjustments: Check off the appropriate box(s) if you would like the system to post the following to Charge Details:
Patient Responsibility (PR)
- Deductible (PR1)
- Coinsurance (PR2)
- Copayment (PR3)
These transactions will be pulled into the charge detail page and are used to balance the due amount when processing secondary or tertiary claims.
The amount listed in the PR field will be updated based on the information provided by the last payor. (Example: PR1 is reported as 500.00 from the Primary. This amount will be posted to the deductible field when the ERA is processed from the primary insurance. If an ERA file is then later processed from the secondary insurance and the PR1 is reported at 250.00 in the ERA file from the secondary, the Deductible field in the charge detail page will be updated to 250.00.)
Note: Patient Responsibility transactions are posted as information only to the fields on the Charge Detail screen.
- Post Surcharge
- CO-137
- PR-137
Note: Specific rules have been put in place for the posting of these items identified as Surcharges. Click here for details on these transactions (v. 3.19). If you are on AmkaiOffice v. 3.19.1 or later, click here.
- Write-off Journal Code: (optional) Select or create a Write-off Code that can be used by the system to apply a write off against the charge. (example: ERP Contractual W/O)
- Write-off Max Amount: (optional) Enter an amount to indicate the maximum amount you would like the system to write off as an adjustment when posting ERPs for this carrier. Enter positive values only. (example: 99.99) If the field is left as the defaulted 0.00, the system will assume no max amount.
- Write-off Correction Code: (optional) Select or create a write off correction code that can be used to reverse a previously posted write off. This option is useful if you have taken the contractual adjustment at the time of posting your charge and the write off may have been slightly overstated. Allowing the system to automatically reverse all or part of the write off could avoid a negative balance on charges or prevent the system from posting no payment at all if the balance due exceeds 0.00 when the payment is posted. (example: ERP Correction W/O)
- Write-off Correction Max Amount: (optional) Enter a positive dollar value that you would like to allow the system to do the write off correction for. (example: 0.01) If the field is left as the defaulted 0.00, the system will assume no max amount.
- Write-off Code for Small Balance: (optional) Select or create a Write-off Code that can be used by the system to remove a small balance that may remain on a charge after the payment has been posted. (example: ERP Small Balance W/O)
Small Balance up to: (optional) Enter an amount to indicate the maximum amount you would like the system to automatically write off as small balance when posting ERPs for this carrier. Enter positive values only. (example: 4.99)
Interest Payment Code: (optional) Select or create a Payment Journal Code that can be used by the system to post a payment received in the ERA file for interest from the payor. (Example: ERP Interest Payment )
Note: The system will post a payment and debit for interest against the first charge associated to the transaction in the ERA file for the patient. Interest is identified in the ERA file when AMT|01 is included. AMT 02 segment is used to determine the amount of the interest payment.
Allow Negative Due: Select Yes (default) if you would like to allow the system to post payments that exceed the due amount on the charge. Select No if you do not wish to allow negative due on charges. If you select No, the system will not post any payments to the charge if the resulting balance will exceed 0.00 due.
Note: If there are write offs associated to the payment the system may post the payment but reject the write off if by posting the write off a negative balance would result.
Surcharge Debit Journal Code: (optional) Select or create a Debit Journal Code that can be used by the system to post a surcharge received in the ERA file. (Example: ERP Surcharge Debit)
Surcharge Debit Correction Journal Code: (optional) Select or create a Debit Correction Journal Code that can be used by the system to post a debit correction against the debit surcharge when included in the ERA file. (Example: ERP Surcharge Debit Correction)
Payment Code: Select or create a Payment journal code for use when posting payments for this ERA Carrier. Use the Alt + E key to jump to the Journal Code Dictionary if you need to add a new code. (example: ERP BC Payment)
Payment Type: Select from the drop down the form of payment that will generally be received, Card, Cash, Check or EFT.
Zero Payment Handling: If a transaction on the ERP has a zero payment, the optionoption you check here will determine what the system will do with the transaction.

Note: The system will default to reject all write-offs associated to a zero payment, regardless of the payment posting option selected.
Transfer to Next Role: If you would like the system to automatically transfer any balance due to the next responsible party in the Billing Group when payments are posted, select Yes (default). If you do not wish to auto transfer select No. If you select No, users will be required to review all transactions and manually transfer the balance to the next responsible party if needed.
Note: The Transfer to Next Role setting does not apply to the Zero Payment transactions. The setting to transfer charges with zero payment is handled by the designated drop-down option, "Zero Payment Handling."
- Transfer Code to SI: Select or create a Transfer Code for use when a balance due is transferred to the Secondary Insurance. (example: ERP Transfer to SI)
- Transfer Code to TI: Select or create a Transfer Code for use when a balance due it transferred to the Tertiary Insurance. (example: ERP Transfer to TI)
Transfer Code to PG: Select or create a Transfer Code for use when a balance due it transferred to the Primary Guarantor. (example: ERP Transfer to PG)
Lump Write-off: This setting combines adjustments with the same group/reason code into one line item on the patient ledger.
Post Write-offs for Adjustments: Check off the box(s) if you would like the system to post adjustments to any of the group codes group codes displayed.
Contractual Obligation (CO)
Corrections and Reversals (CR)
Other Adjustments (OA)
Payor Initiated Reduction (PI)
Post Adjustments: Check off the appropriate box(s) if you would like the system to post the following to Charge Details:
Patient Responsibility (PR)
- Deductible (PR1)
- Coinsurance (PR2)
- Copayment (PR3)
These transactions will be pulled into the charge detail page and are used to balance the due amount when processing secondary or tertiary claims.
The amount listed in the PR field will be updated based on the information provided by the last payor. (Example: PR1 is reported as 500.00 from the Primary. This amount will be posted to the deductible field when the ERA is processed from the primary insurance. If an ERA file is then later processed from the secondary insurance and the PR1 is reported at 250.00 in the ERA file from the secondary, the Deductible field in the charge detail page will be updated to 250.00.)
Note: Patient Responsibility transactions are posted as information only to the fields on the Charge Detail screen.
- Post Surcharge
- CO-137
- PR-137
Note: Specific rules have been put in place for the posting of these items identified as Surcharges. Click here for details on these transactions (v. 3.19). If you are on AmkaiOffice v. 3.19.1 or later, click here.
- Write-off Journal Code: (optional) Select or create a Write-off Code that can be used by the system to apply a write off against the charge. (example: ERP Contractual W/O)
- Write-off Max Amount: (optional) Enter an amount to indicate the maximum amount you would like the system to write off as an adjustment when posting ERPs for this carrier. Enter positive values only. (example: 99.99) If the field is left as the defaulted 0.00, the system will assume no max amount.
- Write-off Correction Code: (optional) Select or create a write off correction code that can be used to reverse a previously posted write off. This option is useful if you have taken the contractual adjustment at the time of posting your charge and the write off may have been slightly overstated. Allowing the system to automatically reverse all or part of the write off could avoid a negative balance on charges or prevent the system from posting no payment at all if the balance due exceeds 0.00 when the payment is posted. (example: ERP Correction W/O)
- Write-off Correction Max Amount: (optional) Enter a positive dollar value that you would like to allow the system to do the write off correction for. (example: 0.01) If the field is left as the defaulted 0.00, the system will assume no max amount.
- Write-off Code for Small Balance: (optional) Select or create a Write-off Code that can be used by the system to remove a small balance that may remain on a charge after the payment has been posted. (example: ERP Small Balance W/O)
Small Balance up to: (optional) Enter an amount to indicate the maximum amount you would like the system to automatically write off as small balance when posting ERPs for this carrier. Enter positive values only. (example: 4.99)
Interest Payment Code: (optional) Select or create a Payment Journal Code that can be used by the system to post a payment received in the ERA file for interest from the payor. (Example: ERP Interest Payment )
Note: The system will post a payment and debit for interest against the first charge associated to the transaction in the ERA file for the patient. Interest is identified in the ERA file when AMT|01 is included. AMT 02 segment is used to determine the amount of the interest payment.
Allow Negative Due: Select Yes (default) if you would like to allow the system to post payments that exceed the due amount on the charge. Select No if you do not wish to allow negative due on charges. If you select No, the system will not post any payments to the charge if the resulting balance will exceed 0.00 due.
Note: If there are write offs associated to the payment the system may post the payment but reject the write off if by posting the write off a negative balance would result.
Surcharge Debit Journal Code: (optional) Select or create a Debit Journal Code that can be used by the system to post a surcharge received in the ERA file. (Example: ERP Surcharge Debit)
Surcharge Debit Correction Journal Code: (optional) Select or create a Debit Correction Journal Code that can be used by the system to post a debit correction against the debit surcharge when included in the ERA file. (Example: ERP Surcharge Debit Correction)
Insurance Carriers: List of the carriers associated to the selected remittance type if specific carriers have been set in the dictionary. If no specific carrier has been set in the ERP dictionary the list will be blank.
Transaction Date: The transaction date that will be applied to all posted transactions during the current electronic remittance session.
This date will default based on the payment date located in the selected file and will generally reflect the date the funds were dispersed from the payor.
EFT/Check Number: The EFT/Check number that will be applied to all posted transactions during the current electronic remittance session.
This number will default based on the payment information located in the selected file.
Preview: Click this option if you wish to generate a report that will display a list of payments that will be posted and a list of payments that will not be posted based on the criteria for the current remittance session.
Select File: If you wish to select a different file, click this option to return to the Select File screen (Screen 2).
Click Advice Preview at the bottom of Setup Posting Parameters screen (Screen 3).
The Advice Preview ScreenAdvice Preview Screen (Screen 4) is an interactive preview screen that displays all of the transactions included in the ERA file. By this point in the ERA posting procedure, the system has processed each transaction against certain parameters and system rules. Based on these criteria, the system will indicate in the Process fieldProcess field whether each transaction is to be posted, rejected or overwritten. This is called the "processing default." In some cases, you have the ability to accept or reject the processing default for a transaction.

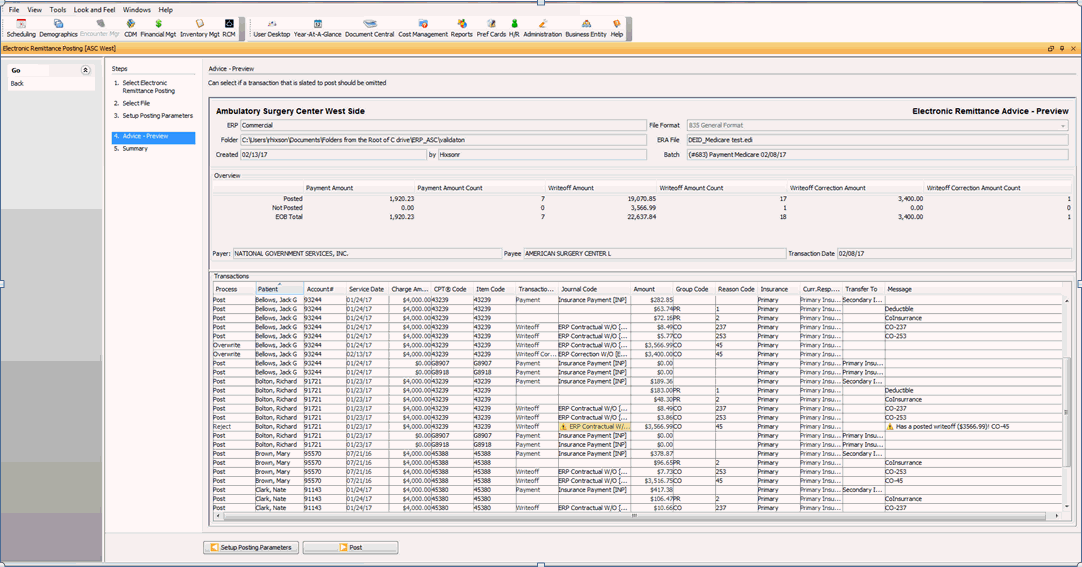
For detailed information on the Advice Preview Screen, including how to change the processing default for transactions, click here.
It is important to review all transactions on the Advice Preview Screen before posting, as there is no option to "undo" the transactions once you have clicked Post.
After reviewing the transactions on the Advice Preview Screen, click Post to complete the posting process. The system will attempt to post all transactions in the file based on the parameters set up. Any transactions that do not post or do not post as you intend will need to be corrected manually.
After posting is complete, the Summary PageSummary Page appears, displaying the results of the electronic posting. The fields on this screen are read-only and include the following information:
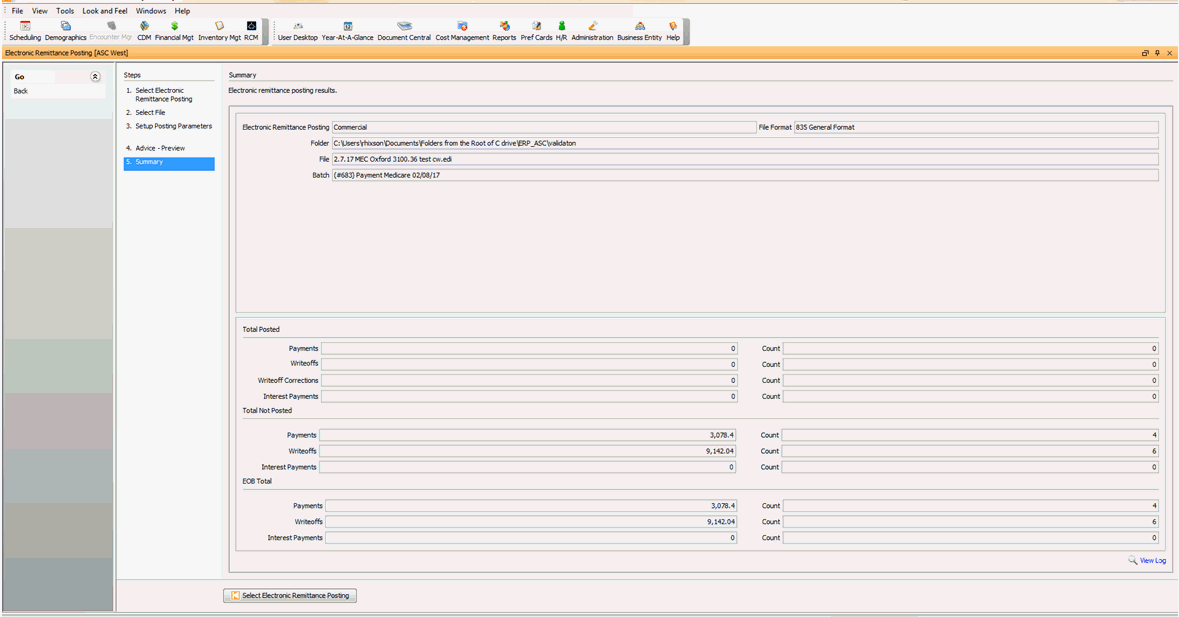
Electronic Remittance: The information displayed here is pulled from the data you entered on Screens 1 and 2 of the ERA Wizard. Click herehere for more information about the fields in this section.
Electronic Remittance: the name of the format selected for posting
File Format: 835 General Format
Folder: The path where the 835 files are located
Batch: The batch that was selected for transactions to be posted to
Total Posted: This section includes the total dollars and number of transactions that were posted successfully in the system. Click herehere for more information about the fields in this section.
Payments: Dollars posted
Count: Number to payment transactions
Writeoffs: Dollars posted
Count: Number of write-off transaction posted
Writeoff Corrections: Dollars posted
Count: Number of Write-off Corrections posted
Interest Payments: Dollars posted
Count: Number of Interest payments posted
Total Not Posted: This section includes the total dollars and number of transactions that were NOT posted successfully in the system. By this point in the process, the system will have attempted to match up the information in the ERA 835 file with the transactions posted in AmkaiOffice. It also will have looked to the preferences set up in the ERA Setup Posting Parameters screen to determine how transactions should be posted, for example, are additional write offs allowed, can account balance go to negative? Click herehere for more information about the fields in this section. Click here for a full list of posting messages.
Payments: Dollar amount not posted
Count: Number of items it is not able to post.
Writeoffs: Dollars posted
Count: Number of write-off transaction posted
Interest Payments: Dollars posted
Count: Number of Interest payments posted
If the payor has automatically processed a secondary or tertiary claim to the next responsible party, the ERP will display the transaction code MA18 and automatically uncheck the GC box for the claim. Insurance Billing History will not reflect that the claim was processed.
EOB Total: The system will display the totals of what was posted and not posted. Click herehere for more information about the fields in this section.
Payments: Total dollars included in the ERA file
Count: Total number of payments included in the ERA file
Writeoffs: Dollars posted
Count: Number of write-off transaction posted
Interest Payments: Dollars posted
Count: Number of Interest payments posted
View Log: Click this option to see a report on the transactions included in the file. Click herehere to see an explanation of the information included on the Electronic Remittance Advice Log.
Business Entity Name: The name of the entity into which the transactions were posted or attempted to be posted
ERA File: the location of the file and the file name
Created by: User Name that posted the ERA file
Batch: The batch number and name into which the transactions were posted
Posted: Payment dollar amount and count, Write-off amount and count, Write-off correction amount and count.
Not posted: Payment amount and count
EOB Total: Payment amount and count
Payor: Quick code / Name
Payee: Business Entity name
Transaction Date: Date included in the ERA file for payment
Patient: Name of the patient the system accessed for ERA information
Account: Account number of the patient accessed
Srv Date (Service Date): The date of service associated to the transaction referenced
Charge: The dollar amount of the charge
CPT Code: The CPT-4 code associated to the charge
Item Code: The code associated to a billable supply
TT (Transaction Type): The type of transaction posted. P = Payment, WO =Write-off, CWO = Correction of Write-off, T = Transfer
Journal Code: The code used when the transaction was posted to the account
Amount: The dollar amount of the transaction
Message: Information on the transaction. The system will display an exclamation mark ( ! ) if there was an issue posting the transaction. If the system was not able to post the transaction the users will need to post the transaction manually.
Related Topics