Purchase Order
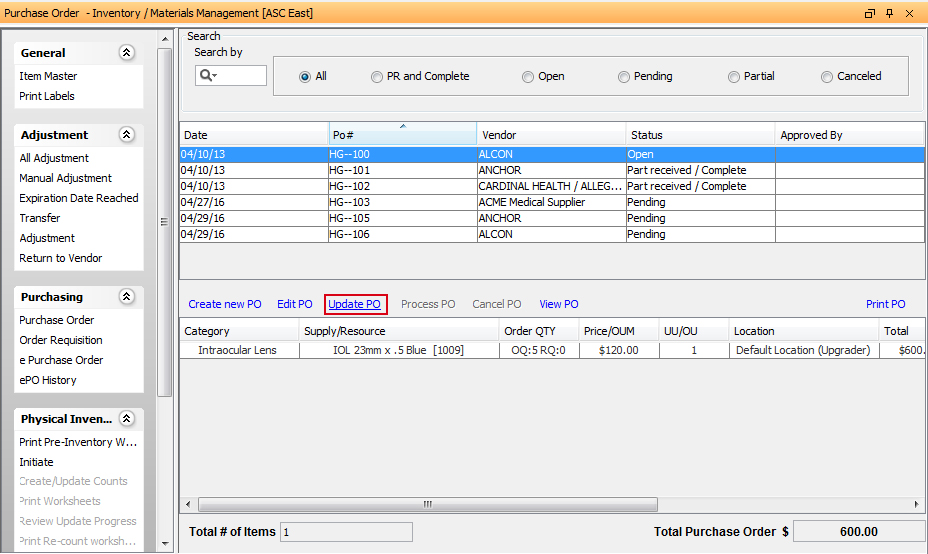
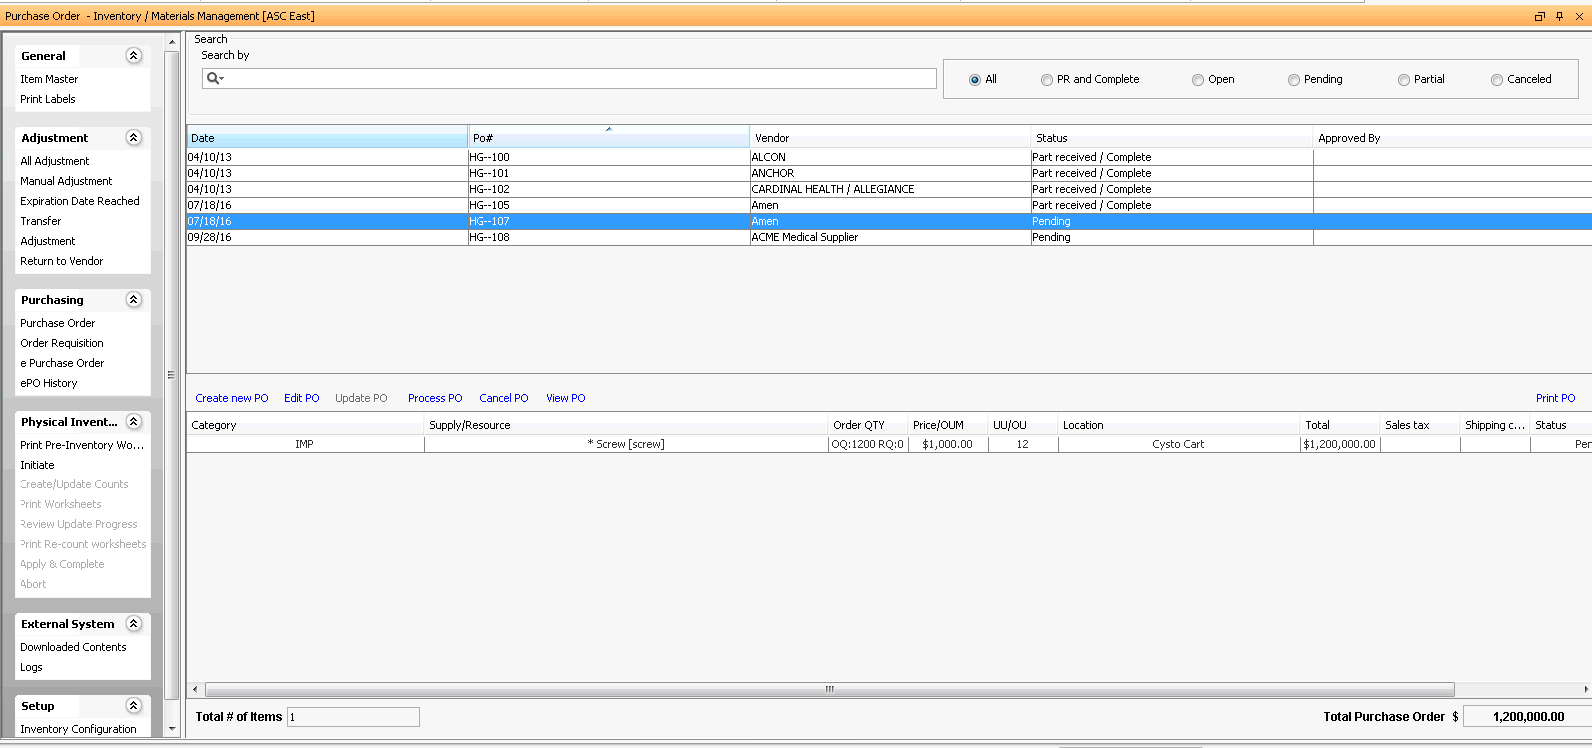
The Purchase Order option under the Purchasing heading on the Inventory Management Sheet Bar enables you to search for Purchase Orders, create, edit, update, process, cancel, view and print purchase orders.
Each of the Tasks linked below begins with the following steps:
- Open the Inventory Management module.
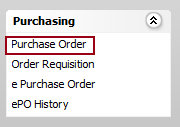
- Click Purchase
OrderPurchase
Order in the Purchasing section on the Sheet Bar.
The purchase order screen is displayed. This is the screen from which
you perform each of the following tasks.
Tasks
- Creating a Purchase Order
- Editing a Purchase Order
- Updating a Purchase Order
- Processing a Purchase Order
- Cancelling a Purchase Order
- Viewing a Purchase Order
- Printing a Purchase Order
- From the Purchase Order screen, click Create
new PO. The New
Purchase OrderNew
Purchase Order dialog appears.
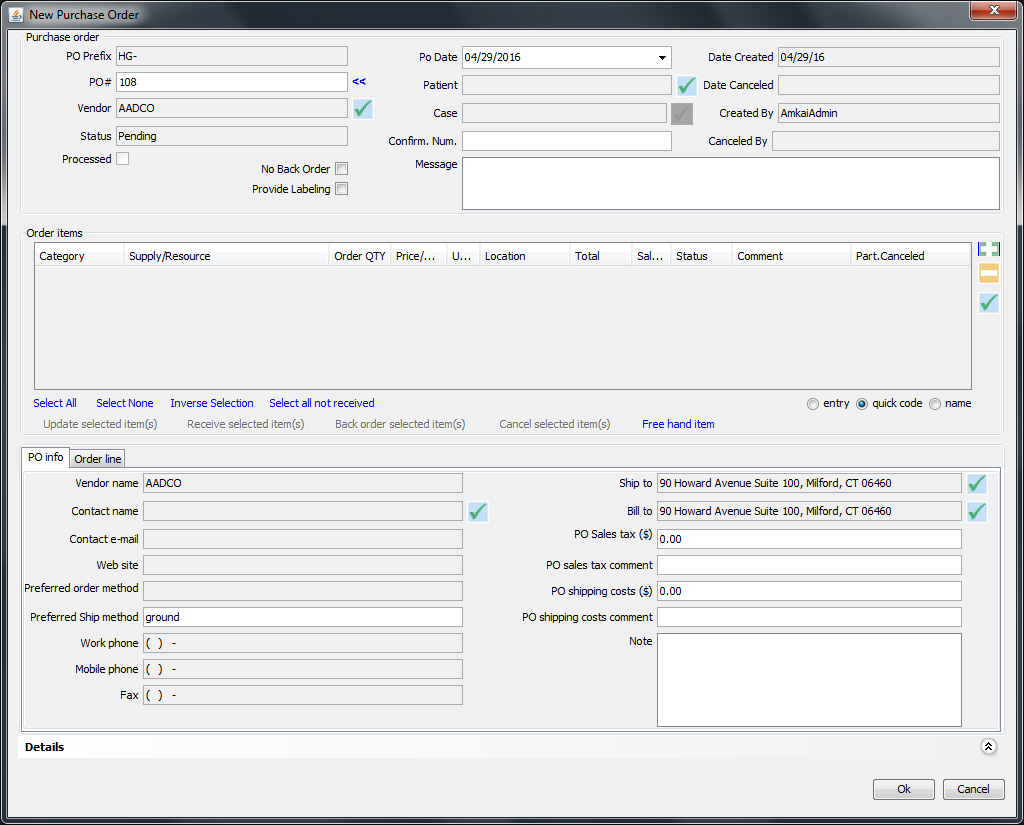
- In the Purchase order sectionPurchase order section
fill the details as appropriate.
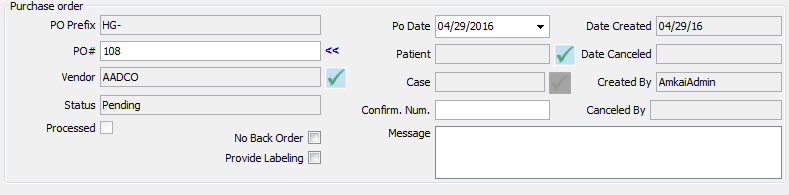
- If a prefix has been set up in the Inventory Configuration screen it will display in the PO Prefix field as read only. If no prefix was set the field will be blank.
- The system will automatically assign the next consecutive number to the purchase order. It can be adjusted if necessary.
- Click
 next to
the Vendor field to select
one from the Third Party Organization Dictionary.
next to
the Vendor field to select
one from the Third Party Organization Dictionary. - The PO Date field displays the current date by default. Adjust if necessary.
- If you want to assign the order to a patient, click next to the Patient
field to select the patient.
- If you want to assign the order to a case, click next to the Case
field to select a case. This field is accessible only if a patient
has been selected.
- If you have a confirmation number for the order it can be added in the Confirm. Num. field.
- The Message field is a free text field used to convey information to the vendor on your order.
- Date Created and Created By fields will auto populate based on the user who is logged into the system and is creating the order. These fields are read only.
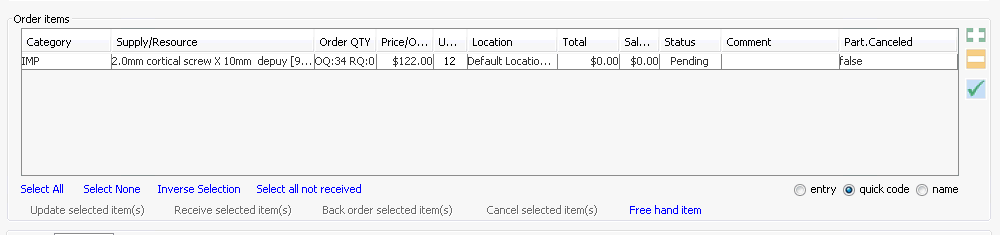
- To add an item to be ordered to the Purchase Order, click
 . The Order
LineOrder
Line dialog opens.
. The Order
LineOrder
Line dialog opens.
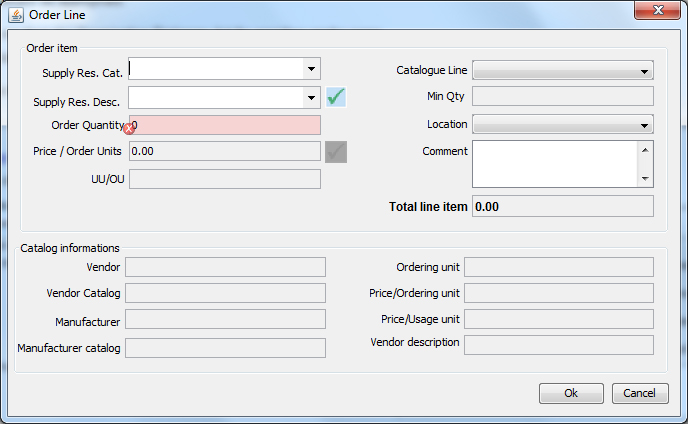
- (Optional) Select a Supply Res. Cat. from the drop down list.
- Select a Supply Res. Desc from the drop down The search defaults to look at description or quick code. Use the right-click option to modify the search field is needed. Note: Only items that have been set up as being available from the selected vendor will be displayed in the Supply Res. Desc. field.
- Enter the quantity of ordering units you wish to order in the Order Quantity field (quantity cannot be entered until an item is selected).
- If you need to enter a new price for this item, click for the Price
/ Order units.
- A message is displayed asking you to confirm if the Catalogue Price needs to be updated as well. Select Yes to have the system adjust the Catalogue information to reflect the new price for all future orders and select No to use the new price for the current purchase order only.
- If more than one ordering configuration has been entered for the item/vendor in the Item Master (on the Ordering Information tab), click Catalogue Line to select the applicable configuration. Example: Ordering Units of Measure may be Case, Box or Each.
- If the location is other than the default, click the Location drop-down to select a location.
- If a minimum quantity has been set for the item, it will display in the Min Qty field.
- Click OK to add the item to the order.
- Click
 to
remove a line from the order.
to
remove a line from the order. - Click to
edit a line item on the order.
- Clicking
the up arrow in the Details
sectionDetails
section will close the PO info / Order line section
of the screen and enlarge the Order items section of the screen to
display more of the items added to the purchase order. Click the up
arrow again to open the PO info/ Order line section.
- Add additional items by clicking for each
new item.
- Select the radio button to determine
the order the items will display on the purchase order:
- Entry (default)
- Quick Code
- Name
- Click OK to save the order as a Pending order.
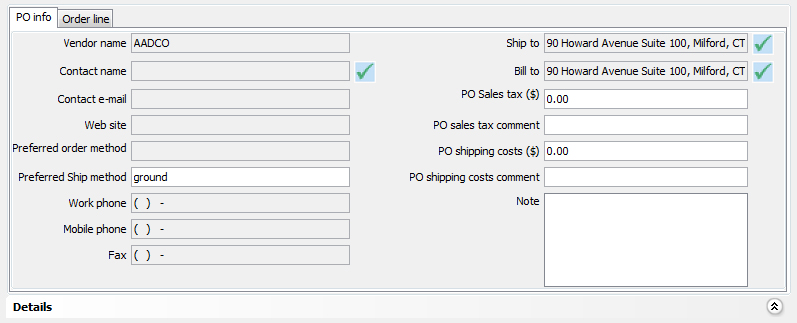
PO Info Tab
Select an item from the Order Items table in the New Purchase OrderNew Purchase Order dialog. Information about that item populates both tabs at the bottom of the New Purchase Order dialog.
From the PO Info tabPO Info tab, click
next
to the Contact name field
to select or access the vendor contact and shipping information. This
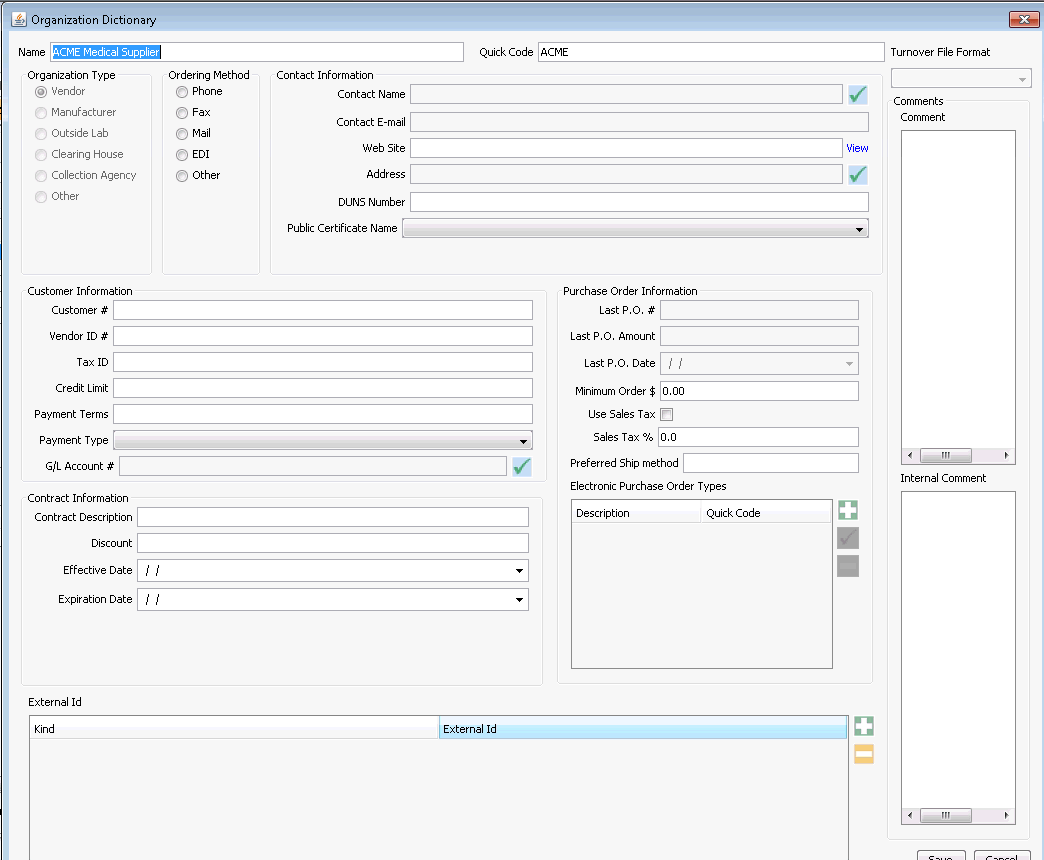
information is pulled from the Vendor data entered in the Third Party
Organization Dictionary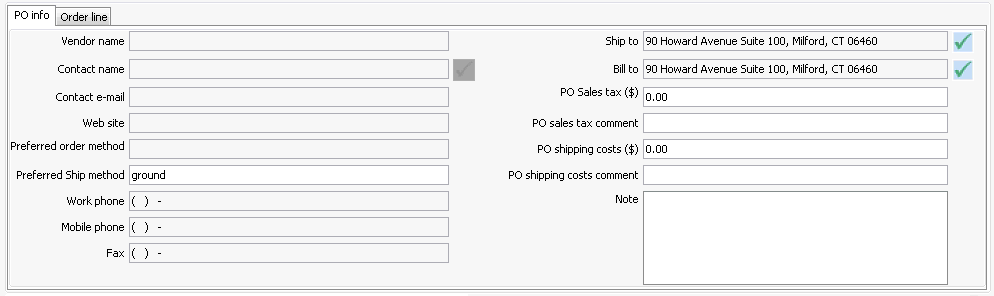
Click
to select
Ship to
address if it is other than the
default (Ship to address is entered Administration > Organization
> Business Entity).Click
to select Bill to address
if it is other than the default (Bill to address is entered Administration
> Organization > Business Entity).Preferred Shipping method will default based on the method set in the Inventory Configuration tab. Modify the field as needed.
- Information entered for the vendor in the Third Party Dictionary will display in the Notes field.
Order Line Tab
Information about the selected item is displayed here and is read-only. However, from the Order line tab, you can access the Third Party Organizations dictionary and edit/add Vendor information.
Select an item in the Order items sectionOrder items section of the New Purchase Order dialog to view details for the supply in the Order lineOrder line tab.
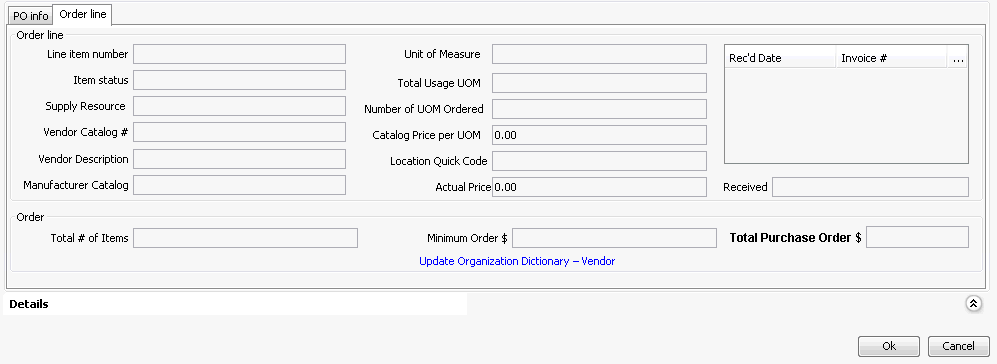
To edit information on file for the vendor, click Update Organization Dictionary – Vendor. The Third Party Organization dictionaryThird Party Organization dictionary appears. Click here to learn how to edit this dictionary.
Orders with a status of Pending may be edited. To edit an order click on the radio button for Pending in the top sectiontop section of the Purchase Order screen and select the PO to be edited.
Click Edit PO. The Edit Purchase OrderEdit Purchase Order dialog appears.
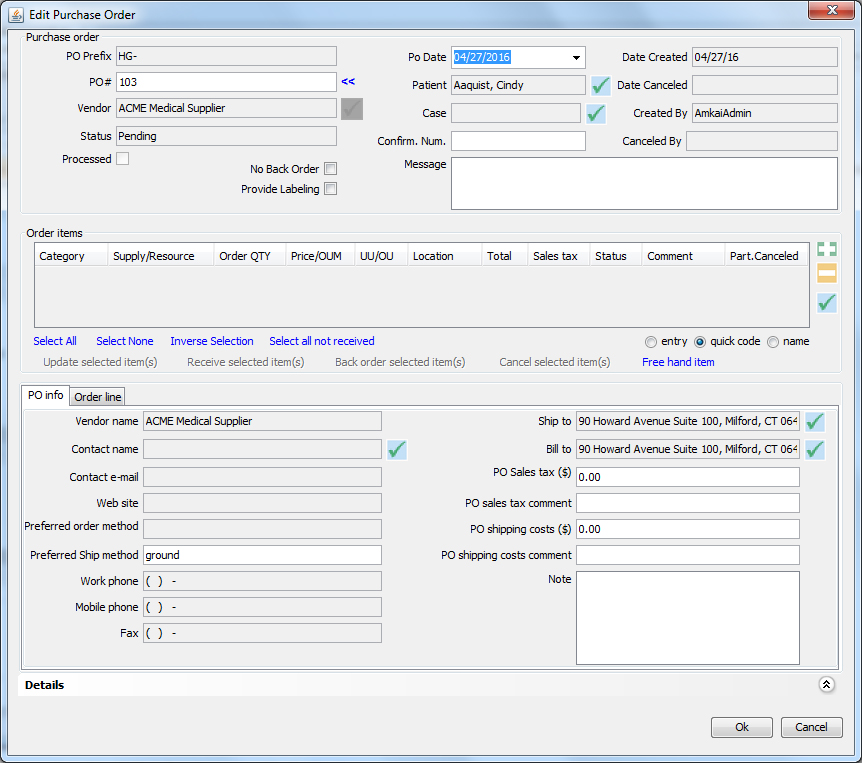
Click
to add
a new item to the order.Click
with
a line item selected to remove the item from the order.Click
with
a line item selected to edit the information entered for that line
item.Click OK to save the changes.
You need to process the Orders (see Processing a Purchase Order, further down on this page) so that they move from a status of Pending to Open. Once an order is processed, it is ready for sending to the vendor. No additional edits will be allowed. If you have indicated in the Inventory Configuration that approval is required for processing the orders only the designated person identified in Setup > Inventory Configuration may approve the order.
Processing a Purchase Order
- Select the order to be processed from the list of Pending orders.
- Click Process PO.
- If approval is required the Approve message appears. If you are authorized to approve the order select the box. If not, you will receive a message indicating you are not authorized.
- If approval is not necessary click ProcessProcess
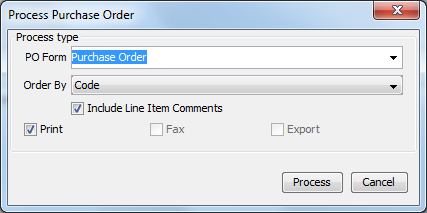 to indicate
that the order is complete. Processing will allow you to view the
order and print a paper copy. The status of the order will be updated
to Open.
to indicate
that the order is complete. Processing will allow you to view the
order and print a paper copy. The status of the order will be updated
to Open. - If you want the order to print to a paper purchase order select the PO From (format) to be used for printing.
- Note: When processing the
order to be sent to your vendor it is recommended to select one of
the following formats:
- Purchase Order (default)
- Purchase Order without Quick Code
- Select the Order By option:
- Code (default)
- Line Number
- Name
- The system default is to include Line Item Comments. These are the notes that were included with the item when it was added to the order. If you do not want to include the comments, uncheck the box.
- If you cancel the process the order will remain in a Pending status. Pending orders may be canceled prior to Processing.
If you received less than the full order or not all of the items have been shipped in full, you will need to edit the purchase order to indicate the quantity received for each line item and update the status of the items that have not been received.
- To update, select the order to be received from the Purchase order screen. The order status must be Open or Partial.
- Click Update
POUpdate
PO. The Update
Purchase OrderUpdate
Purchase Order dialog is displayed. The
blue text underneath the Order Items table represents options for
updating the purchase order. The headings below explain each of these
options:
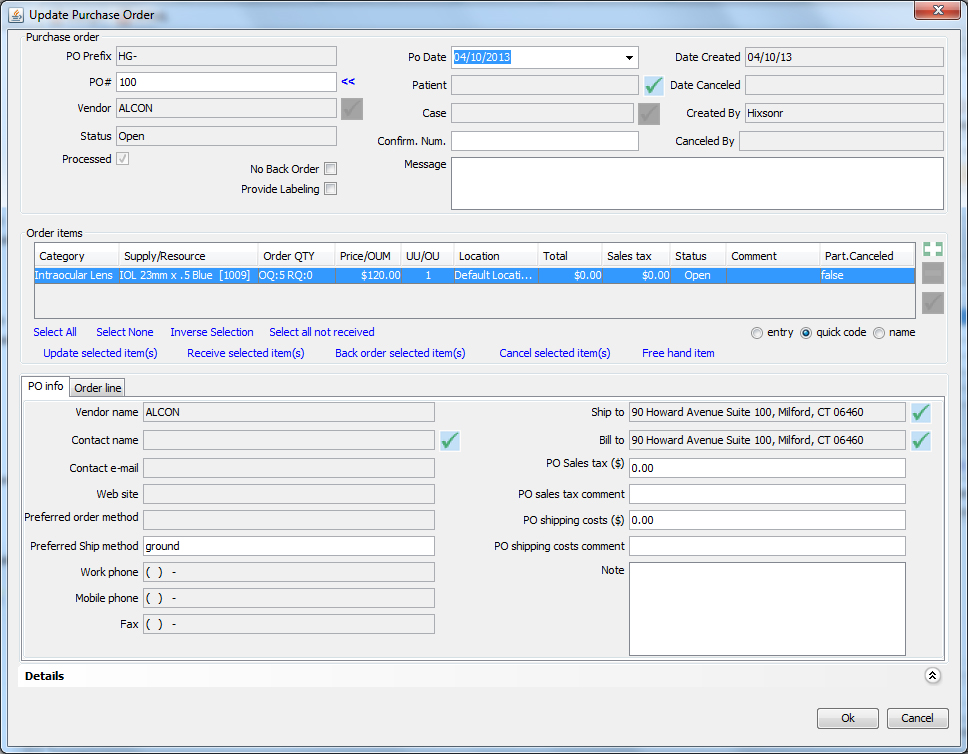
Update Items
- Click
Select All or
select a specific item to be received. Click Update Selected Item. The
Update
item(sUpdate
item(s) dialog is displayed.

- Edit the fields on this dialog as needed. Click each link below
to learn how to edit the fields in each section of the Update item(s)
dialog:
- Receiving
informationReceiving
information
In this section enter the details for the following:
Shipping cost: Enter the amount for shipping the order.
Sales tax: Enter the sales tax.
Vendor invoice number: Enter an invoice number if one is available.
Received Date: Enter the date the items were received. System will default to the current date.
Scanning Options: Click the check mark icon to scan an item to the order. Click the printer icon to print any scanned document or click the minus sign icon to remove any scanned document
- ItemsItems
In this section enter details for the following:
- Receive QTY: Enter the quantity received for the item if it is different from the quantity ordered.
If serial numbers or expiration dates are needed the field Complete will remain false.
Click Details to open the Receive Line Details screen to enter the Serial Numbers.
- Price: If the price of the item being received is not the same as the price on the order you may edit the price at the time of receiving.
Type the new price into the Price field
Click OK to save the information. The system will display a confirmation message “The Catalogue Price per UOM has been edited. Do you wish to update the catalog line item with this price?”
Select Yes to update the current purchase order and line item in the Item Master for the supply resource.
Select No to only update the current purchase order to reflect the new price. The catalogue information will remain unchanged.
- Status: The status of an item may be manually updated by clicking in the Status field and selecting from the options listed:
Canceled
Back Ordered
Part Received
Part Received / Complete
- DetailsDetails
(After completing the needed fields in the sections above, select
the item and click the Details button to modify the transaction
code, serial number or expiration date, or item location.)
The Receive Line DetailsReceive Line Details dialog appears.
Transaction Code
The system will use the default Transaction Code entered into the Inventory Configuration as the transaction code for the receipt of the goods. You may select a different code by clicking in the drop down box labeled Transaction Code.
Serial Number or Expiration date.
Enter the serial number / expiration dates.
If you click on OK to save and the correct number of Serial Numbers or Expiration Dates have not been entered for the quantity received the system will display the Conflict & Violation screen indicating mandatory information has not been completed. Add the remaining information and then click OK.
Update or Add Location:
Modify the location and quantity if required.
Click
to
add a new line and indicate an
additional location for the item (only the locations
associated to the item in the Item Master will
display in this screen. Additional locations can
be added and a Transfer done to move the stock
after it has been received)If the quantity at the location and the quantity received are not the same an error is displayed.
If no Default Location has been entered for the item in the Item Master the system will require you indicate the receiving location at this time.
- Receiving
informationReceiving
information
- Click OK to save the receiving information or Cancel to exit without saving the changes.
- Once all of the receiving data has been entered for the purchase order, click OK to save the data and update the system.
The system will update the order status based on the line item status assigned to the supplies ordered. If there is a balance still to be received on the order, for items that have status of Back Order or Partial, the PO status will be set to Partial. If all of the items have been received or if the line items have been set to Part Received / Complete, the PO status will go to Part Received / Complete. If the only remaining supplies that have not been received in full have a status of Canceled, the PO status will move to Canceled.
Receive all item(s)
If items on the order are received in full, you can receive all items to stock in one procedure.
- From the Update Purchase Order screen, click Select all not received. All items listed in the Order Items table will be selected.
- Click Receive selected item(s).
- The Receive
all item(s)Receive
all item(s) dialog is displayed and the value
for the Status for each item
on the order will be displayed as Part received/Complete and the value
for the column Complete will
be displayed True.
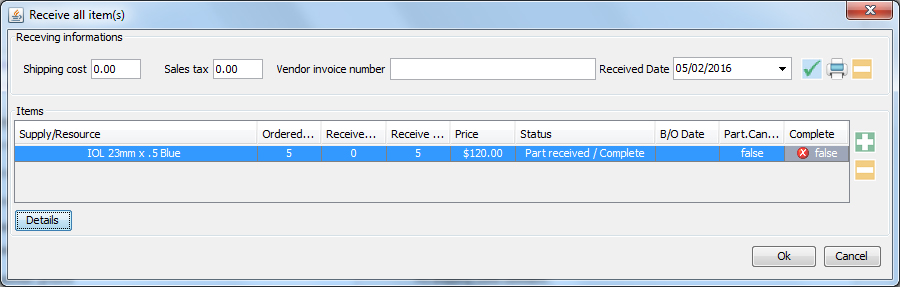
- If the order contains items that have been identified in the Supply Resource Dictionary as being serialized or having expiration dates the value for the column Complete will be False. Select the relevant item and click Details to enter the details on the Receive Line Details dialog.
Back order all item(s)
When you back order all the items on the Purchase order, you can set the status of items to Back ordered in one procedure.
- From the Update Purchase Order screen, click Select all not received. All items listed in the Order Items table will be selected.
- Click Back order selected item(s).
- A confirmation message “Are you sure you want to back order all item(s)?” is displayed.
- Click Yes to have the system update the status to Back Ordered. The Order status changes to Partial. Click No to return to the Update Purchase Order dialog. Click OK to save the changes or Cancel to exit without saving the changes.
Cancel all item(s)
- From the Update Purchase Order screen, click Select all not received. All items listed in the Order Items table will be selected.
- Click Cancel selected item(s).
- A confirmation message “Are you sure you want to cancel all item(s)?”
is displayed:
- Click Yes to have the system update the status to Canceled. The Order status changes to Canceled.
- Click No to return to the Update Purchase Order dialog. Click OK to save the changes or Cancel to exit without saving the changes.
Note: if all items on the order are set to Backordered the PO can only be viewed under the status of ALL.
Free hand item
(insert link to separate topic)
Print PO
A purchase order printed after receiving will include the following additional information. It is recommended that one of the following formats be used when printing received purchase orders:
- Purchase Order - Receiving Copy
- With GL account
- Receiving copy with GL account
- Received quantity
- Sales Tax
- Shipping Costs
- General Ledger Account Number (If they have been associated to Supply Resource Categories. Click here to learn how to edit the Supply Resource Category dictionary.)
To print a PO after items have been updated:
- From the Purchase
OrderPurchase
Order screen, highlight the PO you wish to print
from the table and click Print PO.
- The Print
Purchase OrderPrint
Purchase Order dialog appears. Select the PO Form type and Order
by criteria.
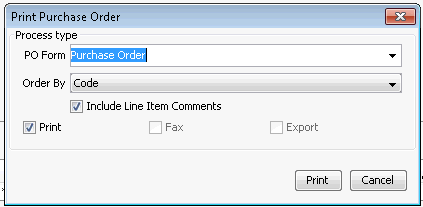
- Click Print.
Canceling a Purchase Order
- To cancel the entire purchase order, select the order that you want to cancel from the orders listed in the table on the Purchase Order screen. Only purchase orders with a status of Pending can be cancelled.
- Click Cancel PO.
- A confirmation message “Are you sure you want to cancel {PO number}?"
is displayed:
- Click Yes to have the system update the status to Canceled. The Order status changes to Canceled.
- Click No to return to the Update Purchase Order dialog. Click OK to save the changes or Cancel to exit without saving the changes.
- The system will update the status of the order to Canceled. You can view the Canceled orders by clicking on the radio button status Canceled.
Viewing a Purchase Order
You can view the details of any order by selecting the purchase order from the Purchase Order screen and clicking on View PO. The order opens in a read only format.
Click OK to close the View Purchase Order window and return to the Purchase Order main page.
Printing a Purchase Order
Once an order has been processed it may be printed or re-printed by clicking Print PO with the order selected.
Inventory Management Topics