Adding a Third Party Organization
To add/edit an organization entry to the Third Party Organization dictionary
- From the System Administration module Sheet Bar, select Dictionary > Third Party Orgs.
- The screenscreen
populates with all organizations already added to the dictionary.

- To edit an existing organization, highlight it and click
 .
. - To add a new organization, click
 .
.
- To edit an existing organization, highlight it and click
- The Organization
Dictionary dialogOrganization
Dictionary dialog appears. Complete the following
fields as needed.

- (Mandatory) Name: Enter the name of the organization as it will appear on the Purchase Order.
- (Mandatory) Quick Code: Enter a short name for the organization.
- Organization Type: This field will default to Vendor, unless you had selected to sort the organization list by a different type, in which case it would default to that type. Select the radio button for a different Organization Type if you are not entering a new Vendor (Manufacturer).
- Ordering Method: Select the appropriate radio button to indicate how the organization prefers to receive orders.
Note: Vendor information is used when Purchase Orders are printed.
Enter the Contact Information:
Contact Name: Click
 to launch the Organization Contacts dialogOrganization Contacts dialog.
Click herehere
to learn how to enter contact information.
to launch the Organization Contacts dialogOrganization Contacts dialog.
Click herehere
to learn how to enter contact information.- Click
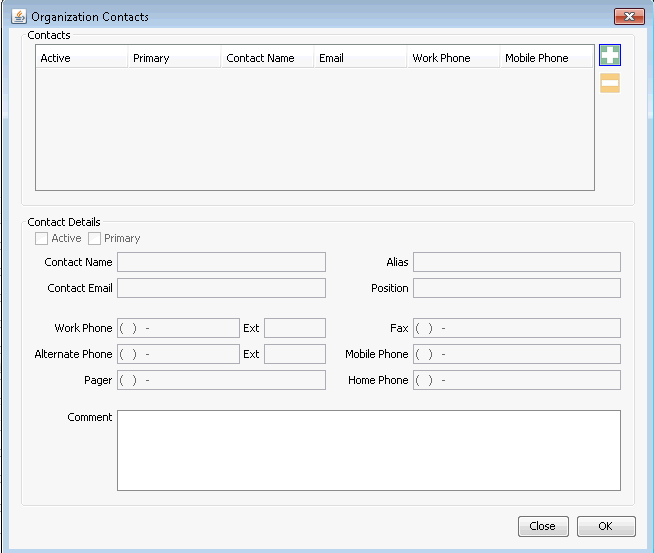
to add a contact.
- In the Contact Details section, check the Active box to indicate the contact is active with the organization
- Check the Primary box if this contact is to be the main contact. The primary contact's name will display on the Purchase Order as the Sales Rep.
- Enter the contact Name as it should appear on the purchase order.
- Enter any nickname the contact would like to be used in the Alias field.
- Complete other contact information as needed.
- In the Comments section, you can enter any free text information you would like to reference for this contact.
- Click OK to save your entries.
- Repeat this process to add any additional contacts.
- Click
- Enter the vendor’s web site URL. Clicking View will open a web browser and take you to the web site.
- Enter an address by clicking and completing
the needed details on the dialogdialog
that launches. You can enter multiple addresses of multiple types.
Click the to add each new address:
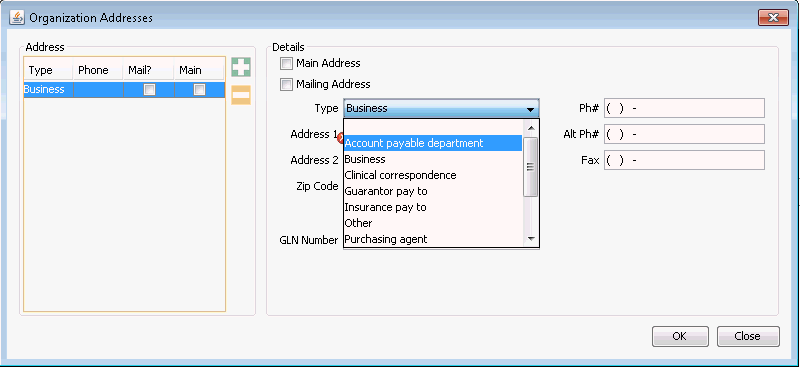
- Main Address: Check this box on the Details section of the dialog to indicate that the address is the main address. The address designated as Main will display on the cover page for the Vendor and will print on the purchase orders as the Vendor’s mailing address.
- Mailing Address: Check this box to indicate that the address is the mailing address for correspondence other than Purchase Orders for the vendor. Purchase orders will print with the Main address. The mailing address, if different, would be for reference only on the Purchase Order.
- Type: For the Main address, select Accounts Payable Department as the address type, as this is where Purchase Orders (POs) will be sent if the selected Ordering Method is Mail.
- You may add additional addresses as needed, selecting the appropriate address type for each. Any additional addresses are for reference only.
- DUNS Number: Enter the Data Universal Numbering System (DUNS) number assigned to this vendor.
- Public Certificate Name: If you are adding McKesson as a vendor and will be using the Electronic Purchase Order, enter the appropriate public certificate name here.
- Enter Customer Information. Click herehere
for information about the fields in this section.
- Customer #: Enter the identification number the vendor uses to reference your organization. This number will appear on the PO.
- Vendor ID #: Enter the identification number your organization uses to reference the vendor.
- Tax ID: Enter your organization's tax identification number.
- Credit Limit: Enter the vendor's credit limit for your organization.
- Payment Terms: Enter the vendor’s payment terms for your organization. This information will print on the PO in the Terms field.
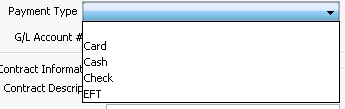
- Payment Type:
Select a default payment
typepayment
type from the drop down menu.
- G/L Account #:
Click
 to assign a default General
Ledger Account number for items purchased from this vendor.
Active items from the General Ledger Dictionary will be
selectable.
to assign a default General
Ledger Account number for items purchased from this vendor.
Active items from the General Ledger Dictionary will be
selectable.
- Enter PO information. Click herehere
for information about the fields in this section.
- Last P.O.#: Read-only field. If you are editing an existing vendor record, the system will display the PO number for the last PO placed with the vendor.
- Last P.O. Amount: Read-only field. Displays the total dollar amount of the last PO listed in the Last P.O. # field.
- Last P.O. Date: Read-only field. Displays the creation date of the PO listed in the Last P.O. # field.
- Minimum Order $: Enter the minimum dollar amount required by the vendor for a PO. The system will display a message when orders are created if the minimum has not been met.
- Use Sales Tax: If the vendor charges sales tax on your purchases, check this box.
- Sales Tax %: If sales tax is assessed on orders, indicate the percentage of tax charges. Only items in the Supply Resource Dictionary that have been indicated as Taxable will have this sales tax % calculated by the system upon receipt of the taxable supplies.
- Preferred Ship Method: Free text field. Enter your organization's preferred shipping method for items ordered from the vendor. This information appears on the PO Info screen.
- If your facility has purchased the add-on feature, Electronic Purchase
Ordering, and the default payment type selected in step 6 is EFT,
click
 to add the Electronic Purchase Order Type(s).
In the dialog that appears, either select an existing type or add
a new one by clicking
to add the Electronic Purchase Order Type(s).
In the dialog that appears, either select an existing type or add
a new one by clicking  . Complete
at least the Mandatory fields (marked in red) on the dialogdialog
that appears.
. Complete
at least the Mandatory fields (marked in red) on the dialogdialog
that appears.

- Enter any Contract Information. Click herehere
for information about the fields in this section.
- Contract Description: Free text field to enter the name of the contact
- Discount: Enter the percentage discount to be applied based on the contract terms.
- Effective Date: Enter the effective date for the contract
- Expiration Date: Enter the expiration date for the contract
- In the Comment field, type any notes you wish to appear on the PO as Vendor Comments.
- In the Internal Comment field, type any notes you wish to display for internal view only when POs are being created on the PO Info screen. These notes will not print on the PO.
Note: If you are working in AmkaiOffice, Version 3.18x or later, there will be an additional boxadditional box on this dialog for you to enter any External IDs needed to match items between the Inventory Management module and an external inventory system.
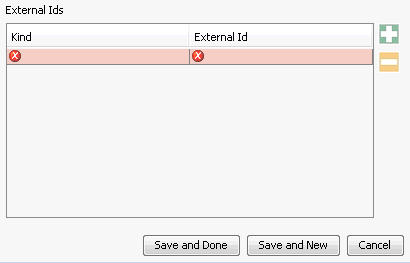
To add an External ID, click the plus sign and complete the Kind and External ID fields. These fields pull from a preset list of interfaces.
- Click Save to record your entries and create the new third party organization.