Selecting an item in the Item Master
On the Item Master page, you can enter/edit ordering information on all items (supplies, medications, implants, equipment and instruments). All active items in the Supply Resources dictionary are displayed on the Item MasterItem Master page. You cannot add items on this dialog. Items are added to the Supply Resource dictionary in the Administration module.
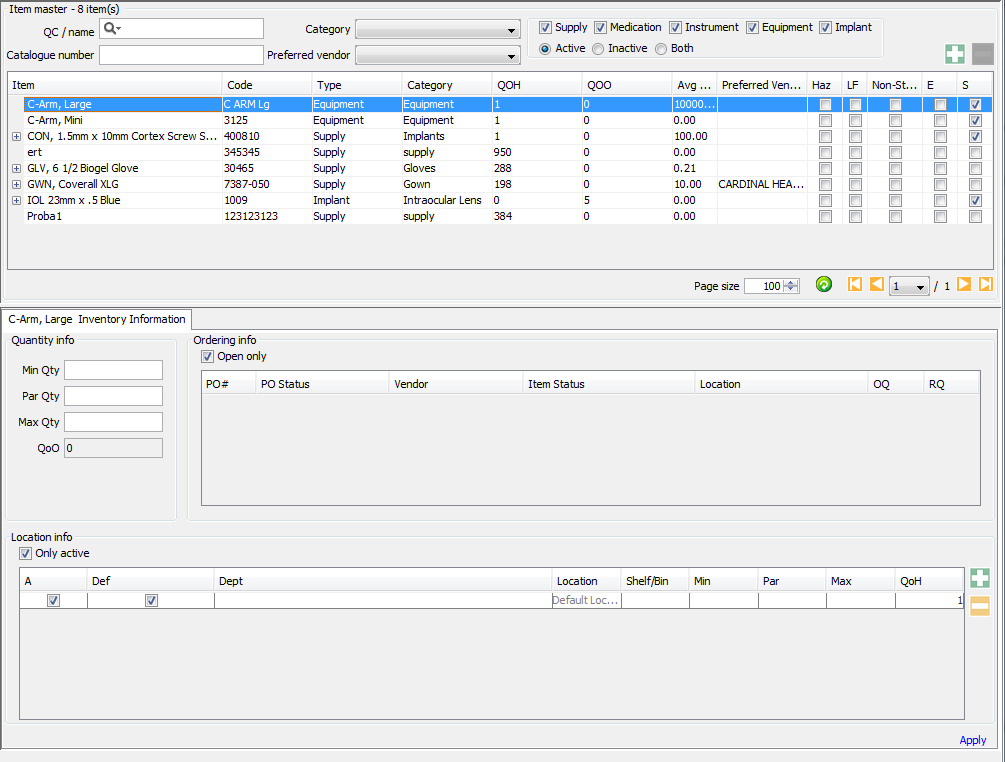
You can search for items using the various filters such as Quick Code, name, Category, Catalogue number, preferred vendor, or type of the item such as supply, medication, instrument, equipment,implant or status of the item such as active or inactive or both.
To enter/edit ordering information for items
- To access the Item Master in the Inventory / Material Management
module, click Item Master
under the General Heading
on the Inventory Management Sheet Bar. The Item
MasterItem
Master page appears.
- All active items in the Supply Resource Dictionary will display
here. This dialog contains three sections:
- The top
sectiontop
section displays the search criteria and the
filters that you use to search for specific items for which to
enter or edit ordering information.

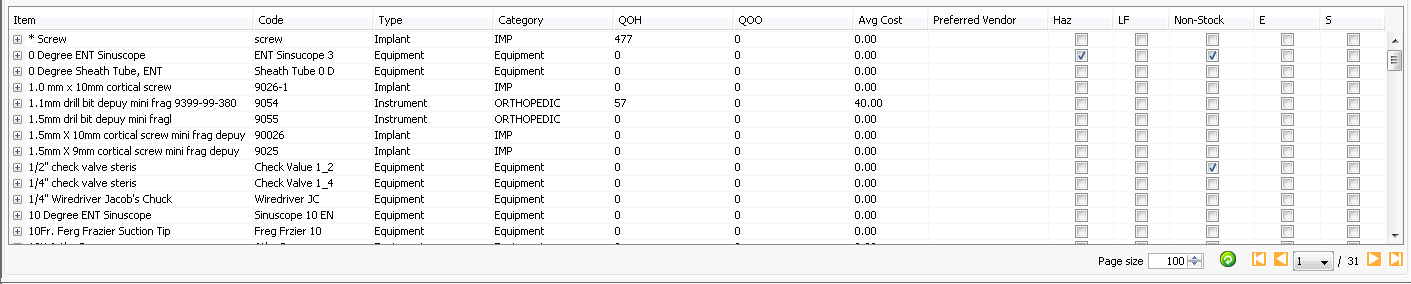
- The table
in the middle sectiontable
in the middle section displays the inventory
information on the item(s) that you select from among the search
display result. All of this information pulls from the Supply
Resource Dictionary.
- The section
below the tablesection
below the table displays quantity and ordering
information.

- The bottom
sectionbottom
section displays Location information.

- The top
sectiontop
section displays the search criteria and the
filters that you use to search for specific items for which to
enter or edit ordering information.
- Search for items using the filters in the top section.
- Click on the item for which you wish to enter/edit ordering information. Any existing ordering information for the item populates in the Quantity Info, Ordering Info and Location Info sections. Enter any new information in these sections as described below in the Sections on the Items Master page section below.
- Click Apply to save the information.
Sections on the Item Master page
Enter Quantity info:
In the Quantity infoQuantity info section enter the usage units for the following:
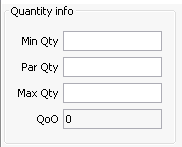
- Min Qty: Enter the minimum quantity of supplies that has to be ordered
- Par Qty: Enter the Par quantity (quantity of supplies normally required for daily requirements)
- Max Qty: Enter the Max quantity that can be stored.(optional)
- QoO: Read-only field that displays the quantity on order for the selected item
Enter Location info:
In the Location
infoLocation
info section, enter information in the following fields.
If the item is to be stored in another location(s), you can add additional
lines to the table by clicking  .
.
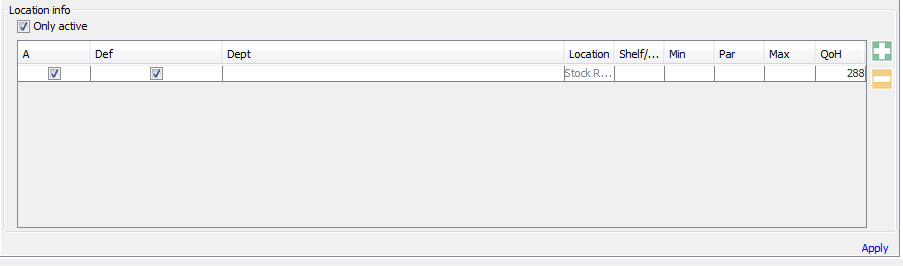
- Def: Default – the first item will be considered the default. Adjust this as required.
- Dept: Department – select the Department the item may be tied to (optional). Inventory Department Dictionary.
- Location: select the Location the item is stored in from the Supply Resource Location Dictionary.
- Shelf/Bin: type in the shelf and bin the item is stored on in the selected location (optional)
- Min: enter the minimum amount of stock that should be stored in this location (optional)
- Par: enter the Par amount of stock that should be stored in this location (optional)
- Max: enter the maximum amount of stock that should be stored in this location (optional)
- QoH: Quantity on Hand – read only field that is maintained by the system
Entering Ordering Information
With the item selected, click on
the top right corner of the Item Master
dialog. The Ordering
InformatioOrdering
Information tab appears. On this tab you can make
it easier to order/reorder an item from a vendor in the future by mapping
the vendor and key ordering information.
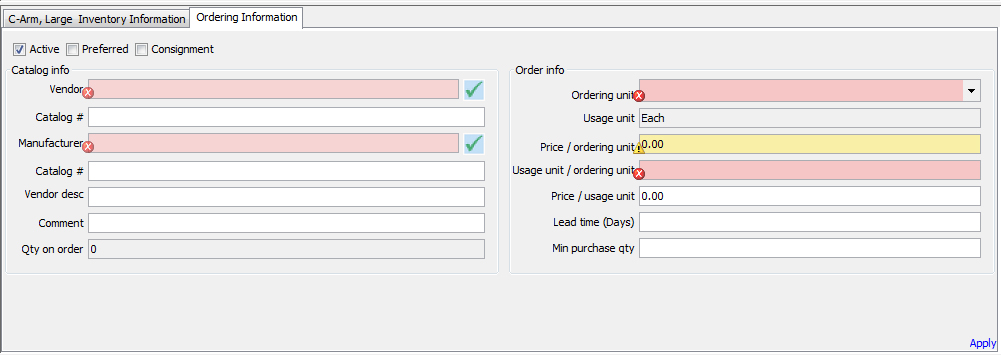
Enter Ordering Information:
In the Ordering Info section, enter information in the following fields:
Enter Catalog InfoCatalog Info:
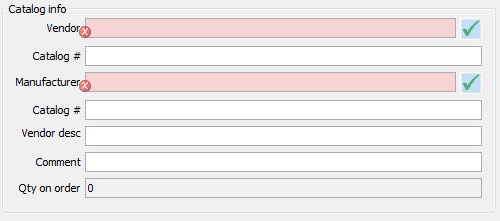
- Active: By Default this is selected.
- Preferred: Select this if you want the vendor to be considered a preferred one.
- Consignment: Select this if the supply item is a consigned item.
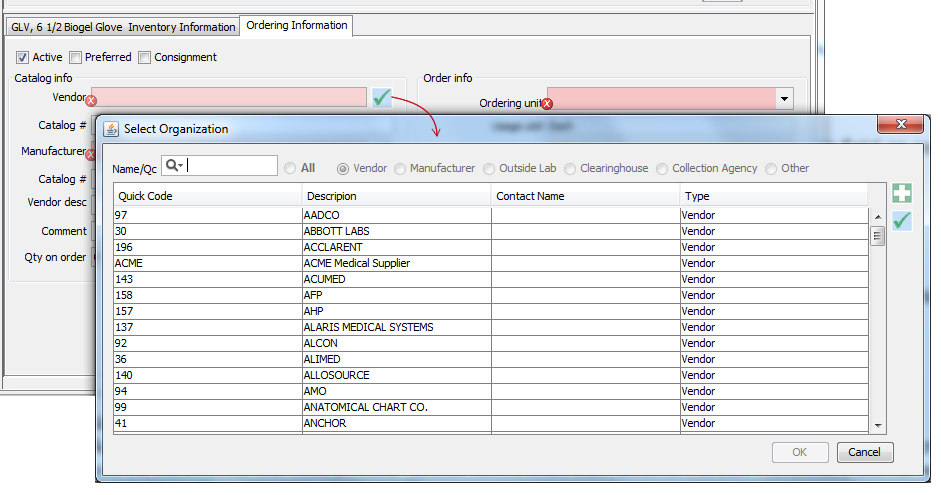
- Vendor: Click the check
mark to open the Organization
DictionaryOrganization
Dictionary. Select the Vendor where the item is
purchased.
- Catalog #: Enter the Vendor’s catalog number as it will appear on the purchase order.
- Manufacturer: Click the
check mark to open the Organization
DictionaryOrganization
Dictionary. Select the Manufacturer for the item.

- Catalog #: Enter the manufacturer’s catalog number for the selected item.
- Vendor desc: If the name (description) of the item entered in your Supply Resource Dictionary is not the same as the vendor’s description of the item, type the vendor’s description in this field.
- Comment: Enter any free text information you would to view on the purchase order screen when this items is ordered.
- Qty on order: This is a read - only field that will display the quantity on order of the selected item.
Enter Order InfoOrder Info:
- Ordering unit: Select the unit of measure for how the item is ordered from the drop-down selection menu.
- Usage unit: This is a read - only field pulled from the Supply Resource Dictionary.
- Price/ordering unit: Enter the dollar amount that is paid for the ordering unit.
- Usage unit / ordering unit: Enter how many usage units are included in the ordering unit.
- Price / usage unit: This value is the cost for one usage unit. The system will calculate this field based on the price / ordering unit and the number of usage units / ordering unit.
- Lead time (Days): Enter the number of days required for by the vendor for shipping the item.
- Min purchase qty: Enter the minimum number of ordering units required for this item by the vendor.
Inventory Management Topics