Patient Statements
The Patient Statements Sheet Bar optionPatient Statements Sheet Bar option under the Billing Heading in the Financial Management module enables you to send out statements of financial responsibility to patients and guarantors related to services provided at your facility or office. You can generate statements for selected individual patients or groups of patients, and you can customize what is included on the statements and how often they can be generated. This Sheet Bar options launches the Patient Statement Screen.
You can also access the Patient Statement screen from the RCM module. Click herehere to learn how.
- Open the RCM module.
- By default, all transactions
with an RCM Follow-up Date
of the current date or earlier that are assigned to you as
the collector will be presented in the queue on the Home Page
when you open the RCM module. You can use the filters at the
top of the page to select a subset of this larger group of
transactions. Click herehere to learn
how to use the filters.
-
Defaults to blank to display all accounts with a Date Type prior to today's date. Enter or select a different date to limit your results.
-
Defaults to today's date. You can enter or select a new date to limit or extend the results.
-
RCM Follow-up Date - (default) - Select this Date Type to view accounts by their assigned follow-up date.
Transaction date - Select to view accounts by date of service
Post date - Select to view accounts by the date the charge was entered into the system
Assigned CollectorAssigned Collector
Click the check mark icon to select a collector, then click Refresh. The charges assigned to the selected collector will pull to the screen. Click the minus sign icon to clear this field.
-
Enter a specific account number to pull only that account to the queue.
Last Name From/ThruLast Name From/Thru
Enter the last name or initial of the last name or range of last names you would like to pull to the queue. Example: A thru N or Aaron thru North.
-
Select a workflow status of the accounts you would like to pull to the queue. Your facility can define your own statuses using the RCM Status dictionary in Administration. Typical Statuses include:
Appealing
Check in Progress
In-progress
Open
Paused
Review
Status Pending
The Status of an account in the queue is set as the account is worked from the RCM Ledger. Any status other than Open indicates the account is being worked by an individual collector or a member of a Workgroup.
-
You can filter the queue by current responsible party (Due from), Provider, Patient Status, Patient Classification, and/or Case Classification by selecting one or more options from one or more of the 5 combo boxes shown.
Underneath each box, the system will display the number of items available to choose from in the box followed by the number selected. Example 12/1 displayed under Due from would indicate that there are 12 items in the list and 1 has been selected. All items are selected by default.
Use the
 icon
to add all of the items in the group or the
icon
to add all of the items in the group or the  to
de-select items already selected in the group.
to
de-select items already selected in the group.
-
- Double-click an item (charge) in the collector's queue, or click the item and then click Ledger from the RCM Home Page Sheet Bar.
- The RCM Ledger screen appears.
- From the RCM Ledger Sheet Bar, click Patient Statements.
To see which patients may not have received statements, run the Unbilled Patients Report.
The Patient Statement Screen
Patient Filters
The Patient Statement ScreenPatient Statement Screen has four tabs with Patient Filters that enable you to select the statements you wish to generate for the current statement run. You can use one or more tabs to define your group of statements:
- Selected Patients– Select this tab to generate a statement for one or several individually selected patients.
- Group of Patients – Select this tab to generate statements for groups of patients. Sort options on the tab allow you to define a group based on Primary Provider, Patient Status, Patient Classification, or Primary Insurance Classification.
- Enterprise – Select this tab if your organization has multiple Business Groups/Business Entities and you wish to combine the statement generation process for all or selected Business Entities.
- Rebill – Select this tab to rebill a previously printed group of statements.
Navigation Buttons
Buttons at the bottom of the screen enable you to navigate from screen to screen to generate the group of statements you defined using the Patient Filters.
Statements - After you select your patient filters from one or more tabs, and then click the Statements button, the Statements Screen appears This screen lists all the statements that match the filter criteria you selected on the tabs.
Billing Options - The Billing Options screen appears after you click the Billing Options button at the bottom of the Statements screen. The Billing Options screen enables you to select what information is included in your group of statements, such as dunning messages, Federal Tax ID, etc.
Create Statements - Click the Create Statements button at the bottom of the Billing Options screen to view/print the statements you have defined on the other screens.
Generating Patient Statements
To generate and view/print patient statements
- From the Financial Management module Sheet Bar, select Billing
> Patient Statement. The Statement
Options screenStatement
Options screen appears.
- In the Statement Options section at the top of the dialog, select the party to whom the statement(s) will be addressed: either the Primary Guarantor or Current Guarantor. Select Current Guarantor if you are not sure whether the charges are currently assigned to the Primary or Secondary Guarantor in the Patient Ledger.
- Select an option for showing aging amounts
on the statement. The past due balances will calculate from the "Age
by" option you select:
- Age
by Transaction DateAge
by Transaction Date
Select this option to show balances overdue by 30, 60, etc. days from the date of service for the charges on the account.
- Age
by Transfer DateAge
by Transfer Date
Select this option to show balances overdue by 30, 60, etc. days from the date the responsibility for payment was transferred to the current guarantor.
- Do
Not Show Aging AmountsDo
Not Show Aging Amounts
Select this option to hide any aging amounts.
- Age
by Transaction DateAge
by Transaction Date
- To exclude cases marked as No Patient Statement, deselect check box at the bottom left of the screen.
- Select one or more of the following tabs to choose which statements
to generate. The system will combine your choices from the filters
on the tabs to create the group of statements. Click the links below
to learn how to use the filters on each tab:
- Selected Patients–Selected Patients–
Select this tab to generate a statement for one or several individually
selected patients.
Click the
 to the right
of the screen to launch the Person - Patient selection
dialog. Select
the patient for whom you wish to generate a statement
from this dialog.
to the right
of the screen to launch the Person - Patient selection
dialog. Select
the patient for whom you wish to generate a statement
from this dialog.To select multiple patients, repeat this step for each additional patient.
The total number of patients selected displays in the Count field at bottom right.
- Group
of PatientsGroup
of Patients – Select this tab to generate
statements for groups of patients. Sort options on the tab allow
you to define a group based on Primary Provider, Patient Status,
Patient Classification, or Primary Insurance Classification.
Filters
- Patient Last namePatient Last name
- Optional
Enter a range of names to be pulled for the statement run by entering data into the from- through fields. To pull only accounts with last names A – N enter A in the From field and N in the Through field.
- Cycle daysCycle days
- Enter a positive value with 0 as an acceptable value.
- Default: last used value or 30. If you modify the cycle days, the system will "remember" the number of days last entered in the field and display that value as the default. The value will remain until it is modified again and is user specific. Use the up/down arrows to modify the value or type a number into the field to adjust the cycle days.
- Note: Cycle days is used to determine how often an account will receive a statement. Setting the Cycle days to 30 tells the system that you only want an account to get a statement once every 30 days. It is important to remember when you ran statements last so that you can adjust your cycle days, if necessary to ensure all accounts that should be getting statements will get them. For example: If you run statements on Friday July 2nd and then again on Friday July 30th, only 28 days has elapsed between billing runs. If your cycle days are set to 30 you may miss some accounts because it has not yet been 30 days since the last statement run. You may need to adjust the cycle days to 27 or 28 to ensure that you get all accounts in the run. Otherwise, some accounts will miss this cycle run and not get a statement until the August statements are run.
- Statement balanceStatement balance
- From / Through: default: from 0.01
- Statement balance represents the balance due from Primary or Secondary Guarantors. The system defaults to send out statements only to patients with patient balances due that are positive and over 0.01. If you would like to send statements only to accounts with positive patient balance greater than $25.00 enter 25.00 in the From field and leave the Through field blank.
- Account BalanceAccount Balance
- From/Through: defaults to blank
- Account balance represents the overall balance due on an account. If you would like to print a statement for an account or accounts that do not yet have a balance due from the PG/SG, use this field to indicate the overall account balance range to include in the statement run.
- Primary providerPrimary provider
- Optional
Select one or more Providers. Only charges associated to the selected Provider(s) will be included in the statement run. The field is multi-selectable. Use the hot keys Ctrl + A to select all items. Click None to clear all selections.
- Patient classificationPatient classification
- Optional
- Select one or more Patient classifications. Only charges associated to the selected Classification(s) will be included in the statement run. The field is multi-selectable. Use the hot keys Ctrl + A to select all items. Click None to clear all selections.
- Patient Classification is entered in Demographics > Account > Classification
- Patient statusPatient status
- Optional
- Select one or more Patient Statuses. Only charges associated to the selected Patient Status(s) will be included in the statement run. The field is multi selectable. If you select more than one Patient Status, accounts that have at least one of the selected options will be included in the statement run. Use the hot keys Ctrl + A to select all items. Click None to clear all selections.
- Patient Status is entered in Demographics > Account > Patient Status
- Primary insurance
classificationPrimary insurance
classification - Optional
- Select one or more Primary Insurance Classifications. Patients with at least one billing group with the given primary insurance classification(s) will be included in the statement run. The field is multi selectable. Use the hot keys Ctrl + A to select all items. Click None to clear all selections.
- Primary Insurance Classification is assigned at the Plan level. Administration> Items > Insurance Plan > Insurance Classification.
- Patient Last namePatient Last name
- Optional
- EnterpriseEnterprise
– Select this tab if your organization has multiple Business
Groups/Business Entities and you wish to combine the statement
generation process for all or selected Business Entities.
Filters
- Patient Last
namePatient Last
name - Optional
Enter a range of names to be pulled for the statement run by entering data into the from- through fields. To pull only accounts with last names A – N enter A in the From field and N in the Through field.
- Cycle daysCycle days
- Enter a positive value with 0 as an acceptable value.
- Default: last used value or 30. If you modify the cycle days, the system will "remember" the number of days last entered in the field and display that value as the default. The value will remain until it is modified again and is user specific. Use the up/down arrows to modify the value or type a number into the field to adjust the cycle days.
- Note: Cycle days is used to determine how often an account will receive a statement. Setting the Cycle days to 30 tells the system that you only want an account to get a statement once every 30 days. It is important to remember when you ran statements last so that you can adjust your cycle days, if necessary to ensure all accounts that should be getting statements will get them. For example: If you run statements on Friday July 2nd and then again on Friday July 30th, only 28 days has elapsed between billing runs. If your cycle days are set to 30 you may miss some accounts because it has not yet been 30 days since the last statement run. You may need to adjust the cycle days to 27 or 28 to ensure that you get all accounts in the run. Otherwise, some accounts will miss this cycle run and not get a statement until the August statements are run.
- Statement balanceStatement balance
- From / Through: default: from 0.01
- Statement balance represents the balance due from Primary or Secondary Guarantors. The system defaults to send out statements only to patients with patient balances due that are positive and over 0.01. If you would like to send statements only to accounts with positive patient balance greater than $25.00 enter 25.00 in the From field and leave the Through field blank.
- Account BalanceAccount Balance
- From/Through: defaults to blank
- Account balance represents the overall balance due on an account. If you would like to print a statement for an account or accounts that do not yet have a balance due from the PG/SG, use this field to indicate the overall account balance range to include in the statement run.
- Business entityBusiness entity
- At least one Business Entity needs to be selected. The entity currently being accessed will be checked as selected as the default. Use the Select All / Select None options to select or deselect all entities.
- Columns displayed are: Selected, Business group name, Business entity name, PDF layout (select from a drop-down list on the Options page), and File layout (select from a drop-down list on the Options page)
- Primary providerPrimary provider
- Optional
Select one or more Providers. Only charges associated to the selected Provider(s) will be included in the statement run. The field is multi-selectable. Use the hot keys Ctrl + A to select all items. Click None to clear all selections.
- Patient classificationPatient classification
- Optional
- Select one or more Patient classifications. Only charges associated to the selected Classification(s) will be included in the statement run. The field is multi-selectable. Use the hot keys Ctrl + A to select all items. Click None to clear all selections.
- Patient Classification is entered in Demographics > Account > Classification
- Patient statusPatient status
- Optional
- Select one or more Patient Statuses. Only charges associated to the selected Patient Status(s) will be included in the statement run. The field is multi selectable. If you select more than one Patient Status, accounts that have at least one of the selected options will be included in the statement run. Use the hot keys Ctrl + A to select all items. Click None to clear all selections.
- Patient Status is entered in Demographics > Account > Patient Status
- Primary insurance
classificationPrimary insurance
classification - Optional
- Select one or more Primary Insurance Classifications. Patients with at least one billing group with the given primary insurance classification(s) will be included in the statement run. The field is multi selectable. Use the hot keys Ctrl + A to select all items. Click None to clear all selections.
- Primary Insurance Classification is assigned at the Plan level. Administration> Items > Insurance Plan > Insurance Classification.
- Patient Last
namePatient Last
name - Optional
- RebillRebill
– Select this tab to rebill a previously printed group of
statements.
Only groups which the current user has privileges in the Business Entities are listed for selection.
Only the last 1000 groups are listed.
Only those statement groups will be listed where guarantor kind was the same as the currently selected value, Primary or Current. If the guarantor kind selection is changed, the list will be reloaded. On the “list of available statements” screen user will get statements from the selected statement groups.
Note: This option will re-select the accounts that were included in the original patient statement run to have new statements printed. If new information has been added to the selected account or if existing information has been changed between when the statement was originally printed and when the Rebill option is selected the reprocessing of the statements will reflect all changes to the account. Rebill does not reprint the statement as it existed when the statement was first included in the selected Patient Statement Group. Rebill selects the same accounts that were included in the Statement Groups and prints statements for that group as the information currently exists on the patients ledger.
- Selected Patients–Selected Patients–
Select this tab to generate a statement for one or several individually
selected patients.
- Click Statements. The Statement Options screen appears.
This screen displays a list of patients that meet the criteria you
entered on one or more tabs in step 5:
- The selected patients are listed here in a tabletable
that shows the guarantor, account and statement balances, and
aging amounts based on your selections in steps 2 and 3.

- To exclude a patient account from this batch of statements, deselect the Selected check box. The number of selected patient accounts displays in the Selected Statements field at bottom right.
- The balance of all selected statements displays in the Selected Statement Balance field at bottom right.
- The selected patients are listed here in a tabletable
that shows the guarantor, account and statement balances, and
aging amounts based on your selections in steps 2 and 3.
- To choose the information
that will be shown on the statement, click the Billing
Options button at the bottom of the screen. The Billing
OptionsBilling
Options screen appears. The selections you made
in steps 2 and 3 are displayed in the Statement
Options section at the top of the Billing
Options screen.
- Select from among the options in the Billing
Options section to determine what information will be shown
on the statement. The PDF Layout field is the only required field.
Your facility has the ability to set preferences in the Administration
module for which of these check boxes will be selected by default.
Click herehere
to learn more about the fields in this section.
- Use
balance forward for charges & unassigned payments
older than < select
an option > days.Use
balance forward for charges & unassigned payments
older than < select
an option > days.
If you select 60 days (the default for this field), the statement will pull in any unpaid balance billed more than 60 days ago, or any unassigned payment posted more than 60 days ago. All transactions older than 60 days are rolled up and displayed as Balance Forward.
- PDF LayoutPDF Layout
(Required)
Select a statement layout from the drop-down list.
- File
layoutFile
layout
Select a layout for the statement from the drop-down list. This field is only used if you would like to create a CSV (comma separated value) file to send to a third party for statement processing.
- Output
folderOutput
folder
Enter the file path for the location where you want the system to save the CSV file for uploading to your third party vendor.
- Show
payment, write-off, ... on separate linesShow
payment, write-off, ... on separate lines
A statement usually shows charges and what is owed, but not payments or write-off amounts that have been applied to those charges. Selecting this field displays all payments and write-off amounts for each charge.
- Show
transfers on statementShow
transfers on statement
Selecting this check box will display transfers on the statement. "Transfer" refers to the date the responsibility for payment was transferred from the insurance company to the guarantor.
- Show
notes attached to charges and unassigned paymentsShow
notes attached to charges and unassigned payments
- Selecting this check box displays General Notes and Notes on separate lines. Transaction-specific notes will follow the Journal Code Description. If the box is not checked, all notes will be hidden.
- Transaction-specific notes will be displayed only if the “print on statement” check box is selected on the ledger note screen and the note is active.
- Show
charges and unassigned payments due from insuranceShow
charges and unassigned payments due from insurance
- If you select this check box, you should also select the "use balance forward... days" option for transactions for which the insurance company is responsible.
- The items for which insurance is responsible will be included in the statement of the billing group's primary guarantor.
- Show
charges and unassigned payments with zero balanceShow
charges and unassigned payments with zero balance
If you select this option, you should also apply the "use balance forward... days" option for transactions with a zero balance.
- Show
all charges for an unpaid caseShow
all charges for an unpaid case
This option overwrites all other billing options: if a case is unpaid, all transactions should be included in the statement (patient & insurance responsible transactions, 0-balanced transactions, and not in balance forward).
- Include
dunning messageInclude
dunning message
Selecting this check box includes the appropriate Dunning message on the statement. You can set up dunning messages in the Administration module.
- Include
Federal Tax IDInclude
Federal Tax ID
This option will show the Federal Tax ID of the current Business Entity on the statement.
.
- Truncate
Procedure Description to < select
an option > charactersTruncate
Procedure Description to < select
an option > characters
Select this option to shorten the procedure description to a specific number of characters.
- Include
Quality Indicator ProceduresInclude
Quality Indicator Procedures
Select this check box to include procedures with a status of Quality Indicators.
- Include
Collector Name/Phone on StatementInclude
Collector Name/Phone on Statement
Select this check box to include the name of the collector assigned to this case in the Financial Management module.
- Sort by #1,
#2, and #3Sort by #1,
#2, and #3
You can select categories from each of the 3 drop down menus in this section to establish the sort order of your statements. The available choices are the same in each drop down menu.
- MessageMessage
The system will include the text you enter in this field on the statement in addition to any default text that was configured in the Administration module. For example, your facility may configure a generic "thank you" message that shows on all statements by default.
- Use
balance forward for charges & unassigned payments
older than < select
an option > days.Use
balance forward for charges & unassigned payments
older than < select
an option > days.
- Click Create Statements. The system will process the statement(s) and display the results on the screen. Print or save the statement(s).
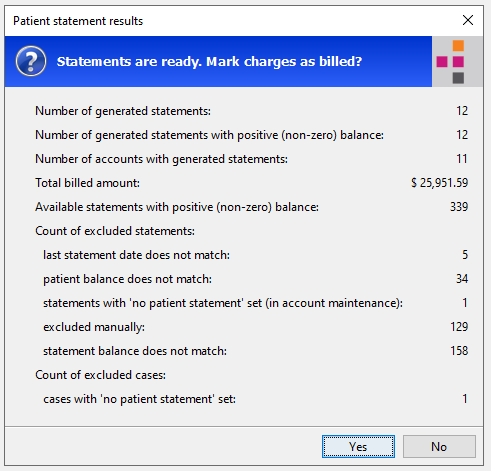
- A promptprompt
appears with a summary of statements generated. This prompts asks
if you want to mark the charges on the statement(s)
as billed. Click herehere
to view a table explaining the results that may appear on this prompt.
Results
Explanation
Number of generated statements
The number of unique statements available to print
Number of generated statements with positive (non-zero) balance
The number of unique statements printed that have non-zero balances
Number of accounts with generated statements
The number of accounts included in the output. If you have chosen “Current Guarantor” and an account has balances out to both Primary and Secondary guarantor, the number in this field may be different than the two above fields.
Total billed amount
Total amount due on the statements included in the output.
Available statements with positive (non-zero) balance
Total number of statements that are available for inclusion in the output.
Count of excluded statements
Last statement date does not match
The last Billed Date of the statements was within the number of cycle days selected. Example: if you have 28 as your cycle days and it has only been 26 days since the last statement run date, no accounts printed in the last statement run will be included now as the 28 cycle days has not elapsed.
Patient last name does not match
Number of statements available for output that are outside of the last name from / through range entered on the Statement Option page
Patient balance does not match
The overall patient balance does not equal the minimum amount entered in the From / Through fields in the Statement Option page to create a statement. System minimum is set to 0.01
Patient balance may be positive on one charge and negative on another
Account balance does not match
The overall Account Balance does not equal the minimum amount entered in the From / Through fields in the Statement Option page to create a statement. System minimum is set to 0.01
Primary Provider does not match
There are statements available to process but they are outside of the range of the Providers selected on the Statement Option page.
Primary Insurance Classification does not match
There are statements available to process but they are outside of the range of the Insurance Classifications selected on the Statement Option page.
Statements with ‘no patient statement’ set (in account maintenance)
The account has been set with a status of “No Statement”. Run the Unbilled Statement report to get a list of accounts with this setting
Excluded manually
Accounts are available for statements but the “selected” box was unchecked on the Statement Option screen
Statement balance does not match
The overall statement balance does not equal the minimum amount entered in the From / Through fields in the Statement Option page to create a statement. System minimum is set to 0.01.
Unassigned payment exceeds open patient balance on a charge.
Accounts out side of a Past Due Range will also be included in this number.
Count of excluded cases
Cases with ‘no patient statement’ set
The case has been set to “No Statement” in Demographics > Case. Run the Unbilled Statement report to get a list of accounts with this setting.
- Click Yes to set a note in the patient account(s) that a statement was generated and to set the cycle date for the next statement to be generated. The statement appears in the file format you selected on the Billing Options screen. You can print the statement(s) or save it to your computer.
- Click No to allow the statement(s) to be printed without adding a note to the statement history. The cycle date for the next statement will not be set.