Payment, Write off or Transfer
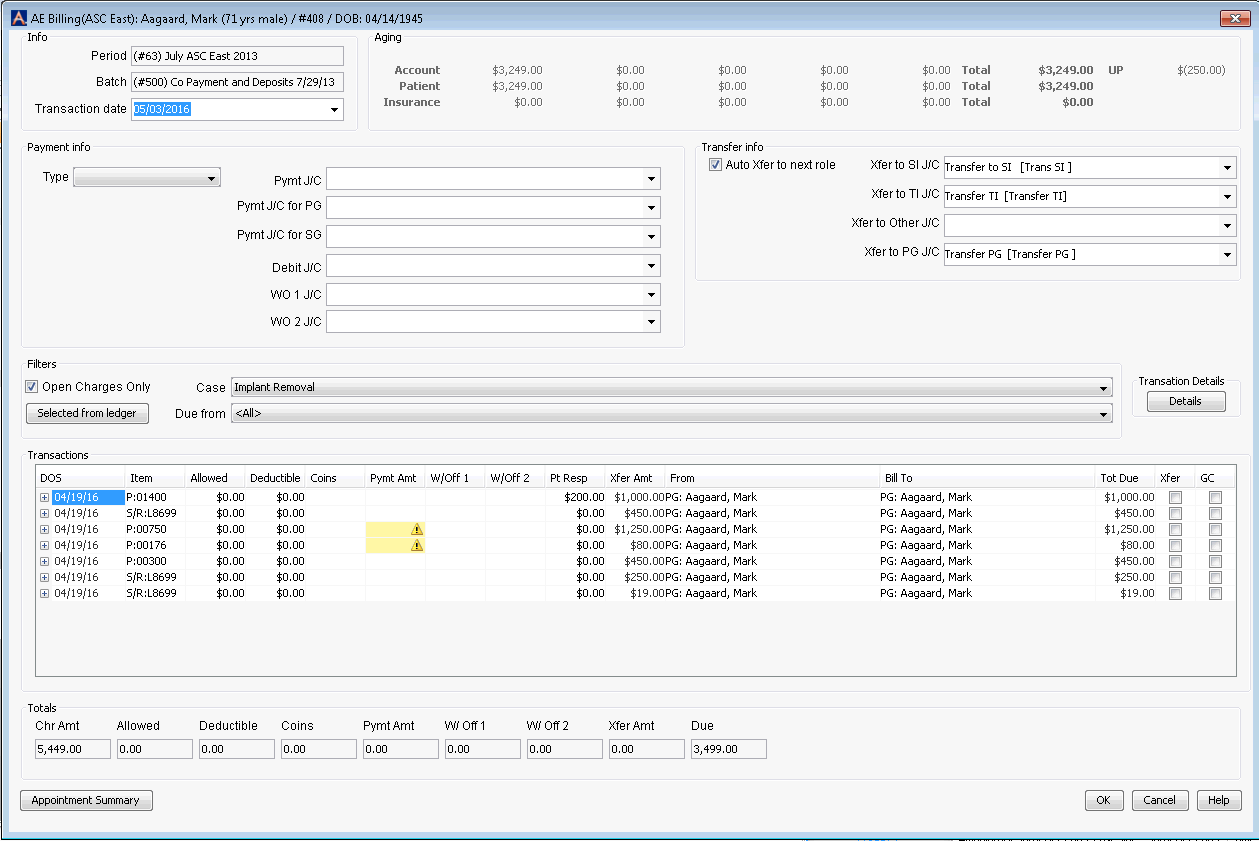
You can post payments or write offs to an individual patient's account by launching the Billing Screen from the Patient Ledger. You can also transfer the remaining balance to the next Responsible Party in the Billing Group that is associated to a Charge from the same screen.
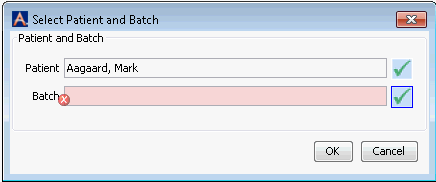
You can also launch this screen by selecting Entry Screens > Pymnt, WO, Xfer Entry from the Financial Management Sheet Bar. You will then be prompted to select a patient and a batchselect a patient and a batch.
Click the  to select a Patient and a Batch
to post Charges to. The Billing screen will then launch.

Additionally, you can launch this screen by right-clicking a transaction on the RCM Ledger in the RCM module.
Video Highlights
To see this procedure in action, watch the following video. This video covers the Transfer to Billing Group feature and payment posting.
To post a payment or adjustment (write-off or transfer) from the Patient Ledger
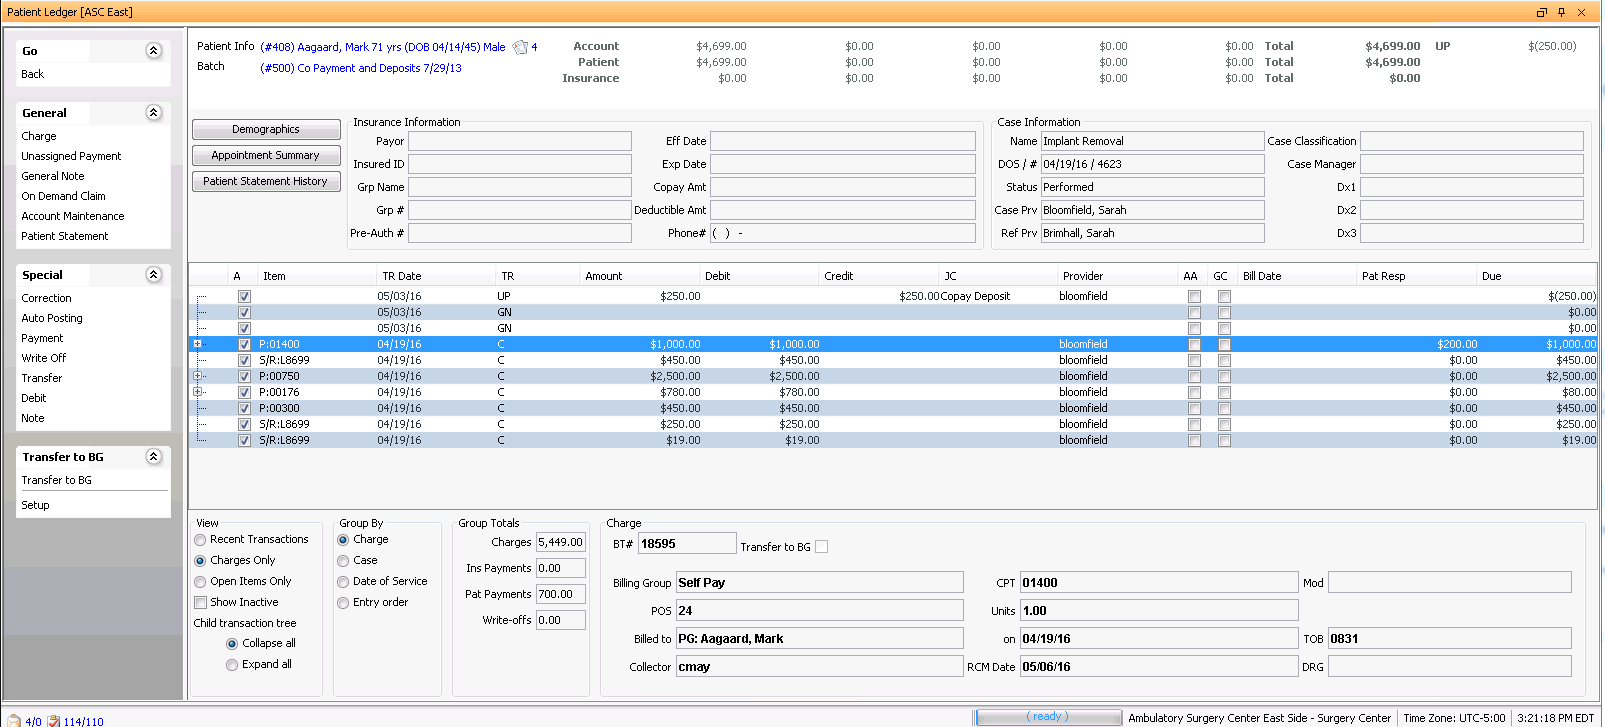
- From the Financial Management Sheet Bar, select Patient Ledger. The Patient
Ledger screenPatient
Ledger screen appears.

- Select a patient and the batch to post the payment or adjustment
to:
- Click the patient information highlighted in blue in the upper left of the Patient Ledger to select a patient record. After selecting a patient, you are returned to the Patient Ledger screen.
- Click the batch name underneath the patient information on the Patient Ledger to select a different batch or create a new one.
- From the Patient Ledger screen's Transaction
listTransaction
list in the middle of the screen, highlight
any charge to enable the Special
heading on the Sheet Bar. Select one of following options from this
heading:

- Payment
- Write off
- Transfer
- Or, you can select one of the options listed above from the right-click menu available from any charge.
- The Billing
ScreenBilling
Screen appears.

- To more easily find the charge you wish to post a transaction to,
use the Filters
sectionFilters
section.

- To quickly find the charge you selected in step 3, click the
Selected from ledger button
in the Filters
sectionFilters
section.

- You can also use the Case and Due from filters to show charges for a specific case or payor.
- You can deselect the Open Charges Only check box to show all charges, both closed and open.
- To quickly find the charge you selected in step 3, click the
Selected from ledger button
in the Filters
sectionFilters
section.
- Select the correct Transaction
date for the transaction you wish to post from the drop-down
menu in the Info
sectionInfo
section.

- In the Transfer
info sectionTransfer
info section, the Auto
Xfer (transfer) to next role check box is selected by default,
so any balance remaining on a charge after you post a payment or write-off
will automatically transfer to the next Responsible
PartyResponsible
Party associated to the Billing Group assigned
to the case.
- PI (Primary Insurance)
- SI (Secondary Insurance)
- TI (Tertiary Insurance)
- PG (Primary Guarantor)
- SG (Secondary Guarantor).

- To "turn off" Auto Transfer for all transactions, deselect the Auto Xfer (transfer) to next role check box.
- Transfer journal codes can be set to default into this section.
- In the Transactions
ListTransactions
List, find the charge to which you
wish to post the payment and enter the amount in the free text
Pymnt Amt field
(Payment Amount) or WO
1 or WO 2
(Write off) field.

- The corresponding Mandatory fields in the Payment Info Section will then be highlighted in red (see step 7).
- Any balance remaining on the charge will be reduced by the amount you entered and will show in both the Xfer Amt (amount of the transaction available to be transferred to the next Responsible Party) and Total Due fields.
- If you are posting a write off, click the plus sign on the
Transaction line where you posted the write off. A lineline
appears under the Transaction. You must input the write off Reason
and Group code in the appropriate fields on this line.

Other actions you can take in the Transactions List section:
- If you have turned off Auto Transfer, you can manually make the balance of a specific transaction available for transfer by selecting the Xfer check box next to the Total Due.
- To make a balance available for a claim (manual or electronic)
to be generated for a secondary or tertiary insurance carrier,
the GC fieldGC field
must be checked.
If the balance due has been transferred to an insurance carrier the GC (Generate Claim) check box will default to checked/unchecked based on the setup for the payor in the Insurance Carrier Dictionary. If you want to have the transaction available for claim generation the box should be checked. If you do not wish to generate a claim, deselect the box.
- Click herehere
to learn how to make a balance available for electronic claims
to be generated for a secondary or tertiary insurance carrier.
- Ensure the GC check box is selected.
Enter the Coinsurance amount shown on the remittance advice in the Coins field. The coinsurance and deductible amount should equal the balance you are expecting from the next responsible party.
If you are on AmkaiOffice version 3.19 or later, and have purchased Electronic Remittance Posting, the Coinsurance amount will automatically populate from the incoming ERP payment if Patient Responsibility is notated.
If you are submitting secondary/tertiary claims, enter the amount referenced here, so your claim will balance.
Enter the Deductible amount shown on the remittance advice in the Deductible field.
If you are on AmkaiOffice version 3.19 or later, and have purchased Electronic Remittance Posting, the Deductible amount will automatically populate from the incoming ERP payment if Patient Responsibility is notated.
If you are submitting secondary/tertiary claims, enter the amount referenced here , so your claim will balance.
Enter the Allowed amount shown on the remittance advice in the Allowed field.
- Click herehere
to learn how to add a note or input a specific (not default) journal
code to the transaction.
- Select the transaction from the Transaction List.
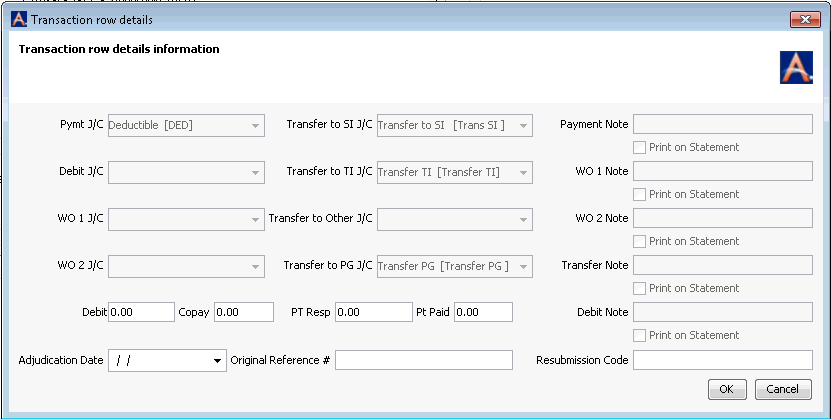
- Click the Details
button (located above the Transaction List). The Transaction row
details dialogTransaction row
details dialog appears.

- Enter a note in the field on the dialog that corresponds
to the transaction
typetransaction
type you selected. To have the
note print on the patient's statement, select Print on Statement.
- Payment
- WO 1 (write off 1)
- WO 2 (write off 2)
- Transfer
- Debit
- If you wish to modify the default journal code for the transaction, select a different one from the appropriate drop-down menu.
- Debit: if you would like to add a debit to the transaction enter the amount of the debit in this field.
Co-pay: enter the co-pay amount to be referenced on the electronic secondary/tertiary claims in this field if needed.
Pt Resp: If you would like to indicate that some portion of the remaining balance on the transaction that is currently out to an insurance carrier is due from the patient you can reference that amount here. This will result in the account now being eligible for a Patient Statement even if the charges are currently set as due from insurance carrier. This field should only be used if the current role for the balance due is PI, SI, or TI.
Pt Paid: Enter an amount that the patient paid, if you would like this information included in the electronic secondary submission.
If you are re-submitting a claim that was denied or whose information changed, enter any required information in the following fields:
Adjudication Date
Original Reference #
Resubmission Code
- Any amount shown in the Pt Resp column was designated as the patient's responsibility when the charge was posted. If you are transferring the remaining balance to the patient, enter zero (0) in the Pt Resp field. The amount the patient owes will be shown in the Total Due field.
- If you are working in AmkaiOffice Version 3.19 or later, an additional field, Surcharge, will display in the Transactions List section. You can add a surcharge by entering the amount in this field. Any surcharge entered on the Charge Entry Screen will appear in this field.
- If you are on AmkaiOffice version 3.19 or later, and have purchased Electronic Remittance Posting, the Surcharge amount will automatically populate from the incoming ERP payment if Patient Responsibility is notated.
- The amount entered in the Surcharge field will not transfer to the secondary/tertiary claim and will need to be added to the deductible or coinsurance field for balancing purposes.
- In the Payment
Info sectionPayment
Info section, complete at least the following
Mandatory fields:

- If you are posting a payment, select the Type of payment received
(Card, Check, Cash, or EFT) from the drop-down menu.
Depending on the type selected, the system will open additional
fieldsadditional
fields in this section.
- Check
- If desired, enter the Check # / Routing # in the fields that appear when you select Check as the Type.
Note: If you are working with a check that includes payments for several accounts, the system will hold the check number as you select each new account to post payments to. Once all of the accounts have been paid for that check, remember to clear the field and enter the new check number for the next check being posted. Also, keep in mind when entering the check number that the system offers several reports that provide the option to search for accounts referenced on a specific check number. Users should be consistent in how the check numbers are entered to aid in searching by check number.
- Card: If the payment type selected is Card, the system opens a field for you to enter the credit card number. For security reasons, it is recommended that you only enter the last 4 digits of the card number.
- Checking Account #/Routing #: If you select EFT as the payment type, the system will open two fields for you to enter the checking account # and routing number to be referenced for the transactions.
- Code: Select the appropriate journal code for the payment or write off from one of the following drop-down menus. (Or use the Alt + E or Alt +D hot keys to modify or add items to the Journal Code Dictionary if needed. If a default code has been set for the insurer in the Insurance Carrier dictionary or for the guarantor in the User Preferences dictionary, it will pull into the appropriate Journal Code field.)
- If an insurance carrier is listed in the From column in the Transactions List for the charge to which you will post the payment, enter the Journal Code in the Pymt J/C field.
- If the Primary Guarantor is listed in the From column in the Transactions List for the charge, enter the Journal Code in the Pymnt J/C for PG field.
- If you are posting a write off, enter the journal code in the appropriate field: WO 1 J/C or WO 2 J/C
- If you are posting a payment, select the Type of payment received
(Card, Check, Cash, or EFT) from the drop-down menu.
Depending on the type selected, the system will open additional
fieldsadditional
fields in this section.
- Click OK to post the payment, write off, and/or transfer and return to the Patient Ledger.
- If you click the plus sign next to the charge on the Patient Ledger,
you can see your payment or write off posted as a child transaction
to the charge. Highlight the payment or write off to view detailsdetails
in the bottom right of the Patient Ledger.

