Creating an Insurance Contract
Video Demo
Click the icon to watch a video covering the following:
- Types of Insurance Contracts you can create in AmkaiOffice
- How to create a new contract
- How to associate a contract to an Insurance Carrier Plan
To create a new insurance contract
- From the System Administration module Sheet Bar, select Dictionary
> Contract. The Contract
details screenContract
details screen appears.
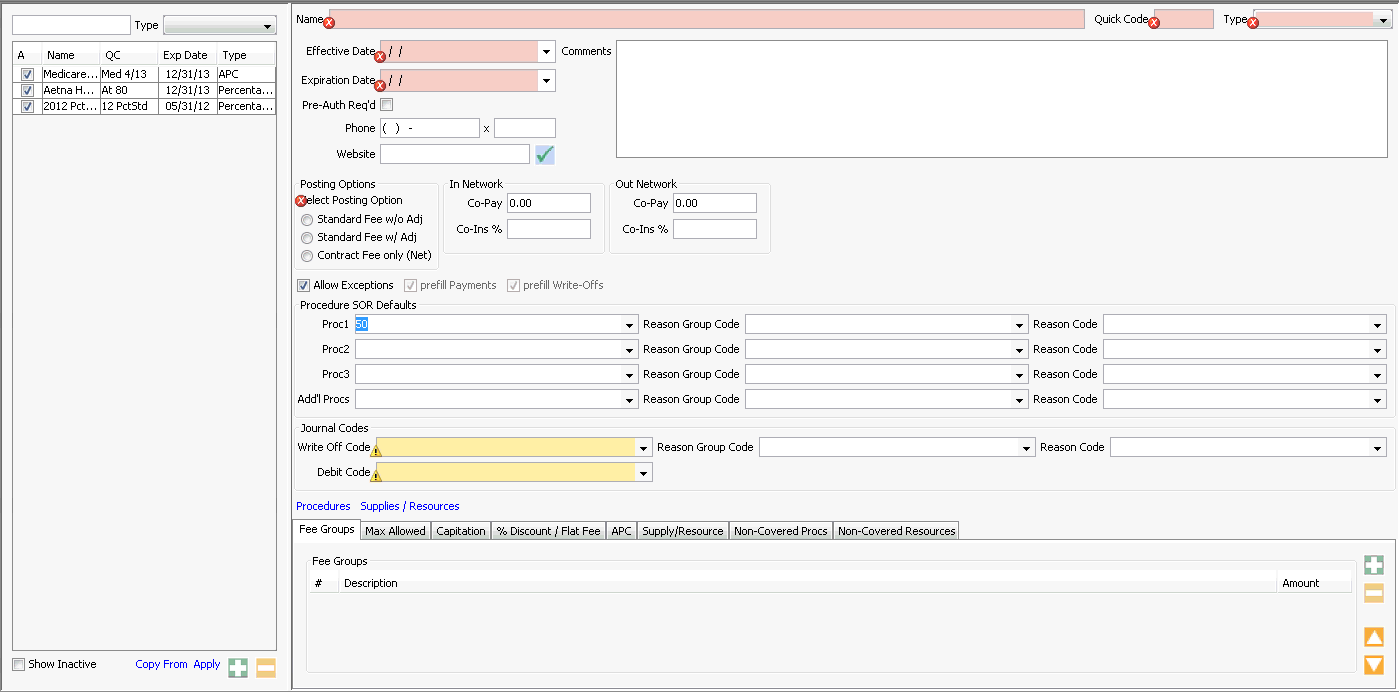
- The left-hand pane displays a list of all contracts in the system for the current BE. A check mark in the A column indicates the contract is active. Check the Show Inactive check box to display inactive contracts.
- You can either copy from an existing contract, or build a new contract
from scratch:
- To copy from an existing contract, select the contract you
wish to copy from and click Copy
From below the left-hand pane. Click herehere
for more information.
- A messagemessage
appears asking if you want to copy the terms and conditions
from the selected contract to a new one. You can also
copy procedure and/or supply notes by checking the
appropriate boxes on this message.
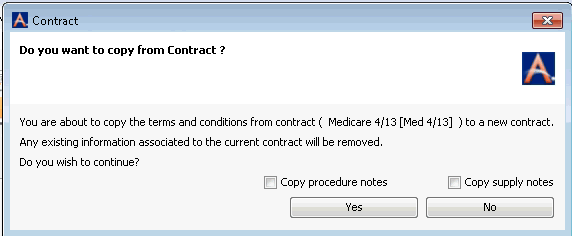
- Click Yes to create the new contract. The Contract Details screen appears.
- Enter a Name and Quick Code for the new contract and edit any of the terms and conditions as described in the following steps.
- Click Apply to save your changes.
- A messagemessage
appears asking if you want to copy the terms and conditions
from the selected contract to a new one. You can also
copy procedure and/or supply notes by checking the
appropriate boxes on this message.
- Or, create a new contract from scratch by clicking
 . The fields on the
Contract details screen clear and Mandatory fields are marked
in red on the screen. Edit the fields as described below, beginning
with step 2.
- To copy from an existing contract, select the contract you
wish to copy from and click Copy
From below the left-hand pane. Click herehere
for more information.
- Complete at least the Mandatory fields (highlighted in red in AmkaiOffice)
In the general
information sectiongeneral
information section of the Contract details screen.
Click herehere
to learn more about these fields.
- (Mandatory) NameName
Enter a name for the contract. The name must be unique. Example: Aetna POS Select 2009.
- (Mandatory) Quick
CodeQuick
Code
Enter a unique short name for the contract, up to 15 characters. Example: AT POS Sel 09
- (Mandatory) TypeType
(Once the contract is saved, you will not be able to change
your selection in this field.)
Select the base type for the contract. The base will be used to apply the overall terms of the contract to the procedures. Modifications can be made for items with unique payment rates or items that are not covered by the contract. Once the contract is saved, you will not be able to change this field.
- (Mandatory) Effective
DateEffective
Date
- Enter the date the contract becomes effective.
- The terms of the contract are applied to a charge based on the date of service associated to the charge.
- If you enter an effective date in the past, the system will display a warning that any charges already on file when the contract is created will not be adjusted based on the contract terms.
- (Mandatory) Expiration
DateExpiration
Date
- Enter the date the contract will expire.
- The terms of the contract are applied to a charge based on the date of service associated to the charge.
- If you enter an expiration date in the past, the system will display a warning that any charges already on file when the contract is created will not be adjusted based on the new contract terms.
- CommentsComments
Free text field. The information you enter here will display when the contract screen is accessed in various areas of AmkaiOffice.
- Pre
Auth Req’dPre
Auth Req’d
Check this box if the contract requires pre-authorization for services. If the contract requires authorization, the system will alert the user during the insurance verification process by displaying the alert symbol on the Authorization field on the Verification page.
- Phone
& ExtPhone
& Ext
Enter the area code and phone number to be used for obtaining pre- authorizations.
- WebsiteWebsite
Enter the web site location used for insurance verification.
- (Mandatory) NameName

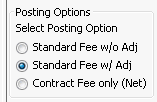
- Select a Posting
OptionPosting
Option to specify how any adjustments will
be made to standard fees. If you selected certain contract types (capitation,
maximum allowed per case, maximum allowed per visit), the system will
automatically select the posting option for you. The
option you select depends on how your facility maintains your Accounts
Receivable: Net (adjustment occurs at time of charge, or Gross (adjustment
occurs at time of payment). Click herehere
to learn more about the posting options.
- Standard
Fee w/o AdjStandard
Fee w/o Adj
Selecting Standard Fee without Adjustment will result in no adjustment being taken at the time of posting the charge. Instead, the system will display the payment and write off amounts at the time of posting the payment based on the terms of the contract. If the contract terms result in the payment amount being more than the standard fee, the system will post a debit transaction to the account to adjust for the additional revenue received.
- Standard
Fee w/AdjStandard
Fee w/Adj
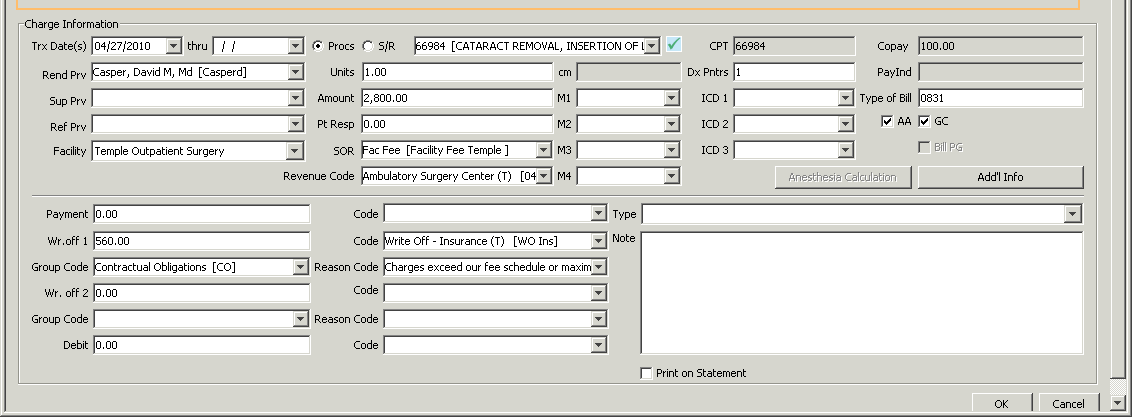
Selecting Standard Fee with Adjustment will result in an adjustment being taken at the time of posting the charge. The system will display the standard fee in the Amount field on the charge screen and will display a write off in the Write off 1 field that will reduce the standard fee to the contract amount. If the contract terms result in the expected contract amount being more than the standard fee, the system will post a debit transaction to the account to adjust for the additional revenue.
- Contract
Fee only (Net)Contract
Fee only (Net)
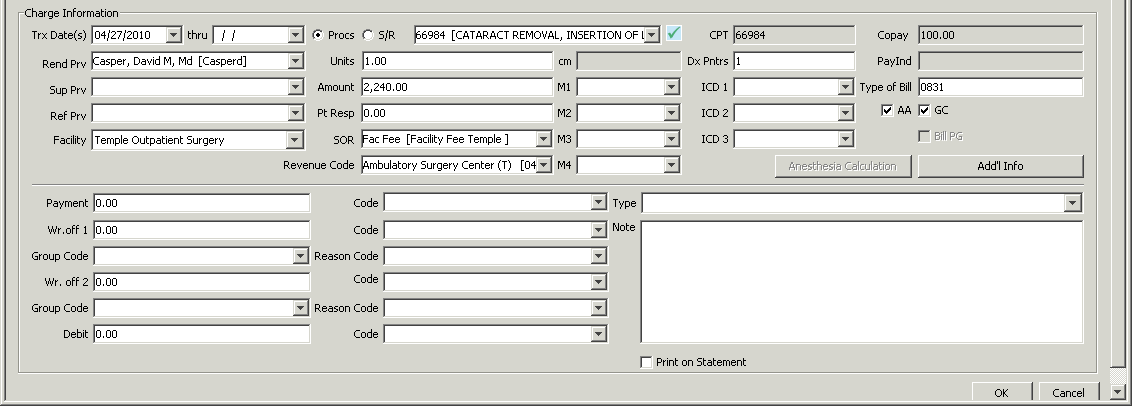
Selecting this option will result in the system displaying the contract amount in the Amount field on the charge screen. No write off or debit amount will be displayed on the charge screen or the payment screen. The system will bill for the expected contract amount based on the contract terms.
- Allow
ExceptionsAllow
Exceptions
This box will be checked by default. Having it checked indicates that you are allowing the user to set carve outs or changes from the base contract type for individual procedures and supplies. If the box is unchecked, you will only be able to apply the base contract type. No exceptions will be allowed at the procedure or supply detail level. Users will be able to set carve out- procedures to Non-Covered or Not-Covered only.
- Prefill
Payments and Prefill Write-OffsPrefill
Payments and Prefill Write-Offs
These options are only available when the Standard Fee w/o Adjustments option is chosen. If these boxes are checked, the system will automatically populate the payment and write-off fields on the payment screen in Financial Management.
- Standard
Fee w/o AdjStandard
Fee w/o Adj
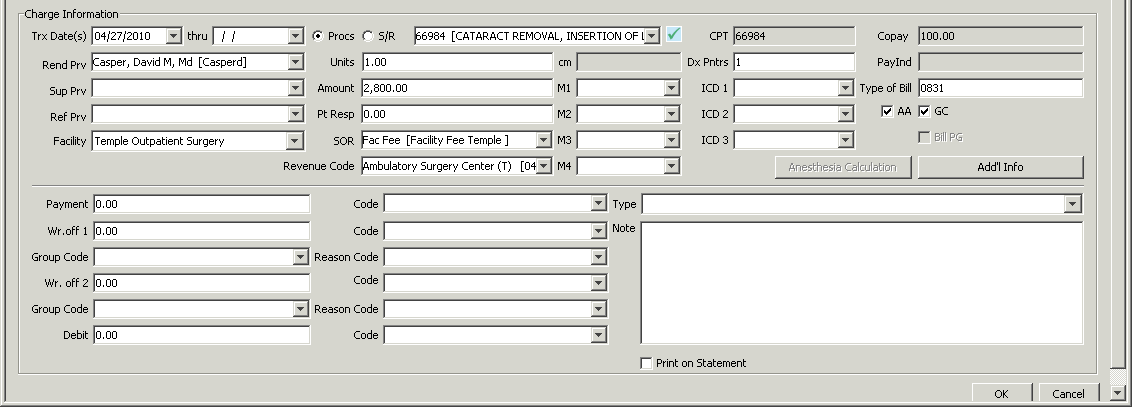
Click the following links for examples of the different posting options for a $2800.00 charge with an allowed amount of $2240.00:
- In the In Network and Out Network sections, you can enter co-pay (dollar amount) and coinsurance (percentages). The amounts will be displayed when you view the contract from various locations in the system.
- In the Procedure
SOR Defaults sectionProcedure
SOR Defaults section, you can set discounts
applied to second, third and additional procedures billed out to the
same case. The system will adjust the discount based on the contract
reimbursement amount. To set the discount to be applied, select the
SOR (Source of Revenue) Code from the drop down lists. If no SOR codes
are entered in the contract terms, the system will use the SOR assigned
at the procedure level (SOR code can be assigned to the procedure
in the procedure dictionary). Click herehere
to learn more about how to set these discounts.
To set discounts to be applied to second, third, and subsequent procedures:
- Select the SOR Quick Code/Name from the drop down menu in any of the fields labeled with a procedure number (Proc1, Proc 2, Proc3 ). The SOR Quick Code/Name fields pulls from the Source of Revenue dictionary for the selected Business Entity. If needed, use the Alt + e/ Alt + d hot keys to jump to the SOR dictionary to add/update entries. Journal codes can be set to default for these discounts in the Source of Revenue dictionary. See Source of Revenue dictionary for more information.
- In the Add'l Procs (Additional Procedures) field, select the SOR to be applied to all procedures after the third billed on the case.
- Reason Group Code: If a write off is being taken to reduce the standard fee down to the contract rate, select the default Group code that would be used to indicate general group the write off belongs to or use the Alt + e/ Alt + d hot keys to jump to the Reason Group Code dictionary. This information will be needed to submit secondary electronic claims as well as to track adjustments more accurately.
- Reason Code: This field becomes mandatory when you select a Reason Group Code. Select the specific reason for the write-off from the drop-down menu, or use the Alt + e/ Alt + d hot keys to jump to the Reason Group Code dictionary.
- Click herehere
to view an example of how the system applies these
discounts when the charge is posted. The Posting Option
selected for this example is Standard
Fee w/Adjustment.
If a discounted SOR is associated to the contract the system will adjust the discount based on the contract reimbursement amount. Example: Standard fee is 2800.00 and the contract rate is 2240.00 allowed if the procedure is primary and adjusts 50% if it is a secondary procedure. The system will adjust as follows: a write off will be applied from 2800.00 to 2240.00 for the allowed rate and from 2240.00 to 1120.00 for the additional procedure discount. If the option to show the SOR discount as a write off has been selected it will be displayed on the Charge screen as follows:
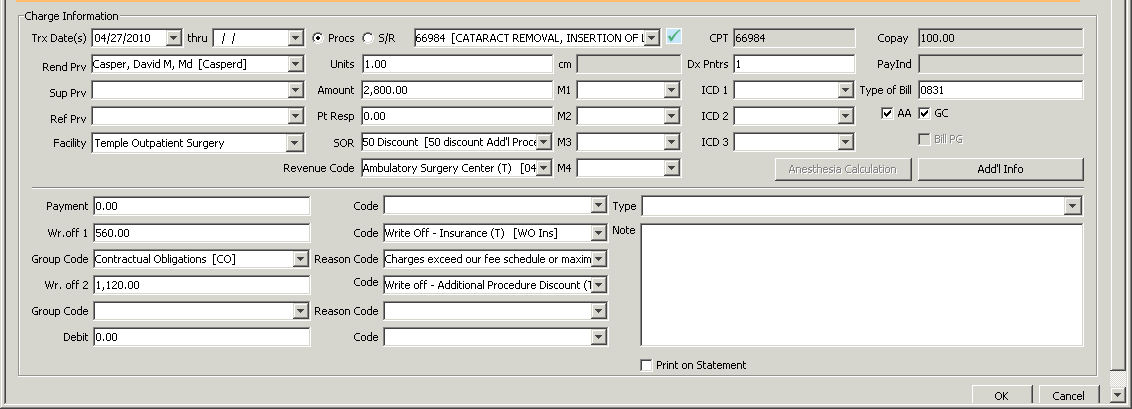

Note: The Posting Option selected (see step 3 above) will determine when the Source of Revenue discount applies. If Standard Fee w/o adjustment is selected, all adjustments are made at the time of posting the payment instead of when the charge is posted.
- You can select default journal codes (Write Off, Reason Group, and Reason Codes) from the list in the Journal Codes section. These journal codes will be used during the posting process when adjustments are needed to bring facility standard fees in line with the contract reimbursement rate. These default journal codes can be modified at the individual patient level as needed.
- In the Debit Code field, select a Journal Code to be used when a Debit transaction is required. Use the hot keys Alt + E or Alt + D to access the Journal Code Dictionary to add or edit an item if necessary.
Note: When entering new journal codes, and reason group and reason codes in the Journal Code dictionary, be sure to enter only codes approved by the payor. All default codes set in the Contract dictionary can be adjusted at the individual patient level.
- Use the tabs at bottom
part of the screenbottom
part of the screen to specify billing options.
Select the tab that corresponds to the type of contract you selected
in step 2, and enter billing specifications on the tab.

Click the links below to learn how to enter billing specifications on each tab:
- Fee
GroupsFee
Groups
- Click the
 to add a fee group.
 - Enter a descriptive name for the fee group in the Description field. (e.g. Anesthesia)
- Enter the amount of the payment rate at which each procedure should be billed in the Amount field.
- Set additional fee groups by repeating steps 1 -3.
- To assign a fee group to covered procedures, click
the Procedures Link to launch the Procedures Detail dialogProcedures Detail dialog.
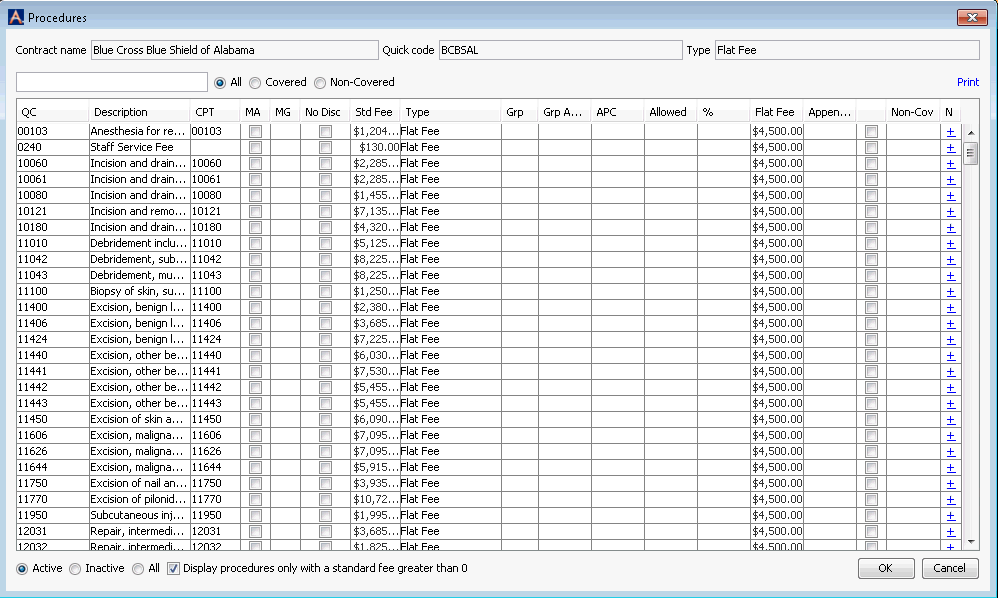
- Select the appropriate Fee Group number from the Grp (Group) column for each covered procedure.
- Click the
- Max
AllowedMax
Allowed (Per Case or Per Visit, depending
on the selected Contract Type)
To set the Max Allowed Per Case:
Select the Max Allowed Per Case radio button.
Click
 to add a visit or appointment type.
Select the appointment/visit type from the drop down menu.
to add a visit or appointment type.
Select the appointment/visit type from the drop down menu.Enter the maximum allowed amount to be billed for the selected appointment/visit type.
To add additional appointment types, repeat steps 1 -3.
Some carriers may stipulate that you bill the lesser amount of the following two options:
A given maximum amount per case or
A specified percentage of the total billed charges
The system will total the standard fee for all charges being billed, then determine what the allowed amount would be based on the percentage indicated in the % Discount field on this tab. The system will compare this value to the max allowed per case or visit and use the lower of these two values for posting the charges. If the max per case or visit rate is used, the system will distribute the total allowed amount across all procedures being billed. If the percent of standard fee is used, the system will apply the write off to each charge based on the standard fee and discount indicated.
To set the option Less or % of Billed Charges:
- Click the radio button Lesser of % Billed Charges.
- Enter an amount in the % Discount field to indicate how much of the standard fee you will be billing. If you are billing for 80% of standard fee enter 80. This will result in a 20% discount on the standard fee being used to calculate the lesser amount of billed vs.. max allowed.
- Select the Appointment Type from the drop down list.
In some cases, the contract terms will indicate that when the Max Allowed vs. Less of % Billed Charges is calculated, the cost of the supplies being billed should also be included to determine which amount should be used for billing, Max Allowed or Less of % of Billed Charges. If the system is to include the cost of the supplies to make the determination, check the box Include supply costs.
The system will post charges for the billable supplies at time of billing regardless of the setting for Include supply costs. This option is only used to determine which value will be used to post the charge to the procedures.
- CapitationCapitation
Enter the amount specified by the capitation agreement and select a covered contract period.
- %Discount/Flat
Fee%Discount/Flat
Fee (Percentage of Allowed or Percentage of
Standard)
For a contract based on a Flat Fee per procedure, you will need to define what the flat fee rate is.
To set the Flat Fee amount:
Flat Fee Amount - Enter the amount to be paid per procedure for this contract.
When the contract terms are based on a specified percentage of the allowed amount, you will need to indicate what that percentage is, as well as any percentage the patient would be responsible for:
To define % Discount and any Patient Responsibility
% Discount Based on Fee: If the contract pays a percentage of the allowed amount, the discount is based on either: Allowed Amount or Standard Fee
Discount % - Enter the discount percent here. Example: If the contract pays 80% of the Allowed Amount enter 80 in this field. The number must be a positive number and up to two decimal points are allowed.
Pat Resp % - If there is an amount due from the patient, enter the amount of the percentage of allowed or percentage of standard due from the patient (Primary Guarantor) based on the terms of the contract. Example: If the patient is responsible for paying 20% of the allowed amount enter 20 in this field. With 80% listed as the Discount % and 20% listed as patient responsible that would indicate that 60 % of the Flat Fee will be paid by the Insurance Carrier and 20% will be due from the patient. The number must be a positive number and up to two decimal points are allowed. If there is no patient responsible amount due, leave the field blank. The amount listed here will be referenced in the Patient Ledger as Patient Responsible.
Note: The Percent Discount entered here may be an amount in excess of 100%. It is not uncommon for the terms of a contract to indicate that payment is based on 145% of the Allowed OPPC rate. Simply enter 145 as the % Discount to accommodate this type of contract term. The system will present the user with a warning if the combined Insurance Discount % due and Patient Responsible % due exceed 100%. This is a warning only. The contract can still be saved.
Note: The system will use either the discount percentage or flat fee based on the contract type you selected.
- APCAPC
In order to adjust the National Standard Rate for Medicare to your locale, you will need to have the National Medicare Rates uploaded to your system. If you need assistance with this, contact your Amkai representative.
- Enter the adjustment value for your area in the Local Wage Index field. Here's how you calculate that index:
- (local rate for CPT + 1)/2 = local wage index
- example: (1.1093 + 1) / 2 =1.05465
- Click Calculate Local ASC rate.
- A system
messagesystem
message appears.
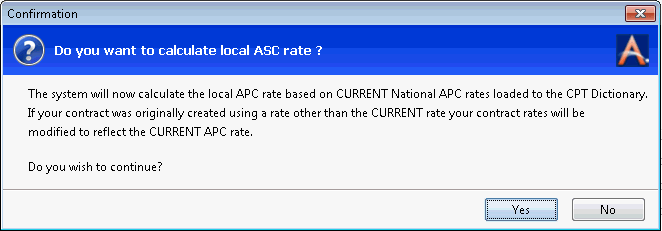
- Click Yes to modify this contract rate to reflect the current APC rate.
- Fee
GroupsFee
Groups
- The base Contract Type does not set the terms for billable supplies/resources.
Instead, on the
Supply/Resource tab
Supply/Resource tab, you identify how *billable
supplies/resources will be billed for contracts whose terms extend
to supplies/resources. (You can also specify terms for non-covered
billable supplies. See step 10 below) If Allow
Exceptions is checked in the Posting Options section (Step
3 above), you can also set individual reimbursement methods (also
known as Contract Type, or Billing Method) for individual supplies/resources
as needed (See Step 11 below). Click herehere
to learn how to specify terms for billable supplies/resources.
(reinsert drop down text)
To specify contract terms for all billable supplies/resources for the case:
Cost options: If, in Step 2 below, you intend to select Markup %, select Average Cost or Current Cost. Costs are pulled from the Inventory Item Master and will be applied using the valuation method specified in your Inventory Configuration for LIFO (Last in, first out) or FIFO (First in, first out). See Item Master. This setting is only used with the option Markup %.
Note: Average and Current Cost are taken from the Supply Resource Dictionary. If there is currently a negative quantity on hand, the system will not have accurate information on how to bill out the charge. The results will be a charge of 0.00 at time of billing.
Select one of the following 4 options to set the base type of contract for all billable supplies. (You can modify the base contract for individual items on the Supply/ Resource detail page if Allow Exceptions is checked in the Posting Options {see step 3 above}.)
Discount %: Enter the percentage amount of the standard fee you would like bill. Example: If you want to take a 10% discount on the Standard Fee, enter 90 in this field so that 90% of the selected standard fee will be charged out. Standard Fee pulls from the Supply/Resource Dictionary's Fixed Price field.
Flat Fee: Enter a specific amount to be charged for each billable supply. Example: If you would like to bill $10.00 for each billable item enter 10.00 in the Flat Fee field.
Markup %: Enter a percentage to be added to Cost for the billable amount. The system will look to the Cost option selected to determine if Average or Current cost should be used when calculating the amount to be billed. Example: To bill at Current Cost + 110 % select the radio button for Current Cost and enter 110 in the Markup % field.
Aggregate Billing - Revenue/Markup Groups: This option enables you to set different mark up rates based on Revenue Codes and to group items together by Revenue Code for billing purposes. You may use a Flat Rate per Revenue Code group or a Percentage markup. All items in the group will be totaled, and the total cost for the items in the group will be used to determine the rate for billing based on the information entered for the group. You may set multiple mark up rates based on min/max cost of the billable items included in the Revenue Code group. This option is only available if you are using the Posting Option Standard Fee with Adjustment or Contract Fee only. To learn how to add a Revenue Group for mark up, click herehere.
To add Revenue Group for mark-up:
- Click
 to open
the Aggregate
Billing dialogAggregate
Billing dialog.
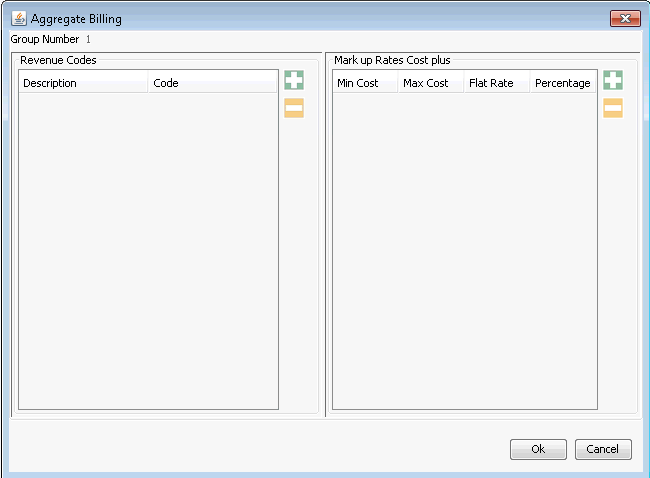
- Click
 to the
right of the Revenue
Codes field to select
the first Revenue Code group
to be included in the group.
You may enter one or more
Revenue Codes to a group.
All items with a Revenue Code
that is included in the group
will be billed out using the
same mark up rate set for
the group. Click
  as needed to
select all of the Revenue
Codes associated to the group.
 - After
selecting all Revenue Code
groups that you would like
to include in the group, click
 the
right of the Mark
up Rates Cost field
to add a markup line for the
group.
 - Min Cost: enter the lower level of cost of billable supplies to be included in the mark up rate. Example: 0.01
- Max Cost: enter the highest level of cost of billable supplies to be included in the mark up rate. Example 99.99
- Flat Rate: If you would like to bill a flat rate for all items in the Revenue Code group(s) selected, enter the flat rate here. Example: If 250.00 was entered in the Flat Rate field, and the total cost of the Billable supplies for the case is between 0.01 and 99.99, the system would bill out each item at a flat fee of 250.00 per unit.
- Percentage: If you would like to bill a percentage of cost for all items in the Revenue Code group(s) selected, enter the percentage here. Example: If you would like to bill all items in the Revenue Code group(s) selected at %110 of cost, enter 110 here. If the total cost for all billable items in the group is between 0.01 and 99.99, the system will bill each supply at a rate of cost plus 110%.
- Click OK to save your entries.
- Click

*Supplies/resources are designated as billable in the Supply/Resource dictionary.
On the Non-Covered Resources tabNon-Covered Resources tab, you can set the general billing terms for supply resources that are considered non-covered by the contract and can be billed to the patient. Click herehere to learn how.
Select one of the following Billing Methods:
Standard Fee: System will apply the standard fee to all supplies/resources identified as Non-Covered
Percentage Discount: System will apply the discount you specify against the Standard Fee
% Discount: Enter a percentage of the standard fee to be applied. If you have selected Percentage Discount as the Billing Method, this will become a required field.
Flat Fee Amount: System will apply a Flat Fee to all billable supplies defined as Non-Covered. If you have selected Flat Fee as the Billing Method this will become a required field.
Click Apply to save your selections.
The system will display a message asking “Do you wish to apply?” Click Yes to save the information.

By default, all procedures inherit the selected Contract Type as their reimbursement/billing type. However, if Allow Exceptions is checked in the Posting Options section (Step 3 above), you can change the reimbursement/billing type for specific procedures on the Procedures Detail dialog. When you select a different reimbursement/billing method for a specific procedure, you then need to go back and complete the necessary information on the tab corresponding to the method you selected, as described in Steps 8, 10 & 11 above.
 For example, if you select Flat Fee as the Contract
Type and enter a flat fee of 4500.00 on the %Discount/Flat
Fee tab (see Step 8 above), all procedures associated to this contract
will be billed by default at a rate of $4,500.00. But let's say you want
a skin biopsy to be billed out at a Percentage
of the Allowed Amount, rather than the Flat Fee. From the Procedures Detail dialog, you would
select Percentage of Allowed in
the Type column on the same line
as the skin biopsy. The Allowed
column would then become mandatory. You would enter the Allowed
Amount for that procedure, and then go back to the %Discount/Flat
Fee tab and follow the instructions in Step 8 above to set the
percentage of the total allowed amount that will be billed to the payor
and any percentage to be billed to the patient.
On the Procedure Details dialog, you can also set rates for Carve-out Procedures and indicate if procedures are Non-covered or Not-covered. You can enter Notes for specific procedures on this screen as well. See Specifying Procedure Details to learn how.
By default, the terms you specified on the Supply/Resource tab (Step 9), are applied to all billable supplies/resources. However, if Allow Exceptions is checked in the Posting Options section (Step 3 above), you can change the reimbursement/billing type for specific supplies/resources on the Supplies/Resource Details dialog. On this dialog, you can also set the dollar amount for Carve-out Supplies/Resources, bill an item out at cost, set an item at Non-Covered or Not-Covered, or add a note to an item. See Specifying Supply/Resource details for more information.
Click Apply on the left-hand pane of the Contract Details screen to save the new Contract.

