Printing Preference Cards
You can print Preference Cards from the Scheduling module by Patient, by Surgeon/Specialty, or by Date of Service. Printing by Patient allows you to print all cards associated to a case for which the Patient is scheduled. The Patient information shows on the Card. Printing by Surgeon allows you to print all Cards on file for a specific surgeon. Printing by Specialty allows you to print all Cards on file for a certain specialty. Printing by Date of Service allows you to print Cards for all cases scheduled on a particular date that have preference cards associated to them.
Printing a Preference Card by Patient
- Open the Scheduling module.
- Access the Print
Preference Cards dialog in one of the following ways:
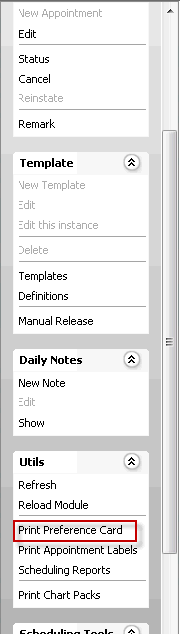
- Right-click the Appointment on the Scheduling Grid. Click Preference Card Printing from the menu. Or,
- Click the Appointment on the
Scheduling Grid and then click Print
Preference Card from the Utils
heading on the Sheet BarUtils
heading on the Sheet Bar.
- The Print
Preference Cards dialogPrint
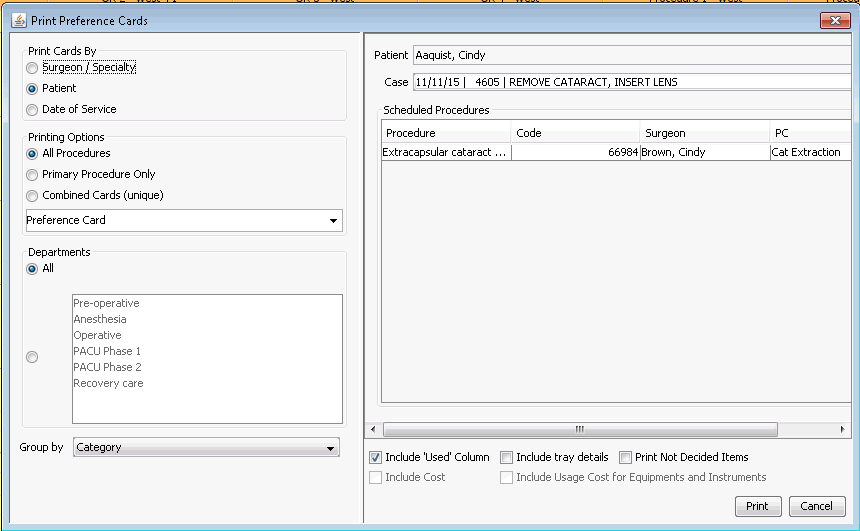
Preference Cards dialog appears. Select the Patient radio button under Print Cards by.
- Under Printing
Options, select one of the following:
- All
ProceduresAll
Procedures
If there are multiple Preference cards associated to the case scheduled, selecting this option prints all them.
- Primary
Procedure OnlyPrimary
Procedure Only
Prints only the Preference card associated to the Primary Preference card (1st preference card selected), regardless of how many preference cards are associated to the Appointment.
- Combined
Cards (unique)Combined
Cards (unique)
Choose this option if you selected more than one Preference Card at the time of scheduling and you want to combine the requirements for all selected Cards. This option is only available when you select Print by Patient.
When cards are combined, the primary preference card is used as the base.
Unique items with a status of Open on all of the additional preference cards will be added to the primary cards.
Duplicate items found on the additional cards will be added to the card as Hold Only.
Comments on the additional preference cards will be included on the printed card.
Equipment will be combined from all cards.
- All
ProceduresAll
Procedures
- Select the FormForm
from the drop-down list under the Printing
Options section.
You have the option to choose to print the Preference Card for all departments or have the card print as a 2, or 3 page card.
You can also select to print the card without ordering price and usage information.
- Preference Card: includes items from all departments
- Preference Card – 2 page: all items for department Operative are printed on one page and all items for departments Pre-op, Anesthesia, PACU1, PACU2, and Recovery Care are printed on a second page.
- When this option is selected highlight all departments you want to print in the Department box.
- Preference Card – 3 page: all items for department Operative are printed on one page, Anesthesia items on a second “page” and Pre-op, PACU1, PACU2, and Recovery Care on a third page.
- In the Departments section, you can select to include information that pertains to all departments (select the All radio button) or you can choose to exclude all information from the card except that which pertains to a specific department (select the other radio button and then select a single department: only information needed by that department will print on the Card).
- In the Group by field,
select the optionoption
that best matches the method your facility uses to organize supplies.
- CategoryCategory
Refers to the Resource Category the items are associated to in the supply dictionary. Bandage, IV fluid, Implant, etc
- TypeType
Refers to the Type that was used to classify the item when it was added to the supply dictionary. Supply, Implant, Medication, Equipment, Instrument. Trays will be grouped as Instrument Type or Supply Type.
- LocationLocation
(e.g. shelves, bins, etc.)
- Refers to the default location associated to the supply in the Item Master. Anesthesia Cart, Main Stock Room, Central Storage Shelf 1 / Bin 5, etc.
- This option is good to use for the staff that is pulling the items from stock if you have included bin/shelf information at the item level during setup. It can help streamline the picking of stock for surgical cases.
- CategoryCategory
- Select any of the following options to choose the information
that prints:
- Include
"Used" ColumnInclude
"Used" Column
Selecting this option will insert a column on the printed card for clinical staff to manually check off whether an item was used and the quantity used. There is only enough room on the printed preference card to have a Used column or a Cost column. If you choose to have a Used column, the cost button will deselect automatically.
- Include
Tray DetailsInclude
Tray Details
Select this option to print all items included in Trays of supplies. If you do not select this option, only the name of the Tray will print on the card.
- Print
Not Decided ItemsPrint
Not Decided Items
When adding supplies to preference cards, you can indicate the quantity of each supply you want opened, pulled, or undecided. If an item is marked as Not Decided, it will not be available in the CDM module for depletion. However, you can print these items on the preference card by selecting Print Not Decided Items.
- Include
CostInclude
Cost
Selecting this option will include the unit cost of each disposable item on the printout. If you selected Include "Used" Column, this option will be deactivated.
- Include
Usage Cost for Equipment and InstrumentsInclude
Usage Cost for Equipment and Instruments
If you selected Include Cost, you can also select this option. Since equipment and instruments are not depleted, the cost of using them is different than the cost of a disposable item. See Supply Resource Dictionary for information on assigning costs to equipment and instruments.
- Include
"Used" ColumnInclude
"Used" Column
- Click one of the following options:
- PrintPrint
Click Print and the Preference Card appears in PDF form. You can save the PDF to your computer or print from the PDF menu.
- CancelCancel
Click Cancel to close the dialog and return to the Scheduling Grid without printing the Card.
- PrintPrint
Printing by Surgeon/Specialty or by Date of Service
- Open the Scheduling module.
- From the Utils heading
on Sheet Bar, click Print Preference
Card. The Print
Preference Cards dialogPrint
Preference Cards dialog appears.
- Select one of the following radio buttons under Print
Cards by. Depending on the button you select, the options
change on the right-hand side of the dialog. Click the links below
to learn how the options change with each choice.
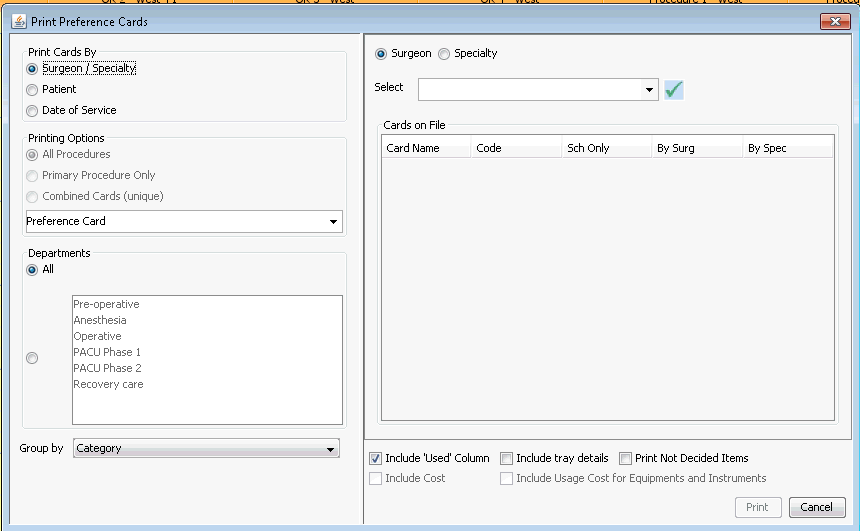
- Surgeon/SpecialtySurgeon/Specialty
Allows you to print all Preference Cards on file for either a specific Surgeon or Specialty. Selecting this option enables the following options on the right side of the dialog:
- Select Surgeon or Specialty
- Select either the name of the Service or Surgeon from the drop-down list. (To edit either the physician or surgeon dictionary, click the check mark icon.)
The Cards on File section is populated with Cards for the Surgeon or Specialty you chose.
All of the Cards listed will be printed.
- PatientPatient
Allows you to print a Preference Card for a specific Patient. You can choose to print cards for all tasks scheduled for the Patient or for just a Primary Procedure. When you select to print by Patient, the right side of the dialogdialog offers the following options:
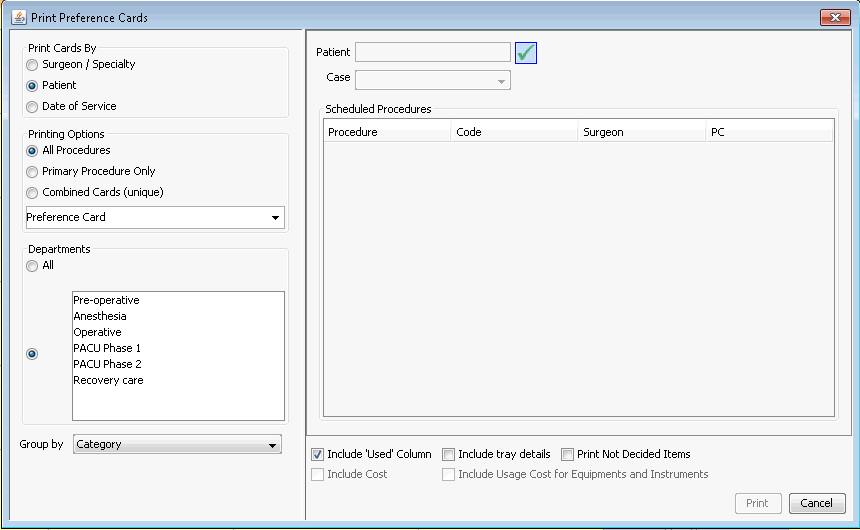
- Select the Patient by clicking the check mark icon. The Person - Patient selection dialog appears. Use this dialog to find the Patient.
- Select a Case from the drop-down list. You can only print a Card for one Case.
- Date
of ServiceDate
of Service
Allows you print Cards for all tasks or a primary procedure scheduled for a specific date. Selecting this option enables the following option on the right side of the dialogdialog:
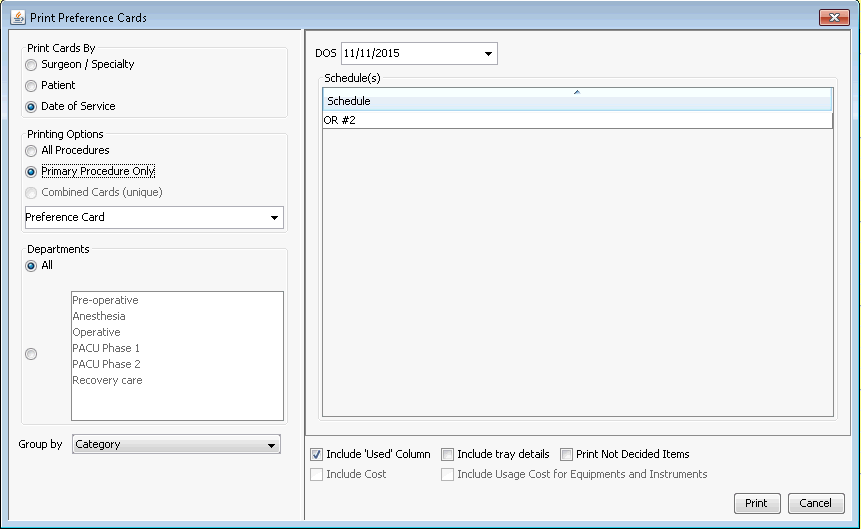
Select a dateSelect a date of service from the DOS field. The Schedule field populates with a list of Rooms where tasks are scheduled for the date you selected. Preference cards will print for all Rooms shown.
Use one of the following methods to populate a date field:
- Manually type a date in the field. You must use this date format: MM/DD/YYYY.
Or
- Click the drop-down in the date field to access a calendarcalendar:
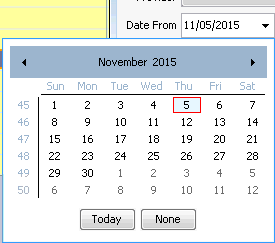
- Populate the date field by clicking a date on the calendar.
- Leave the field blank by clicking None.
- Navigate to a prior or future month using the arrows to the right and left of the month name.
- Click the month name to see a list of months and select the name of the month you wish to view from the list.
- Navigate to a prior year by clicking the year and using the up/down arrows to move forward or back one year at a time.
- Populate the field with today's date by clicking Today.
- Surgeon/SpecialtySurgeon/Specialty
- Under Printing Options, select one of the following:
- All
ProceduresAll
Procedures
If there are multiple Preference cards associated to the case scheduled, selecting this option prints all them.
- Primary
Procedure OnlyPrimary
Procedure Only
Prints only the Preference card associated to the Primary Preference card (1st preference card selected), regardless of how many preference cards are associated to the Appointment.
- Combined
Cards (unique)Combined
Cards (unique)
Choose this option if you selected more than one Preference Card at the time of scheduling and you want to combine the requirements for all selected Cards. This option is only available when you select Print by Patient.
When cards are combined, the primary preference card is used as the base.
Unique items with a status of Open on all of the additional preference cards will be added to the primary cards.
Duplicate items found on the additional cards will be added to the card as Hold Only.
Comments on the additional preference cards will be included on the printed card.
Equipment will be combined from all cards.
- All
ProceduresAll
Procedures
- Select the FormForm
and Form Type from the drop-down list under the Printing
Options section.
You have the option to choose to print the Preference Card in 1, 2, or 3 pages; or to print the Preference Card with ordering price and usage information.
- In the Departments section, you can select to include information that pertains to all departments (select the All radio button) or you can choose to exclude all information from the card except that which pertains to a specific department (select the other radio button and then select a single department: only information needed by that department will print on the Card).
- In the Group by field,
select the optionoption
that best matches the method your facility uses to organize supplies.
- Category
- Type (e.g. saws, implants, etc.)
- Location (e.g. shelves, bins, etc.)
- Select any of the following options to choose the information
that prints:
- Include
"Used" ColumnInclude
"Used" Column
Selecting this option will insert a column on the printed card for clinical staff to manually check off whether an item was used and the quantity used. There is only enough room on the printed preference card to have a Used column or a Cost column. If you choose to have a Used column, the cost button will deselect automatically.
- Include
Tray DetailsInclude
Tray Details
Select this option to print all items included in Trays of supplies (instruments). If you do not select this option, only the name of the Tray will print on the card.
- Print
Not Decided ItemsPrint
Not Decided Items
When adding supplies to preference cards, you can indicate the quantity of each supply you want opened, pulled, or undecided. If an item is marked as Not Decided, it will not be available in the CDM module for depletion. However, you can print these items on the preference card by selecting Print Not Decided Items.
- Include
CostInclude
Cost
Selecting this option will include the unit cost of each disposable item on the printout. If you selected Include "Used" Column, this option will be deactivated.
- Include
Usage Cost for Equipment and InstrumentsInclude
Usage Cost for Equipment and Instruments
If you selected Include Cost, you can also select this option. Since equipment and instruments are not depleted, the cost of using them is different than the cost of a disposable item. See Supply Resource Dictionary for information on assigning costs to equipment and instruments.
- Include
"Used" ColumnInclude
"Used" Column
- Click one of the following options:
- PrintPrint
Click Print and the Preference Card appears in PDF form. You can save the PDF to your computer or print from the PDF menu.
- CancelCancel
Click Cancel to close the dialog and return to the Scheduling Grid without printing the Card.
- PrintPrint