Using Remittance Posting
The Remittance Posting feature in the Financial Management module is used to post adjustments (payments/write offs/debits) from one or more payors' remittance advice to multiple patients' accounts. Typically, Remittance Posting is used to post payments from a single payor that is paying on multiple patients' accounts from a single check or EFT transfer.
This feature enables you to search for multiple patients’ charges and bring them together onto one screen, to post adjustments to those charges and to transfer remaining balances to the next Responsible Party.
Closing a Remittance Posting Session
Closing a session has the same affect on the transactions as closing a batch. Once the information in the session has been applied and balanced, the session should be closed. When you close a batch that is referenced in the Remittance Posting area, the session will also be closed. It is critical to be sure to post the Remittance Posting session before the associated batch is closed or none of the transactions in the session will be applied. The system provides a warning when you attempt to close a batch used in remittance posting to remind you to ensure all adjustments have been posted before closing the batch.
Video Demo of Remittance Posting
View the procedure described below in action by clicking the video icon:
Using Remittance Posting
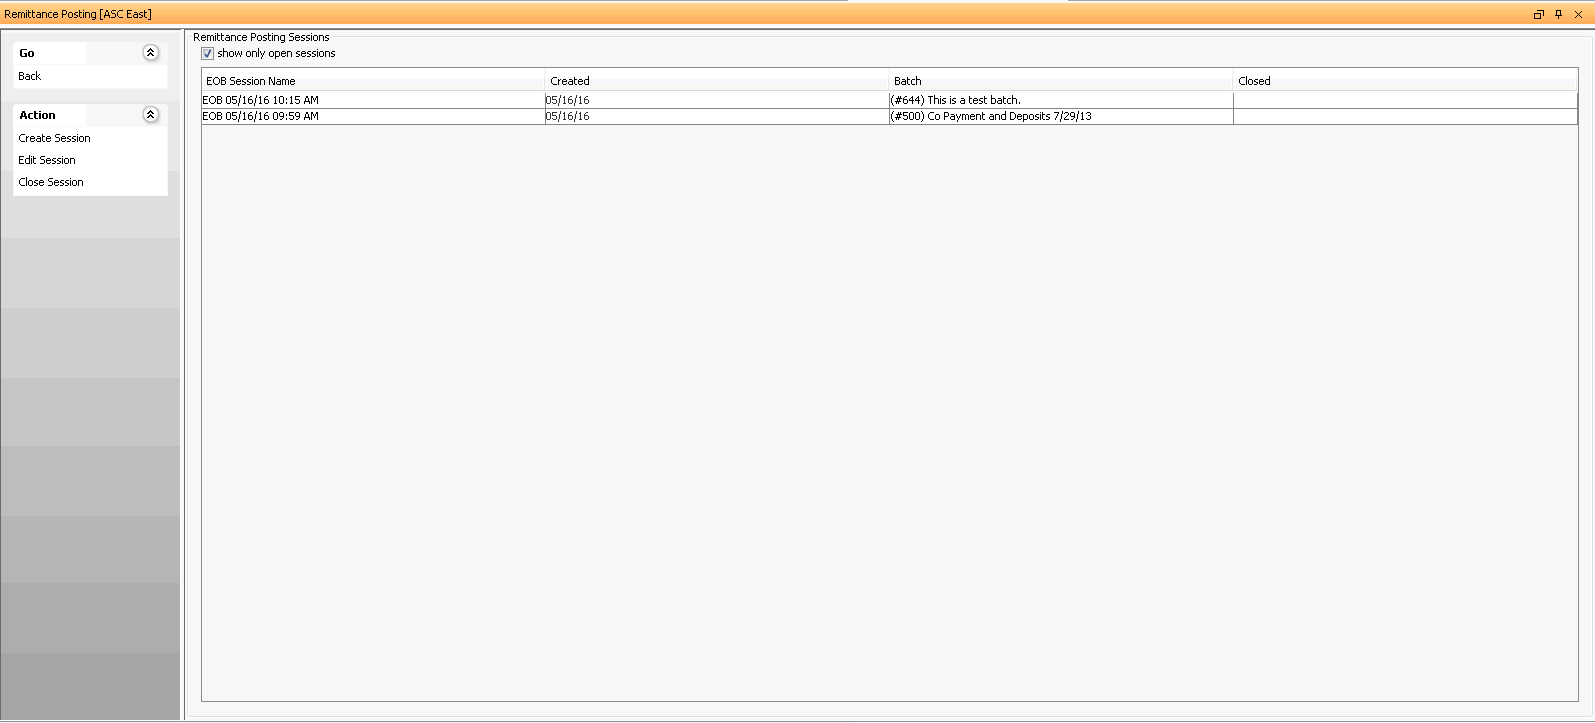
From the Financial Management Sheet Bar, select Billing > Remittance Posting. The Remittance Posting Sessions screenRemittance Posting Sessions screen appears. This screen lists existing Remittance Posting sessions. To include both open and closed sessions in the list, deselect the Show only open sessions check box.

To begin posting, you must either create a new posting session or edit an existing one. (Typically, you would create a new session for each remittance advice.):
Edit an existing session by either double-clicking it or highlighting it on the Remittance Posting Sessions screen and selecting Action > Edit Session from the Sheet Bar.
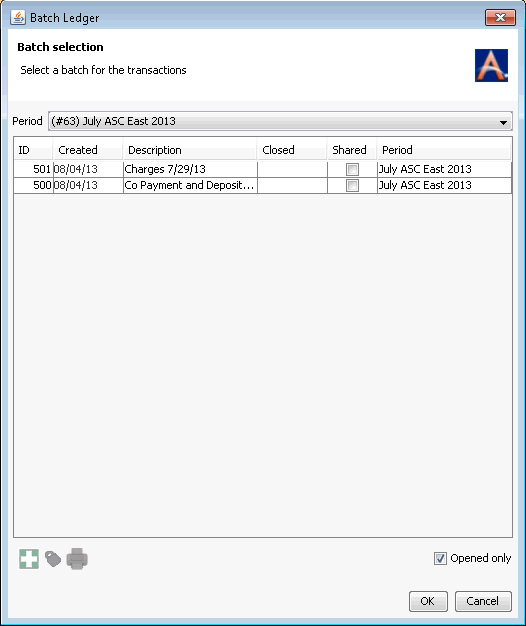
Create a new posting session by selecting Action > Create Session from the Sheet Bar. The Batch Selection dialogBatch Selection dialog appears. Select a Batch or create a new one.

 It is suggested
that you create a new batch for each remittance posting session to avoid
the risk the batch will be closed before you have completed and applied
remittance posting. See Closing a Remittance Posting Session above.
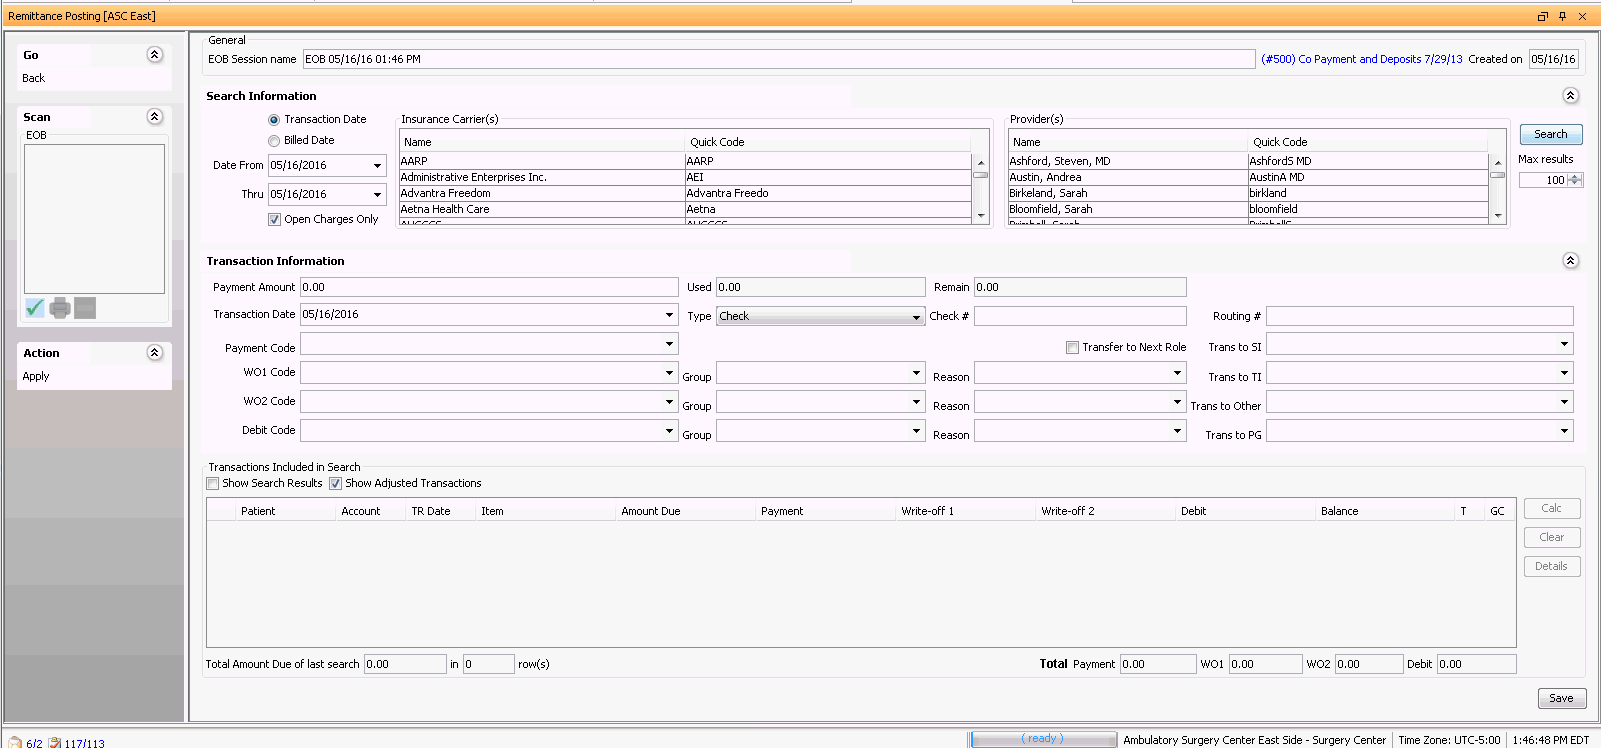
The Remittance Posting screenRemittance Posting screen appears. This screen enables you to search for transactions within a specified date range to post adjustments to, enter details of those adjustments, and apply the adjustments to the selected patients' records. You can expand and collapse sections of this screen by clicking
 .
.
(Optional) In the General sectionGeneral section of this screen, you can enter a personalized name for your session by typing over the system-generated named in the free text EOB Session name field. You can also change the batch you selected in step 2 by clicking the blue font.

(Optional) You can scan in the paper copy or load a PDF copy of the Remittance Advice to keep on file using the options under the Scan heading on the Sheet Bar.
Enter search criteria in the Search InformationSearch Information section to pull to the screen the charges you wish to post adjustments to. Click herehere to learn how.
Select the type of date to search by: Transaction DateTransaction Date or Billed DateBilled Date.
Date a claim was processed to the carrier and was marked as Billed at the end of the Insurance Billing process.
Date associated to the charge at the time it was posted on the Charge screen: typically the date of service.
Define a date range for your search using the Date From and Thru fields. If you wish to include both open charges and those with no balance due, deselect the Open Charges Only check box.
(Optional) You can narrow your search to specific carriers and/or providers by highlighting your choices in the two drop down menus. (Use Ctrl + Click to select multiples.)
(Optional) You can limit the number of charges shown in your results using the up and down arrows in the Max Results field. If the search results in more transaction than allowed, a yellow warning will be displayed.
Click Search. The charges that meet your search criteria display in the Transactions Included in SearchTransactions Included in Search section at the bottom of the screen. This is the section where you will allocate payment and/or write off amounts to specific charges and indicate whether any remaining balances on those charges will be transferred to the next responsible party (T column) and whether a claim is to be generated (GC column).


Enter information about the total check or EFT amount that will be posted for the session in the Transaction InformationTransaction Information section. You will allocate the payment to specific charges in the Transactions Included in Search section of the screen (see the next step), but other entries you make in the Transaction Information section apply to all transactions in the session. Click herehere to learn how to enter information in this section.
(Optional) Payment Amount field - As you allocate portions of the total payment to specific charges in the Transactions Included in Search section, the fields Used and Remain will recalculate to help you easily see how much of the total payment you have left to allocate.
Transaction Date - Date associated to the payments/write offs you are posting in this session. The system defaults to today's date. You may select a date up to 3 days into the future.
(Optional) Type - Select the Type of payment received (Card, Check, Cash, or EFT) from the drop-down menu. Depending on the type selected, the system will open additional fieldsadditional fields in this section.
- Check
- If desired, enter the Check # / Routing # in the fields that appear when you select Check as the Type.
Note: If you are working with a check that includes payments for several accounts, the system will hold the check number as you select each new account to post payments to. Once all of the accounts have been paid for that check, remember to clear the field and enter the new check number for the next check being posted. Also, keep in mind when entering the check number that the system offers several reports that provide the option to search for accounts referenced on a specific check number. Users should be consistent in how the check numbers are entered to aid in searching by check number.
- Card: If the payment type selected is Card, the system opens a field for you to enter the credit card number. For security reasons, it is recommended that you only enter the last 4 digits of the card.
- Checking Account #/Routing #: If you select EFT as the payment type, the system will open two fields for you to enter the checking account # and routing number to be referenced for the transactions.
Payment Code, WO 1 Code, WO 2 Code, Debit Code - Select a journal code to be applied to all payments/write offs/debits entered in this session in the corresponding field. If, when you searched for charges to post to in step 5, you specified one insurance carrier, the system will enter any default journal codes for the selected carrier/plan.
(Optional) Group and Reason Codes - You can select Denial Group and Denial Reason Codes to be applied to all write offs and debits posted in this session. These codes are required for electronic claims when write offs are applied to a charge. If you select a Reason Code, you must also select a Group Code.
(Optional) Transfer to Next Role - To automatically transfer the balance due on each transaction to the next responsible party, check this box. (You can also choose this option for one or more specific charges in the Transactions Included in Search section.)
Trans to SI, TI, Other, PG - If you opted to Transfer balances due to the next responsible party, select the journal codes to be used as the default for transfers to the each of the roles indicated.
Note: You can also use the [Alt] + [E] keys in the field to add or edit a code (journal or group or reason) or the [Alt] + [D] keys to access the respective dictionaries. Use the right-click options to adjust the sort order or clear a field.

Allocate portions of the total amount of the payment/write off/debit to individual charges in the grid in the Transactions Included in SearchTransactions Included in Search section. Click herehere to learn how.
You can sort the grid by its column headings to more easily find the charges you seek.
Enter the portion of the total amount of the remittance to apply to a specific charge in the appropriate field (Payment, Write off 1, Write off 2, or Debit).
As you enter amounts in these fields, the Balance field recalculates to reflect the amount you entered, and as stated in step 6, the amounts shown in the Used and Remaining fields in the Transaction Information section adjust accordingly.
In addition, the Total Payment allocated to individual charges displays below this section and adjusts as you continue to allocate the remainder of the total amount.
(Optional) The T (Transfer to next Responsible Party) and GC (Generate Claim) check boxes are automatically checked if you selected Transfer to Next Role in step 6. You can deselect these check boxes for individual transactions, if you do not wish to transfer them or to enable claim generation.
(Optional) Highlight a transaction and click one of the buttons to the right of this section:
CalcCalc (Use to calculate payment/write off amounts for insurance plans with a contract specified in the system.)
If a transaction is associated to an insurance plan with a contract specified in the system (with the posting options set to Standard Fee w/out Adjustment), then this action will allow the system to calculate the payment amount and any write-off associated to the transaction. If no contract is associated to the transaction, this action will not have any affect on the transaction.
ClearClear (Use to remove your entries from a transaction. Can only be used before you click Apply.)
Clears any entries for transactions that are selected/highlighted. All other transactions will remain unaffected.
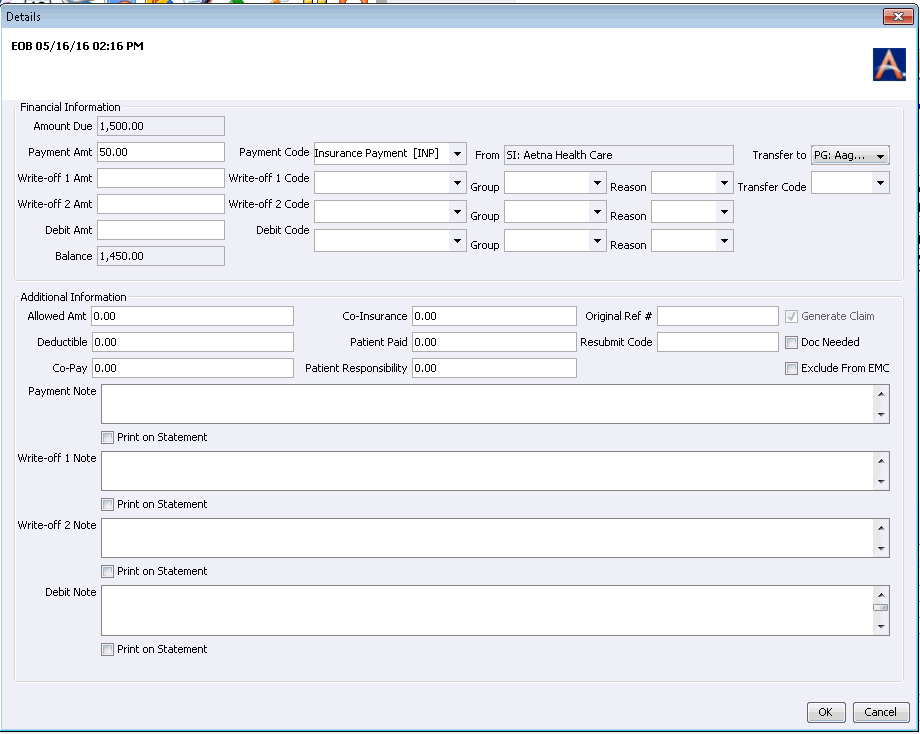
DetailsDetails (Use to change default codes for an adjustment or add information needed for a secondary claim.)
Highlight a transaction and click the Details button (which opens the Details screenDetails screen for that transaction) if you wish to override any default codes entered in previous steps (enter your changes in the Financial Information section), or to add more information such as notes associated to specific adjustments that you can also elect to print on the statement, or information needed for a secondary claim (Additional Information section).

(Optional) The Show Search Results check box defaults to selected to retain your search results to allow you to finish posting from the Remittance Advice if you are interrupted and have to return later.
(Optional) The Show Adjusted Transactions check box is used in conjunction with the Show Search Results check box to retain adjustments you have posted to individual transactions until you are ready to click Apply. When you leave the session the system will flag transactions as Adjusted and display the work you have already done in the session if the box is checked. Unchecking the box will hide the transactions that have adjustments already posted to them.

Click Save to save your entries.
To apply the adjustments you entered to the patients' records, select Action > Apply from the Sheet Bar. A message pops up asking you to confirm that you wish to apply the adjustments you posted. Click Yes to apply the adjustments.
After the session has been applied and balanced, you can close the session so that nothing else can be posted to it. Adjustments can be made to the transaction from the patient ledger if the remit session is closed but the batch is still open. Changes made in the patient ledger will be reflected in the remittance screen. Click herehere to learn how to close the session:
Select Go > Back from the Sheet Bar.
Highlight the session on the Remittance Posting Sessions screen.
Select Action > Close Session from the Sheet Bar. Click Yes on the confirmation pop-up.
The session is now closed to further posting, but it can be viewed by deselecting the Show only open sessions check box on the Remittance Posting Sessions screen.
