Auto Posting
The Auto Posting feature allows you to let the system break down a payment, write-off or debit amount amongst several charges at the same time. For example, if you receive a check for a patient who has multiple charges, you do not have to manually break down each amount and then post each payment and write-off to each charge. Instead, the Auto Posting feature does that for you.
The Auto Posting feature allows you to select multiple charges from multiple cases or a single case and then let the system break down the amounts based on two posting options:
- Proportional Percentage Posting:
The system breaks down the amounts based on a percentage calculation
of each charge’s Due Amount vs. the total
amount due for all charges. Click herehere
to see an example.
In the following example, there are four (4) charges totaling $2000.00 and the payment amount is $1000.00:
- Charge 1 Due Amount = $1000.00 Percentage of Total = 50% Payment Amount = $500.00
- Charge 2 Due Amount = $200.00 Percentage of Total = 10% Payment Amount = $100.00
- Charge 3 Due Amount = $200.00 Percentage of Total = 10% Payment Amount = $100.00
- Charge 4 Due Amount = $600.00 Percentage of Total = 30% Payment Amount = $300.00
- Total Due Amount = $2000.00 Percentage of Total = 100% Total Payment = $1000.00
- Oldest Balance Payment:
The system breaks down the amounts based on the oldest balance first,
then moves on to the second oldest balance, etc. Click herehere
to see an example.
For example, there are four (4) charges selected by the user and the payment amount is $1500.00:
- Charge 1 Due Amount = $1000.00 DOS = 12/10/07 Payment Amount = $1000.00
- Charge 2 Due Amount = $200.00 DOS = 12/18/07 Payment Amount = $200.00
- Charge 3 Due Amount = $200.00 DOS = 02/01/08 Payment Amount = $200.00
- Charge 4 Due Amount = $600.00 DOS = 03/15/08 Payment Amount = $100.00
- Total Amount Still Due = $500.00 Total Paid = $1500.00
To use the Auto Posting feature
- Open the Financial Management module.
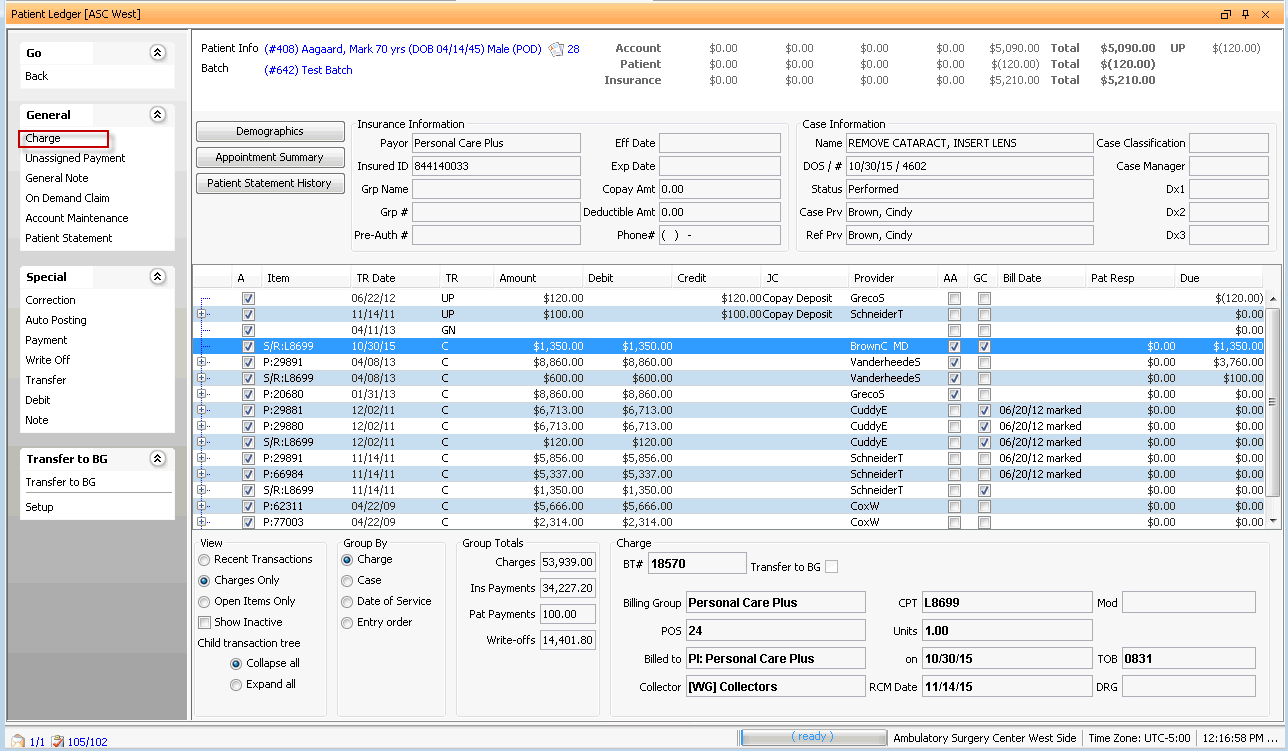
- From the Sheet Bar, click Patient
Ledger. The Patient
Ledger screenPatient
Ledger screen appears.

- Click on any Charge transaction from the list in the middle of the Patient Ledger to enable the Special > Auto Posting Sheet Bar option. Select this option.
- The system will display a message “Do you want to use the Default
Settings from Insurance Plan?” After you make your selection, the
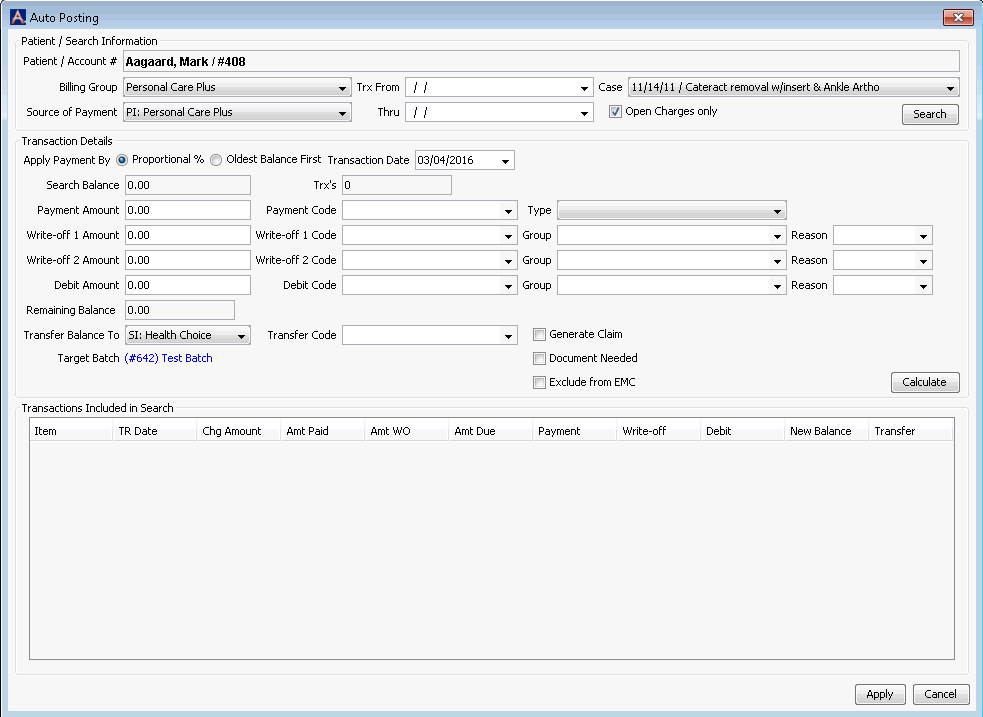
Auto Posting
dialogAuto Posting
dialog appears. If you elected not to use the
default journal codes, you will be able to enter journal codes on
this dialog.

- Search for the transactions you want to post the payment to using
the following filter criteria in the Patient / Search Information sectionPatient / Search Information section,
then click Search:

- Billing GroupBilling Group
Lists all Billing Groups associated to the patient’s account. If you select a different Billing Group, the message about insurance plan default settings appears again as in step 4 above.
- Source of PaymentSource of Payment
Lists all of the Insurance Policies associated to the selected Billing Group as well as the Primary and Secondary Guarantors (if applicable). From this list, select the source of the payment you are posting.
- Filter your search either by Transaction Date or by Case by selecting one of the following:
- Trx From/ThruTrx From/Thru ,
OR
Date Range (From/Through) by DOS (Date of Service). May include more than one case.
- CaseCase
Select a single case to post the payment to.
- Trx From/ThruTrx From/Thru ,
OR
- Open Charges onlyOpen Charges only
The system default is to bring only open charges to the Auto Post screen (those with an outstanding balance). Deselect this box to include both open and closed charges.
- Billing GroupBilling Group
- The system will display your search results in the section at the bottom of the screen: Transactions Included in Search.
- In the Transaction Details sectionTransaction Details section,
you can specify how to post the payment, write-off, and/or debit and
to enter the journal codes (if you elected not to use the default
codes in step 4) to post with the pending transactions using the following
fields. You can also transfer any remaining balance to another entity
in this section.

Note: For any field requiring a code, either use the drop down menu to select one, or use Alt + e or Alt + d to jump to the dictionary if necessary. Use the right-click options to clear the field or use the dictionary look up.
- In the Apply Payment by section, select either Proportional % or Oldest Balance First.
- Select the Transaction Date from the drop down menu.
- Enter the payment, write off, and/or debit amount in the appropriate field(s). If you did not elect to use the default journal codes, the system will now highlight in red the journal code fields that correspond to your entry or entries.
- (Optional) Enter Group and Reason codes for any write off or debit you are posting. If you enter a Group code, the Reason code will become mandatory.
Note: Users who are submitting in the x12 format should include this information when posting, so that secondary claims may be submitted electronically. The Denial Report also uses this data.
If you are posting a payment, select the Type of payment received (Card, Check, Cash, or EFT) from the drop-down menu. Depending on the type selected, the system will open additional optional fieldsadditional optional fields in this section.
- Check
- If desired, enter the Check # / Routing # in the fields that appear when you select Check as the Type.
Note: If you are working with a check that includes payments for several accounts, the system will hold the check number as you select each new account to post payments to. Once all of the accounts have been paid for that check, remember to clear the field and enter the new check number for the next check being posted. Also, keep in mind when entering the check number that the system offers several reports that provide the option to search for accounts referenced on a specific check number. Users should be consistent in how the check numbers are entered to aid in searching by check number.
- Card: If the payment type selected is Card, the system opens a field for you to enter the credit card number.
- Checking Account #/Routing #: If you select EFT as the payment type, the system will open two fields for you to enter the checking account # and routing number to be referenced for the transactions.
- Remaining Balance - This is a read-only field that displays the remainder of the Search Balance after you enter a payment, write-off or debit amount. The field will continue to update based on changes made to any of the amount fields.
- If you wish to transfer the remaining balance, complete the following fields:
- Transfer Balance To - Select to whom any remaining balance should be transferred.
- Transfer Code - Enter a Journal Code to be used if there is a balance transferred to next role.
- GC (Generate Claim) - Check this field so that an insurance claim can be generated for any balance you are transferring to an insurance carrier.
- Document Needed – Check the box if documents will need to be included in with the submission of claims to the insurer. NOTE: this will place the claims into a sub-grouping for insurance billing.
- Exclude from EMC – Check this box if you do not want the claims produced from the transfer to be included in the EMC claim transmission. Claims will only be included when Paper is selected in Insurance Billing.
- Target Batch – Select or create a batch for the transaction by clicking the blue batch name.
Click Calculate. The amounts shown in the Transactions Included in SearchTransactions Included in Search section will adjust based on your entries in the Transaction Details section.

Click Apply. The system will display a message window asking you to confirm you would like to apply the transaction:
Yes – system will apply the transactions to the patient account and close the Auto Posting screen
No – system will return you to the Auto Posting screen