Printing Appointment Labels from Demographics
You can print appointment labels to use for your paper charts, specimen jars, etc. from either the Scheduling module or the Demographics module. This topic covers printing labels from the Demographics module. From this module, you can print labels for one or more patients, and Dates of Service (DOS).
Note: The labels available vary based on which screen you access the Print Label feature from.
- Open the Demographics module.
- Select or create a patient record, then click Print Labels from the Sheet Bar.
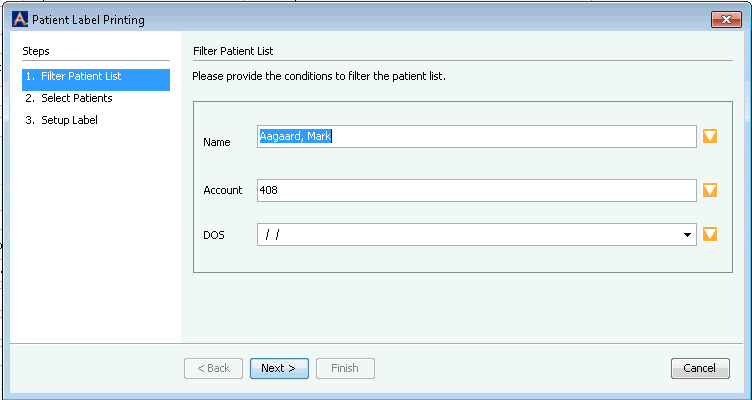
- The Patient
Printing dialogPatient
Printing dialog appears.

- To print labels only for
the patient you selected, select
the DOS (Date of Service) you would like the labels to print for and
click Next.
- If
the DOS that defaulted into this field is not the one you want,
select the correct one from the drop-down menu. Or, use
the orange arrow to select
a range of dates of serviceselect
a range of dates of service.
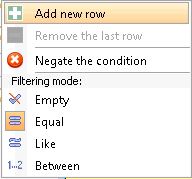
- Click the orange arrow beside the DOS field.
- Click Between.
- Select dates in the From and Through fields.
- If
the DOS that defaulted into this field is not the one you want,
select the correct one from the drop-down menu. Or, use
the orange arrow to select
a range of dates of serviceselect
a range of dates of service.
- To print labels for more than
one patient:
- Click the orange arrow beside the Name field and do one of the following:
- Use the orange arrow to select
a range of namesselect
a range of names.
- Click the orange arrow beside the Name field.
- Click Between.
- Enter names in the From and Through fields.

The name must be entered exactly as it is in the MPI, so the easiest way to look up a name is to use an asterisk (*) as a wild card to bring up all names that start with a letter (e.g. A* pulls up all names that begin with A.).
- Will the account numbers for those patients automatically pull? or do i select the range? or just skip this part?
- Select one date of service from the DOS drop down menu. Or,
Use the orange arrow to select
a range of dates of serviceselect
a range of dates of service.
- Click the orange arrow beside the DOS field.
- Click Between.
- Select dates in the From and Through fields.
- Use the orange arrow to select
a range of namesselect
a range of names.
- If you wish to print You can print labels Find the Date of Service
(DOS) for which you wish to print labels by editing the following
fields as needed. (To apply further conditionsconditions
to one of these fields, click the orange arrow beside the field.)

- NameName
To select a different patient name, close the dialog, and select Search from the Demographics Sheet Bar. Select or create the patient record. Click Print Labels again.
- AccountAccount
Enter the account number of the patient you would like to print labels for.
- DOS
(Date of Service)DOS
(Date of Service)
If the DOS that defaulted into this field is not the one you want, select the correct one from the drop down list.
- NameName
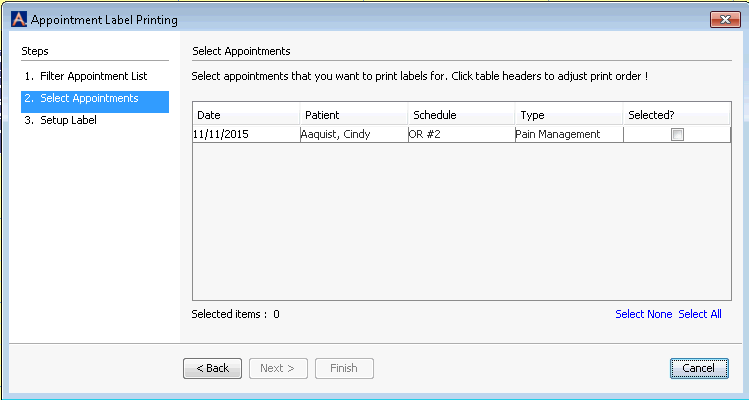
- Click Next. The Select
Appointments sectionSelect
Appointments section appears on the right. Your
search results are listed in this section.

- Choose one of the following options:
- Choose a single appointment by selecting the Selected? check box.
- Select None
- Select All
- Click Next. The Setup
Label sectionSetup
Label section appears on the right. Select a template
for your labels using the drop-down list.

- Typically, sheets of labels come with 10 rows and 3 columns (30 labels to a sheet), but you can print a partial sheet and later use the rest of that sheet by selecting a row and column at the Start at field.
- Select a number of copies to print. This field refers to copies of a single label, not sheets.
- If, for example, you choose to print labels for more than 1 patient, and you want 15 copies/labels for each patient, if you do not choose any other option, 30 labels will print all on one page, 15 for 1 patient and 15 for the other. If you select Separate pages and Print same item immediately, you will get 2 pages. 1 with 15 labels for patient 1 and another with 15 labels for the other patient. If you deselect Print same item immediately, you will get 15 pages with 1 label for each patient on each page.
- Select one of the following
options:
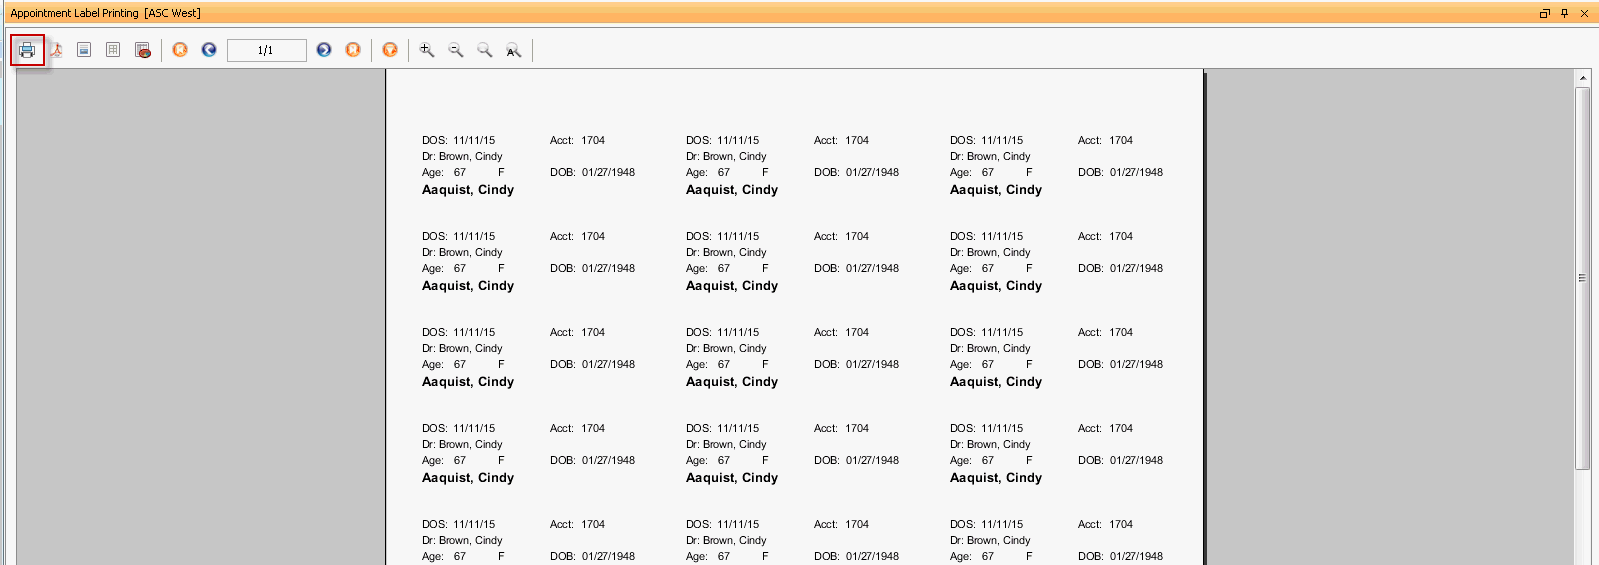
- Print (again): Displays a print preview as a tab in AmkaiOffice. The Setup Label dialog remains on screen, so you can review the labels, and make changes to the layout before printing. Click the print icon to print the labels.
- Finish. A print
previewprint
preview appears in a pop-up window. If you
want to make changes to setup, you must reopen the Setup Label
dialog. From this preview window, click the print
icon to print the label.

Related Topics