Electronic Remittance Posting, v. 3.16 - 3.18
Electronic Remittance Posting is an add-on feature that provides facilities the option to have electronic remittance advices posted automatically to patient accounts.
Each carrier that requires a unique posting configuration of the 835 ERA for posting should be set up in the Electronic Remittance Dictionary. You do not need to set up a posting configuration per carrier, you only need to create multiple configurations if you want different rules to be applied to different payors. (Example: if you want to post write-offs for payments received from Medicare but not if the payment is from Blue Cross you would create two posting configuration set ups to accommodate the different rules.)
The following steps outline how to create a new item. Unless otherwise indicated, all fields are mandatory and must be complete in order to file the item in the dictionary. This dictionary is Business Entity specific and is not shared.
To add a posting configuration for a carrier
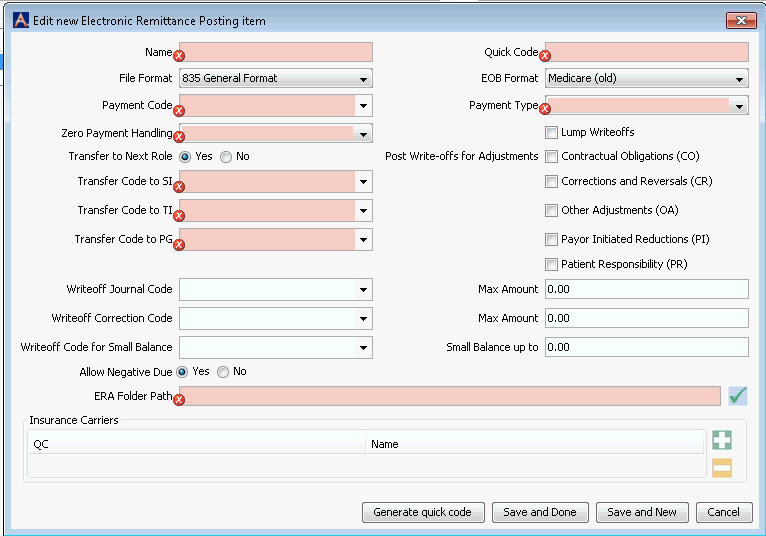
Click New Item from the Actions sectionActions section in the upper right of the dictionary. The Edit new Electronic Remittance Posting item dialog appearsEdit new Electronic Remittance Posting item dialog appears. Complete the following fields.


- Name: Enter a description for the entry. The entry must be unique to all other items in the dictionary. (Example: ERP Blue Cross /Blue Shield) This name will be seen on other screens where the item is to be selected and used.
Quick Code: Enter a short name for the item. This name may be used when displaying information about the item in a table format.
File Format: The system will default to 835 General Format.
EOB Format: Select the applicable format from the drop down list. Options are Medicare, Blue Cross or Commercial. Use Commercial for any carrier that is not Medicare or Blue Cross.
Payment Code: Select or create a Payment journal code for use when posting payments for this ERA Carrier. Use the Alt + E key to jump to the Journal Code Dictionary if you need to add a new code. (example: ERP BC Payment)
Payment Type: Select from the drop down the form of payment that will generally be received, Card, Cash, Check or EFT.
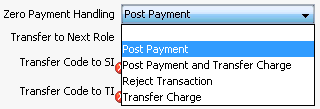
Zero Payment Handling: If a transaction on the ERP has a zero payment, the optionoption you check here will determine what the system will do with the transaction.

- Transfer to Next Role: If you would like the system to automatically transfer any balance due to the next responsible party in the Billing Group when payments are posted, select Yes (default). If you do not wish to auto transfer select No. If you select No, users will be required to review all transactions and manually transfer the balance to the next responsible party if needed.
- Transfer Code to SI: Select or create a Transfer Code for use when a balance due is transferred to the Secondary Insurance. (example: ERP Transfer to SI)
Transfer Code to TI: Select or create a Transfer Code for use when a balance due it transferred to the Tertiary Insurance. (example: ERP Transfer to TI)
Transfer Code to PG: Select or create a Transfer Code for use when a balance due it transferred to the Primary Guarantor. (example: ERP Transfer to PG)
Post Write-offs for Adjustments: Check off the box(s) if you would like the system to post adjustments to any of the group codes group codes displayed.
Lump Write-offs
Combine adjustments with the same group/reason code into one line item on the patient ledger
Contractual Obligation (CO)
Corrections and Reversals (CR)
Other Adjustments (OA)
Payor Initiated Reduction (PI)
Patient Responsibility (PR)
- Write-off Journal Code: (optional) Select or create a Write-off Code that can be used by the system to apply a write off against the charge. (example: ERP Contractual W/O)
- Max Amount for WO: (optional) Enter an amount to indicate the maximum amount you would like the system to write off as a contractual adjustment when posting ERPs for this carrier. Enter positive values only. (example: 99.99)
- Write-off Correction Code: (optional) Select or create a write off correction code that can be used to reverse a previously posted write off. This option is useful if you have taken the contractual adjustment at the time of posting your charge and the write off may have been slightly overstated. Allowing the system to automatically reverse all or part of the write off could avoid a negative balance on charges or prevent the system from posting no payment at all if the balance due exceeds 0.00 when the payment is posted. (example: ERP Correction W/O)
- Max Amount: (optional) Enter a positive dollar value that you would like to allow the system to do the write off correction for. (example: 0.01)
- Write-off Code for Small Balance: (optional) Select or create a Write-off Code that can be used by the system to remove a small balance that may remain on a charge after the payment has been posted. (example: ERP Small Balance W/O)
Small Balance up to: (optional) Enter an amount to indicate the maximum amount you would like the system to automatically write off as small balance when posting ERPs for this carrier. Enter positive values only. (example: 4.99)
Allow Negative Due: Select Yes (default) if you would like to allow the system to post payments that exceed the due amount on the charge. Select No if you do not wish to allow negative due on charges. If you select No, the system will not post any payments to the charge if the resulting balance will exceed 0.00 due.
ERP Folder Path: Use the check mark to browse to the location you will store the 835 Remittances Advice as they are downloaded from your clearing house or other source. If you are working in an Enterprise database you should set up a unique folder for each Business Entity. Users may set up as a unique folder for each type or carrier that will be posted using the ERA option. (example: C:\ERP_ASC). Click herehere for more information.
A folder must be created (preferably on a network drive for access by multiple users) and used for housing all of the electronic remittance posting files. These files should be received by the center through their regular channels and then moved to the folder created for the sole use of AmkaiOffice ERA Posting. The assistance of IT staff may be required to set up the new folder on your network
Insurance Carrier: Select the carrier from the drop down menu that will be associated to ERAs posted using this entry. (example: Blue Cross/Blue Shield). If the configuration is specific to an individual payor select that payor here. If the set-up is to be used for all payors you do not need to make any selection. The parameters will be applied to all payors.
Generate quick code: If the Preference to Auto generate quick code has been set this field will be displayed when new items are added to the dictionary. If a quick code has not been set or if you would like to override the code that has been entered in the field, click this button to have the system generate a quick code.
- Click one of the following buttons:
- Save
and DoneSave
and Done
Click to save your changes and return to the Items screen.
- Save
and NewSave
and New
Click to save your changes and clear the fields on the dialog, so you can add another new Item to the dictionary.
- CancelCancel
Click to discard your changes and return to the Items screen.
- Save
and DoneSave
and Done