Electronic Purchase Order Type
The AmkaiOffice Electronic Purchase Order (ePO) feature allows you to send existing purchase orders electronically to associated vendors via EDI 850 Purchase Order transaction set that complies with the Electronic Data Interchange standards.
In addition, AmkaiOffice will receive various confirmation files in return, including the EDI 855 Purchase Order Acknowledgement. This report in PDF format allows users to update the status of the purchase orders.
The ePO module uses the industry standard X12 850/851 transaction sets to send and receive information via an FTP or sFTP connection.
Each report received from the vendor will be saved in a history file for each purchase order which can be reviewed by the user at any time.
Before you can use the ePO feature, settings for each vendor must be configured by adding an entry for that vendor in the Electronic Purchase Order Type dictionary.
The dictionary is Not Shared (Business Entity). Items created or modified in the dictionary will be active only in the Business Entities in which they are created.
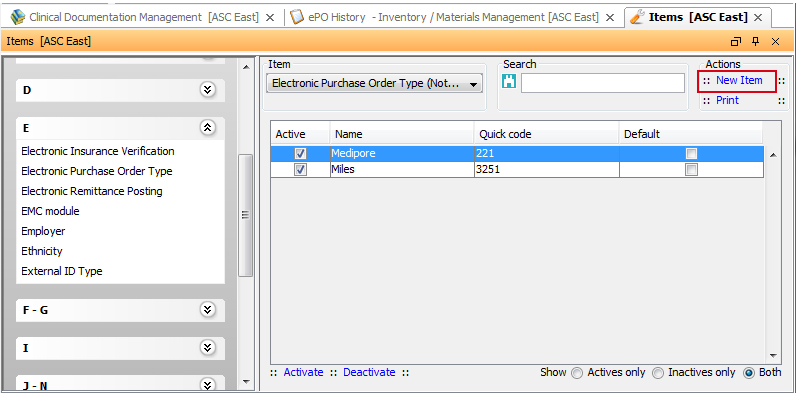
To add a New Entry to the Electronic Purchase Order Type dictionary
- Once the database is set up to accept a new entry, from the Administration
module, access the dictionarydictionary
and click New Item. The EPO
edit dialogEPO
edit dialog is displayed.


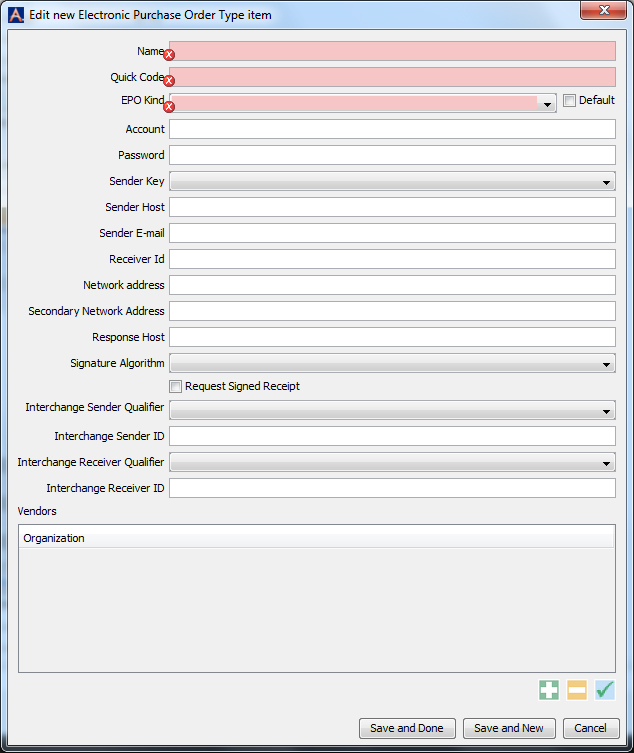
- Fill the fields on the dialog as appropriate. Click the links below to learn more about these fields:
Name and Quick CodeName and Quick Code
Enter appropriate text in these fields so that the user can identify the vendor easily on the screens when sending purchase orders.
-
Select one of the EDI X12 formats for the Purchase Orders from the EPO Kind drop-down list.
The remaining settings will typically remain the same for any specific vendor. Each vendor may have different requirements for entering the remaining information. To ensure that the most up to date information is entered for each vendor, information should be gathered from the vendor.
Generally, the following fields are used:
-
The user name used to log into the vendor’s system.
-
The password used to log into the vendor’s system.
Network AddressNetwork Address
This is where the sFTP or FTP address for connecting to the vendor’s system should be entered.
Interchange Sender QualifierInterchange Sender Qualifier
Select the appropriate value based on the vendor being entered. Again, these values will typically remain the same for each vendor but this information should be gathered upon each client’s implementation. The following selections are typically used and will produce the associated values in the ISA06 element. If not specifically detailed in the vendor’s setup documentation, use the Mutually Defined value.
Duns Number: 01
Duns Number with Suffix: 14
Mutually Defined: ZZ
Interchange Sender IDInterchange Sender ID
This ID is obtained from the vendor.
Interchange Receiver QualifierInterchange Receiver Qualifier
Select the appropriate value based on the vendor being entered. Values are the same as the Interchange Sender Qualifier.
Interchange Receiver IDInterchange Receiver ID
This ID is obtained from the vendor.
-
This list is linked to the Third Party Org’s dictionary. Any vendors whose purchase orders will be sent via the module being entered must be listed here. Click on the icon to add a vendor.
Once the vendor row is added, double-click on the row to enter address information.
In the address list window, click on the icon to add the following addresses:
Select a Shipping address.
The system will bring the user back to the address list window and the Identifier field will be mandatory. This ID is assigned to the client by the vendor.
In the address list window, click on the icon to add the following addresses:
Select an Accounts Payable Department address.
- The system will bring you back to the address list window and the Identifier field will be mandatory. This ID is assigned to the client by the vendor. It may be the same as the Shipping Address ID.
- Click one of the following buttons:
- Save
and DoneSave
and Done
Click to save your changes and return to the Items screen.
- Save
and NewSave
and New
Click to save your changes and clear the fields on the dialog, so you can add another new Item to the dictionary.
- CancelCancel
Click to discard your changes and return to the Items screen.