Searching for a Free Slot on the Scheduling Grid
Choose this method of scheduling a new appointment when you want to find any open time slot within a specified time range. This method is typically used when the schedule is quite full.
- Open the Scheduling module.
- From the Search menu on the Sheet Bar, click Free Slot. The Free Slot Search dialogFree Slot Search dialog appears. The options that display on this dialog depend on your facility's configuration. If your facility does not schedule PAT or Recovery appointments, these sections are not included in the dialog.

- To include free slots located within templates in your search, select the Include templates check box.
- Depending on the type of visit you are scheduling, complete the search criteria fields in one of these sections:
- OP VisitOP Visit
-
- Select the day(s) of the weekday(s) of the week on which you would like to schedule the appointment.
Select individual days using the days of the week check boxes.
Select Working days check box to select Monday through Friday.
Select All check box to choose all seven days.
-
Select a date or date rangeSelect a date or date range in the Date from and through fields.
Use one of the following methods to populate a date field:
- Manually type a date in the field. You must use this date format: MM/DD/YYYY.
Or
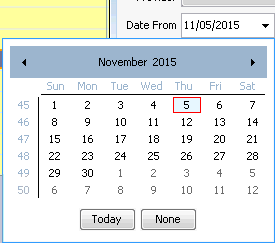
- Click the drop-down in the date field to access a calendarcalendar:

- Populate the date field by clicking a date on the calendar.
- Leave the field blank by clicking None.
- Navigate to a prior or future month using the arrows to the right and left of the month name.
- Click the month name to see a list of months and select the name of the month you wish to view from the list.
- Navigate to a prior year by clicking the year and using the up/down arrows to move forward or back one year at a time.
- Populate the field with today's date by clicking Today.
-
Select preferred Begin time and End time, or leave these fields blank to search the entire day.
-
Select the appointment type from the App. type list. This list displays your facility's active Appointment Types from your Appointment Type dictionary.
-
Enter the estimated Length of the procedure in minutes by either moving the arrows up and down or by typing in the free text field.
-
In the Operating RoomProce… section, select the room(s) that are appropriate to the procedure you’re scheduling. To select all rooms, click the Check Mark icon. To remove all selections, click the Minus Sign icon .
-
In the Request section, specify one or more Providers to include in your free slot search. Click the Plus Sign icon in the Request section. The Role column is populated with Provider. Select a Provider using the drop-down list in the Schedule column. To remove a Provider, select that Provider's name and click the Minus Sign icon.
- Select the day(s) of the weekday(s) of the week on which you would like to schedule the appointment.
-
- PAT VisitPAT Visit
-
-
Select the day(s) of the weekday(s) of the week on which you would like to schedule the appointment.
Select individual days using the days of the week check boxes.
Select Working days check box to select Monday through Friday.
Select All check box to choose all seven days.
-
Select a date or date rangeSelect a date or date range in the Date from and through fields.
Use one of the following methods to populate a date field:
- Manually type a date in the field. You must use this date format: MM/DD/YYYY.
Or
- Click the drop-down in the date field to access a calendarcalendar:

- Populate the date field by clicking a date on the calendar.
- Leave the field blank by clicking None.
- Navigate to a prior or future month using the arrows to the right and left of the month name.
- Click the month name to see a list of months and select the name of the month you wish to view from the list.
- Navigate to a prior year by clicking the year and using the up/down arrows to move forward or back one year at a time.
- Populate the field with today's date by clicking Today.
-
Select preferred Begin time and End time, or leave these fields blank to search the entire day.
-
Select the Business Entity for which you wish to schedule the appointment.
-
Select the appointment type from the App. type list. This list is built by your facility based on your typical appointment types.
-
Enter the estimated Length of the procedure in minutes by either moving the arrows up and down or by typing in the free text field.
-
In the Pre Admit Testing… section, select the room(s) that are appropriate to the procedure you’re scheduling. To select all rooms, click the Check Mark icon . To remove all selections, click the Minus Sign icon .
-
In the Request section, specify one or more Providers to include in your free slot search. Click the Plus Sign icon in the Request section. The Role column is populated with Provider. Select a Provider using the drop-down list in the Schedule column. To remove a Provider, select that Provider's name and click the Minus Sign icon.
-
-
- Recovery CareRecovery Care
-
-
Select the Length of Stay in hours either by typing a number in the free text field or by moving the up and down arrows.
-
Select the appointment type from the App. type list. This list is built by your facility based on your typical appointment types.
-
In the Recovery Room section, select the room(s) that are appropriate to the procedure you’re scheduling. To select all rooms, click the Check Mark icon . To remove all selections, click the Minus Sign icon .
-
In the Request section, specify one or more Providers to include in your free slot search. Click the Plus Sign icon in the Request section. The Role column is populated with Provider. Select a Provider using the drop-down list in the Schedule column. To remove a Provider, select that Provider's name and click the Minus Sign icon.
-
-
- OP VisitOP Visit
-
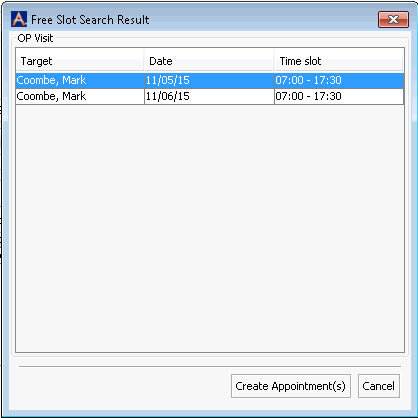
To start the search, click Execute. The Free Slot Search Result dialogFree Slot Search Result dialog appears. This dialog shows any available time slots that meet the search criteria you entered.

-
To schedule the appointment, click Create Appointment. The Appointment dialog appears. Click here to learn how to schedule an Appointment.
Related Topics