Working with Daily Notes
Daily Notes is a feature of the Scheduling Module that allows you to add a notenote that appears automatically on the Scheduling Grid when any user opens the module during a specified time frame. Unlike Appointment Notes, Daily Notes are not tied to a specific Appointment, and unlike Remarks, Daily Notes are only available in the Scheduling module. Daily Notes can be configured to display for a specific day or within a specific time frame.

Tasks
- Creating a Daily NoteCreating a Daily Note
-
- Open the Scheduling module.
- From the Sheet Bar heading, Daily Notes, click New Note. The Daily Messages dialogDaily Messages dialog appears.

- Type the text of your note in the free text field at the bottom of the dialog.
- Select a date range during which the note will be visible using the Visible from and to fieldsfields.
Use one of the following methods to populate a date field:
- Manually type a date in the field. You must use this date format: MM/DD/YYYY.
Or
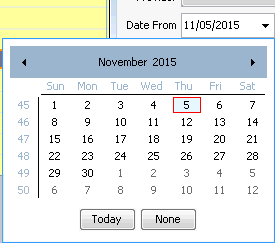
- Click the drop-down in the date field to access a calendarcalendar:

- Populate the date field by clicking a date on the calendar.
- Leave the field blank by clicking None.
- Navigate to a prior or future month using the arrows to the right and left of the month name.
- Click the month name to see a list of months and select the name of the month you wish to view from the list.
- Navigate to a prior year by clicking the year and using the up/down arrows to move forward or back one year at a time.
- Populate the field with today's date by clicking Today.
- Click the plus sign at the bottom of the dialog to add an additional note. The text moves to the Messages field. To remove the note, select it and click the minus sign.
- To create additional notes, repeat steps 3 - 5.
- Click OK. The note displays each time any user opens the module.
- To make the note disappear until the next time the module is opened, click anywhere on the Scheduling Grid.
-
- Editing a Daily NoteEditing a Daily Note
-
- While the note is showing on the Scheduling Grid, click Edit under the Daily Notes Sheet Bar heading . The Daily Messages dialogDaily Messages dialog appears.

- Select the Note you wish to edit in the Messages field.
- Edit the text of the note in the free text field at the bottom of the dialog. You can also edit the Visible from and to dates.
- Click OK.
- While the note is showing on the Scheduling Grid, click Edit under the Daily Notes Sheet Bar heading . The Daily Messages dialogDaily Messages dialog appears.
-
- Displaying a hidden Daily NoteDisplaying a hidden Daily Note
Click Show from the Daily Notes Sheet Bar heading. The note appears on the Scheduling Grid.