Modify Claim Office
If a claim form was sent to the wrong claim office when a charged was billed to an Insurance Carrier, you can change the claim office associated to that Carrier/Billing Group using the Modify Claim Office option from the RCM Ledger. If additional charges are on file for the selected Carrier/Billing Group, all transactions associated to that Carrier/Billing Group will be switched to the new Claim Office.
Note: Billing Groups are specific to the patient for whom they are created, so claims for other patients will not be impacted when you modify the claim office for the current patient.
Upon modifying the claim office, you will be prompted by the system to generate a claim to the new claim office. All claims currently on file for the patient for the selected Insurance Carrier will be modified to the new claim office. Demographics will also be updated to reflect the new information. Existing claim offices can be edited and new offices added from this option as well.
The Modify Claim Office option is available from the menu that appears when you right-click a transaction on the RCM Ledger.
To modify the Claim Office associated to a transaction
-
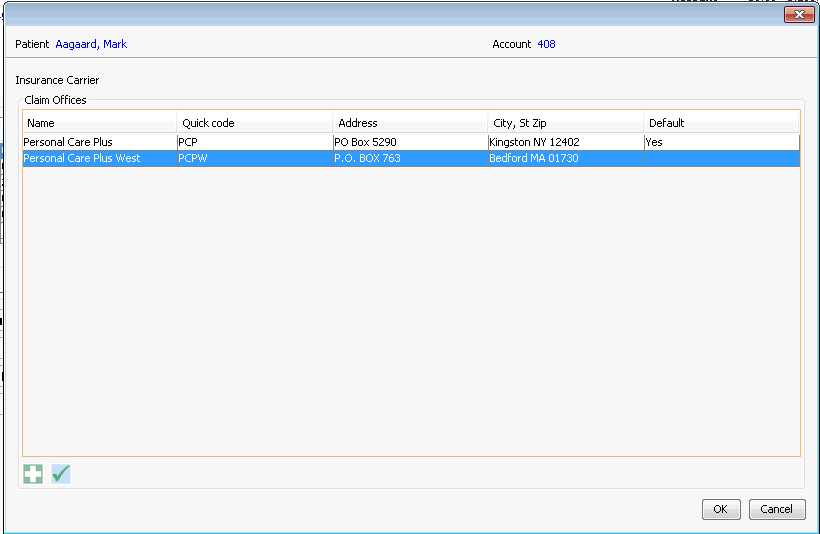
Right-click the transaction from the RCM Ledger and select Modify Claim Office. The Modify Claim Office dialogModify Claim Office dialog appears. The dialog displays all current Claim Offices on file for the associated Insurance Carrier.

Note: The responsibility for payment for the transaction you select must currently belong to an insurance carrier. If the responsibility for payment currently rests with the PG or SG, you will receive a warning message.
-
Select the new claim office that should be associated to the Carrier/Claim Office/Billing group and click OK.
-
The Claim Office Change message promptClaim Office Change message prompt will display. If additional charges are on file for the selected Carrier/Claim Office/Billing Group, the system will warn you that all transactions associated to the Billing Group will be updated at this time. Click Yes to continue or No if you do not wish to make the change.

-
If you clicked Yes, the system will display a prompt asking “Would you like to generate claim?” If you click Yes, the Generate Individual Claim dialog launches. See Generate Claim. If you do not wish to generate a claim at this time, click No.
-
-
The system will record a Remark indicating the claim office has been updated. If you elected to generate a claim, a second Remark will be logged by the system to indicate that the transaction has been flagged for rebill. Demographics will also be updated to reflect the new claim office information for the Insurance Policy.
To add or edit a new Claim Office
-
Right-click the Transaction from the RCM Ledger and select Modify Claim Office. The Modify Claim Office dialogModify Claim Office dialog appears. The dialog displays all current Claim Offices on file for the associated Insurance Carrier.

-
Click on
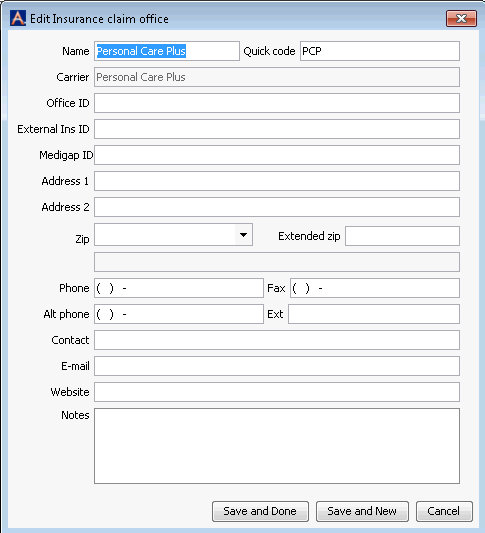
 at the bottom of the dialog. The Edit Insurance Claim Office dialogEdit Insurance Claim Office dialog appears. Enter details about the new claim office on this dialog and click one of the following buttons:
-
Save and Done - Save the new claim office information and return to the Modify Claim Office dialog.
-
Save and New - Save the new claim office information and create another new claim office.
-
Cancel - Discard your changes and return to the Modify Claim Office dialog.
-
-
To edit a claim office, highlight the office on the Modify Claim Office dialog and click
 . The Edit Insurance Claim Office dialogEdit Insurance Claim Office dialog appears. Make any needed changes to the claim office information and click one of the buttons described in step 2 above.