Small Balance Write Off
The Small Balance Write Off Sheet Bar option, available from the RCM Home Page, enables you to write off small balances for a group of accounts. This feature is a global version of the option available at the account level from the right-click (context) menu on the RCM Ledger screen.
As with all transactions, as long as the batch to which the Write off is posted is open, you can modify the data, if needed, on the Patient Ledger.
To write off small balances for a group of accounts
From the RCM Home Page Sheet BarRCM Home Page Sheet Bar, select Administrative > Small Balance Write off. The Small Balance Write off screenSmall Balance Write off screen appears.
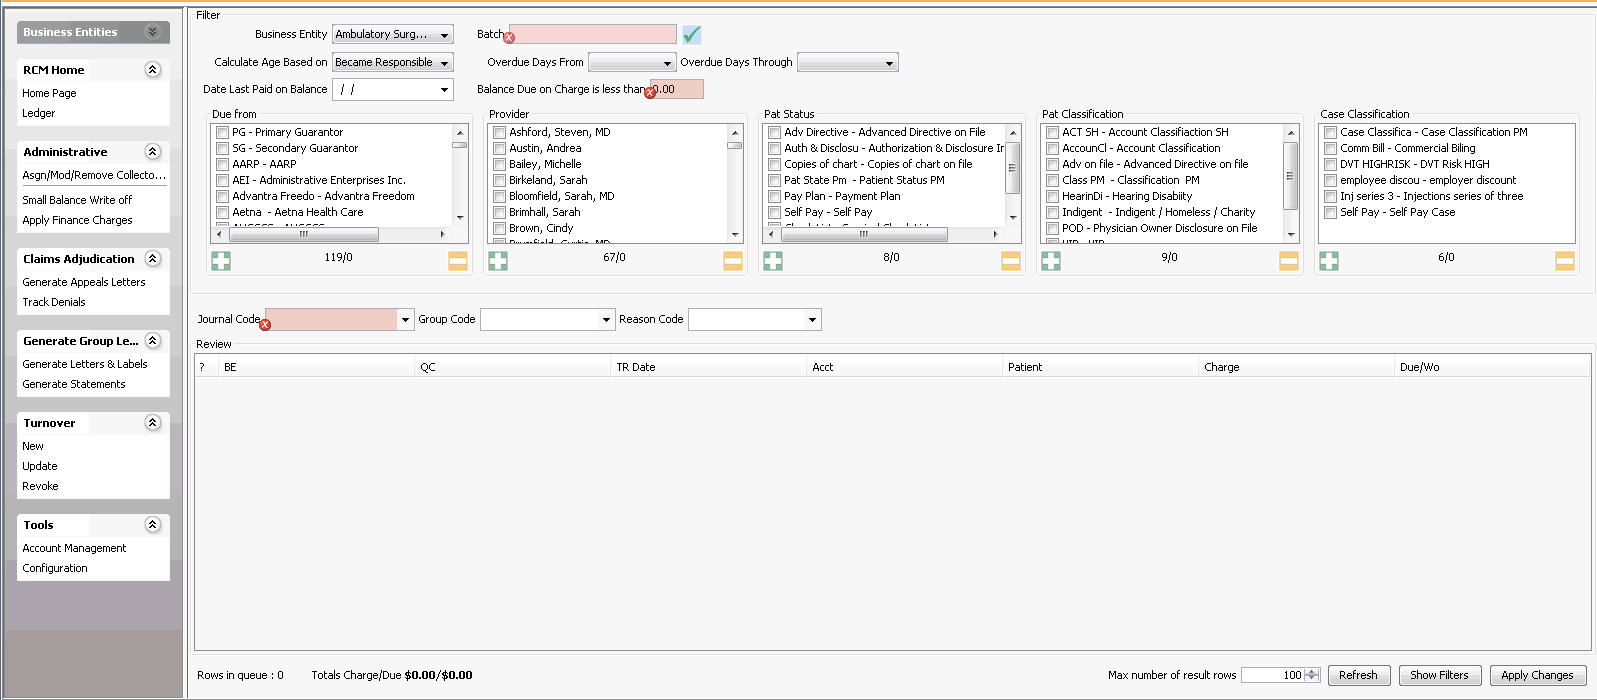
Use the filters at the top of the screen to select the group of accounts for small balance write off, and select a batch for the write off transactions. Click herehere to learn more about the filters and batch selection field.
Business Entity: Small Balance Write offs are done at the Business Entity (BE) level. If you have configured your RCM Module for Central Collections, each of the associated Business Entities attached to your database will be displayed in the drop down menu. You will need to select each BE and perform the small balance write off option for each BE in batches. If you are a single Business Entity or are not doing central collections, the current Business Entity name will appear as read only in this window.
Batch: Click
 to
select
or create a batch for the write off transactions.
We suggest you create a batch that will be used exclusively
for this write off session and will contain only transactions
related to the RCM Small Balance Write offs being done
at this time.
to
select
or create a batch for the write off transactions.
We suggest you create a batch that will be used exclusively
for this write off session and will contain only transactions
related to the RCM Small Balance Write offs being done
at this time.Calculate Age Based on: The age the transaction is currently past due will be calculated based on the selection made here and the current date:
Became Responsible: The date the current role become responsible for the balance due
Transaction Date: The date of service for the charge
Overdue Days From/Overdue Days Through: Select the past due age of the transactions to be selected for write off from the drop down menu.
Date Last Paid on Balance: Enter the date of the last payment posted to the account. If you have patients making monthly budget payments, this option will help to exclude these accounts that may meet the criteria for being past due, but are being paid according to their agreement.
Balance Due on Charge is less than: Enter the minimum amount due on the charge you wish to write off. NOTE: This field is based on the minimum per charge and not the minimum on the account.
Due From: Selection options are available to further refine the accounts that will have small balance write offs. Selections options include the following. Each option will allow multiple selections. If you do not select anything in the filter boxes provided the system will assume that all accounts would be search.
Due from, Provider, Patient Status, Patient Classification, and Case Classification: You can filter the queue by current responsible party (Due from), Provider, Patient Status, Patient Classification, and/or Case Classification by selecting one more options from one or more of the 5 combo boxes shown.
Underneath each box, the system will display the number of items available to choose from in the box followed by the number selected. Example 12/1 displayed under Due from would indicate that there are 12 items in the list and 1 has been selected.
Use the
 icon
to add all of the items in the group or the
icon
to add all of the items in the group or the  to
de-select items already selected in the group.
to
de-select items already selected in the group.
Journal Code: Select the Journal Code that will be associated to each write off transaction posted.
Group Code: (Optional) Enter Group and Reason codes for any write off or debit you are posting. If you enter a Group code, the Reason code will become mandatory.
Reason Code: If you have entered a Group Code, the Reason Code is mandatory.
Max number of result rows: The system will default to the number of rows set in Tools > Configuration. You can modify the number as needed.
Refresh: Once you have entered all of the parameters, click Refresh.
The selected group of charges appears on the Review Changes screenReview Changes screen. Click herehere for an explanation of the fields on this screen. (See Tip below).
? : The system will place a check mark in this field to indicate that the transaction has been selected for write off. If you do not want the system to write off the transaction selected click in the box to remove the check mark.
BE - Business Entity the transaction belongs to
QC - Quick Code of the procedure/ supply/resource selected for write off
TR Date - Transaction Date associated to the charge
Acct - Account number
Patient - Last name, First name, Middle Name, and Title of the patient
Charge - Amount of the original charge
Due/WO - Amount due being written off.
Totals Charge/Due: The total of the charges associated to the item selected along with the current balance due for the selected charges.
Refresh: Use this option when you have made changes to the selection filters of modified the Max number of results rows.
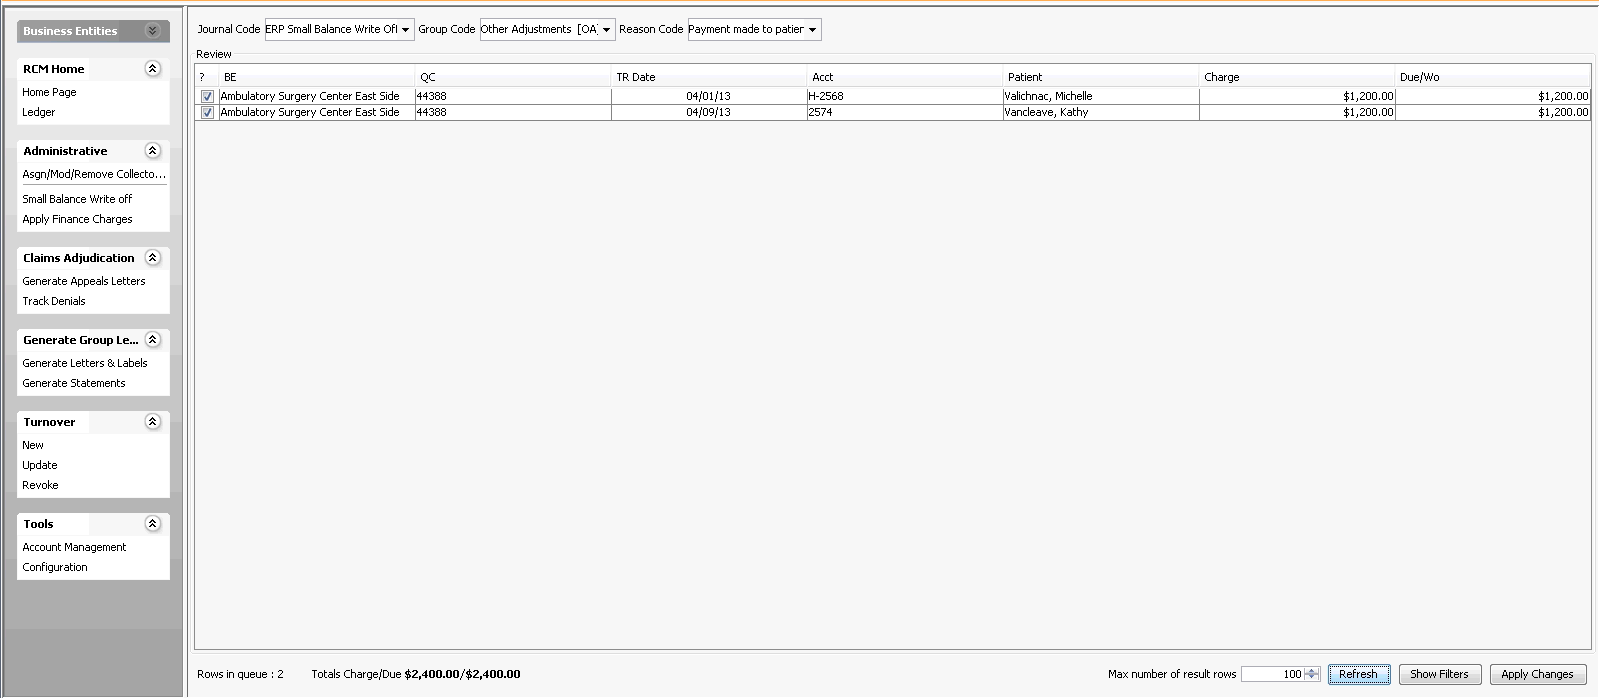
If you wish to modify your selection of accounts, click Show Filters to return to the Small Balance Write off main page to adjust the filters.
When you are ready to apply the small balance write offs to the selected accounts, click Apply Changes from the Review Changes screen.
 It is
important to remember that the Due/W.O. amount
that is displayed on the Review
Changes Screen is the amount due on
an individual transaction and not on the overall account balance. It is
recommended that you review the accounts selected prior to committing
the changes. Run the Ledger
Entry report in the Reports module
to review all of the transaction posted to the individual accounts.
It is
important to remember that the Due/W.O. amount
that is displayed on the Review
Changes Screen is the amount due on
an individual transaction and not on the overall account balance. It is
recommended that you review the accounts selected prior to committing
the changes. Run the Ledger
Entry report in the Reports module
to review all of the transaction posted to the individual accounts.