Generate Letters and Labels
The Generate Letters and Labels Sheet Bar option, available from the RCM Home Page enables you to generate letters and labels for a group of accounts. To learn how to generate letters and labels for individual accounts, see Generate Letters.
To generate letters and labels for a group of accounts
-
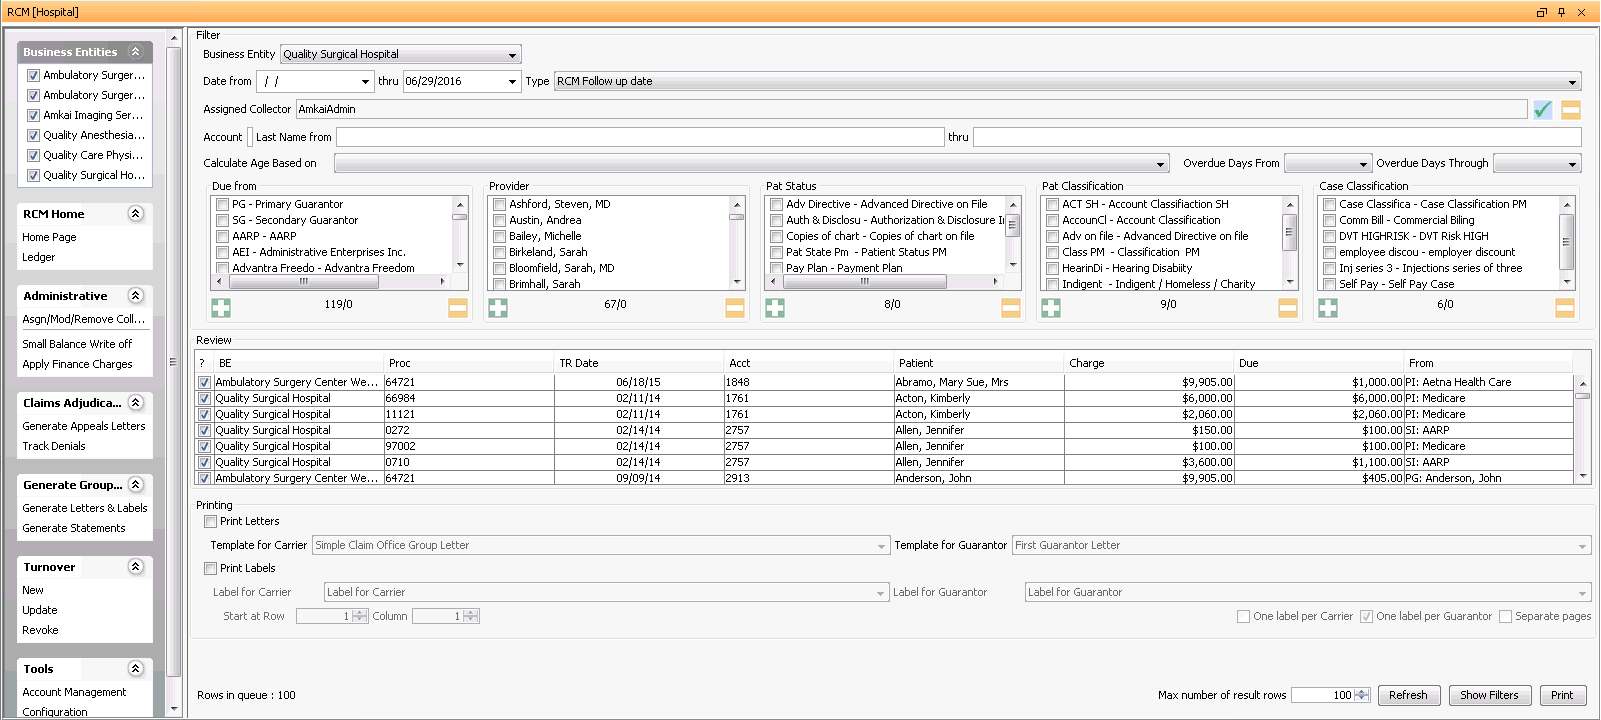
From the RCM Home Page Sheet BarRCM Home Page Sheet Bar, select Generate Group... > Generate Letters & Labels. The Generate Letters & Labels screenGenerate Letters & Labels screen appears.


-
Use the filters at the top of the screen to select the group of accounts for which you wish to generate letters & labels. These are the same filters used on the RCM Home Page. Click herehere to learn how to use the filters.
Click the following links to learn more about the filters:
-
-
Defaults to blank to display all accounts with a Date Type prior to today's date. Enter or select a different date to limit your results.
-
Defaults to today's date. You can enter or select a new date to limit the results to those whose Date Type is a prior date.
-
-
-
RCM Follow-up Date - (default) - Select this Date Type to view accounts by their initially assigned follow-up date.
-
Transaction date - Select to view accounts by date of service
-
Post date - Select to view accounts by the date the charge was entered into the system
-
-
-
Assigned CollectorAssigned Collector
Click the check mark icon to select a collector, then click Refresh. The charges assigned to the selected collector will pull to the screen. Click the minus sign icon to clear this field.
-
Enter a specific account number to pull only that account to the queue.
-
Last Name From/ThruLast Name From/Thru
Enter the last name or initial of the last name or range of last names you would like to pull to the queue. Example: A thru N or Aaron thru North.
-
Select a workflow status of the accounts you would like to pull to the queue. Options are:
-
-
Appealing
-
Check in Progress
-
In-progress
-
Open
-
Paused
-
Review
-
Status Pending
-
The Status of an account in the queue is set as the account is worked from the RCM Ledger. Any status other than Open indicates the account is being worked by a member of a Workgroup.
-
-
You can filter the queue by current responsible party (Due from), Provider, Patient Status, Patient Classification, and/or Case Classification by selecting one more options from one or more of the 5 combo boxes shown.
Underneath each box, the system will display the number of items available to choose from in the box followed by the number selected. Example 12/1 displayed under Due from would indicate that there are 12 items in the list and 1 has been selected.
Use the
 icon to add all of the items in the group or the
  to de-select items already selected in the group.
-
-
-
The selected accounts appear in the Review sectionReview section. All are selected by default to include in the letter run. To exclude an account from this letter run, deselect the check box in the ? column.

-
By default, a maximum of 100 rows displays in the Review section. You can adjust this quantity using the Max number of result rows field.
-
In the Printing sectionPrinting section, select the Print Letters check box.

-
Select the Template from the drop down menu for the letter you wish to send for this account. The system will send the selected letter based on the role currently responsible for the charges you selected. If the current responsible party is PI (Primary Insurance) the letter selected under Template for Carrier will be used. If the current responsible party is PG (Primary Guarantor), the letter selected under Template for Guarantor will be used.
-
To print an address label, check the Print Labels box.
-
Select the label you would like to use for this account. The label associated to the current responsible party will be printed if you selected the Print Labels check box.
-
Select the Start at Row and Column option for the label.
-
Select how labels should be printed: One label per Carrier, One label per Guarantor, and Separate pages (per label).
-
Click Print to process the letter/label or Close to exit without printing.
-
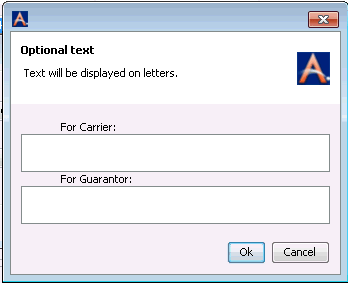
An Optional text windowOptional text window will display. This window provides the opportunity to include free text information in the letter that is specific to this letter run. If the letter is being sent to an Insurance Carrier, enter the free text in the field labeled For Carrier. If the letter is going to a Guarantor enter the free text in the field labeled For Guarantor.

-
If the information is being sent to the Insurance Carrier, this text is intended to be used to include information on an Alternate Contact; for example, the name and phone number of the collector assigned to the account who can be contacted for questions.
-
If the letter is being sent to the Guarantor, the information entered in this area will be appended to the end of the text in the letter.
-
-
The system will add a System Remark to the account for each transaction included in the Generate Letter option. The remark will include the standard information associated to all Remarks as well as which specific letter was sent, the amount of the transaction included, and the role (current responsible party) the letter was addressed to.