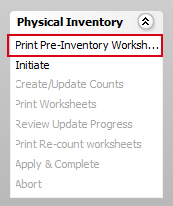
Print Pre-Inventory Worksheet
The Pre-Inventory Worksheets function is an optional feature of the Inventory Management module which allows users to print count worksheets for planning and resource needs without locking adjustment functionality in Inventory Management. If these worksheets are printed and then used by staff to count items, be sure that the parameters used to generate these worksheets are the same parameters used for generating the data entry screen in the Create/Update Counts process. The parameters used to print the worksheets will be printed in the header of the report.
To print a pre-inventory worksheet
From Inventory Management Sheet Bar, click Print Pre-Inventory WorksheetsPrint Pre-Inventory Worksheets under the Physical Inventory heading. The Worksheet Definition Editor – Create NewWorksheet Definition Editor – Create New dialog is displayed.

- Select from the following options to sort and organize your worksheets to best suit your facility’s needs:
Sort by: Select whether the report should sort the items included on the report in Name or Quick Code order.
Ordered by: You can group the worksheet, or order it based on certain criteria. This option will allow users to group the worksheet based on the following data.
- Category is based on the Inventory Category dictionary value assigned to the supply item in the Supply Resource dictionary.
- Department is based on the Inventory Department dictionary value assigned to the supply item in the Item Master.
- Location is based on the Supply Resource Location dictionary value assigned to the supply item in the Item Master.
- Type is based on the Supply Resource Type assigned to the supply item when it was first entered into the Supply Resource dictionary.
Note: Free text that will print on the worksheet.
Inclusion Options: Select or clear the check boxes for the following information based on what should print on the worksheet with each item. Information will only print on the worksheet if it has been included in the Item Master.
- Include Supply Location will list the supply item's assigned location on the supply line (as assigned in the Item Master).
- Include Bin/Shelf will list the supply item's bin/shelf information on the supply line (as entered in the Item Master per location).
- Include Cost will list the supply item's current Unit Cost on the supply line (as noted in the Item Master).
- Include QOH will list the current Quantity on Hand currently in stock for the item.
- Consignment Only will filter the report to ONLY include items that are on consignment (Consignment is set in the Item Master> Ordering Information tab).
- Include Consignment will allow items on consignment to ALSO be included on the report in addition to all other, non-consignment items.
- Non-Stock Items will allow items marked as non-stock to be included on the report (as set in the Supply Resource dictionary).
- Select All will either select all inclusion options or un-check all inclusion options.
- Available List: This list will display values based on the Order By selection noted above.
- Selected List: This list displays the values selected by the user from the Available List. To move items to the Selected List, click '>'. To move items back to the Available List, click '<' .
- Once you have chosen all of the options noted above click OK.
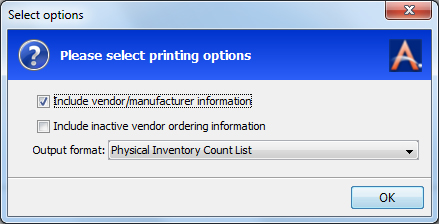
The Printing OptionsPrinting Options dialog is displayed. Select the desired values and click OK. We suggest that you leave these unselected and select the Physical Inventory Count List – Simple as the printed format.
You can then select an outputoutput method for the report.
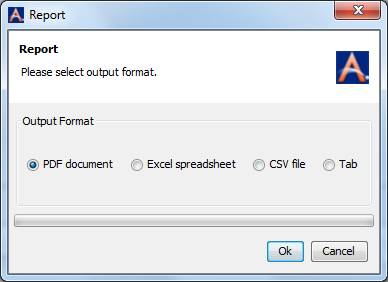
PDF: Will open the worksheet in a PDF document.
Excel: will open the worksheet in an Excel Spreadsheet.
CSV File: Will open the worksheet in a file using the program which is registered on the user’s computer as the default program to open/edit CSV type files.
Tab: Will open the worksheet in a report format in a new AmkaiOffice tab.
Inventory Management Topics
- About Inventory Management
- Purchasing
- Performing Physical Inventory
- Making Inventory Adjustment
- External System