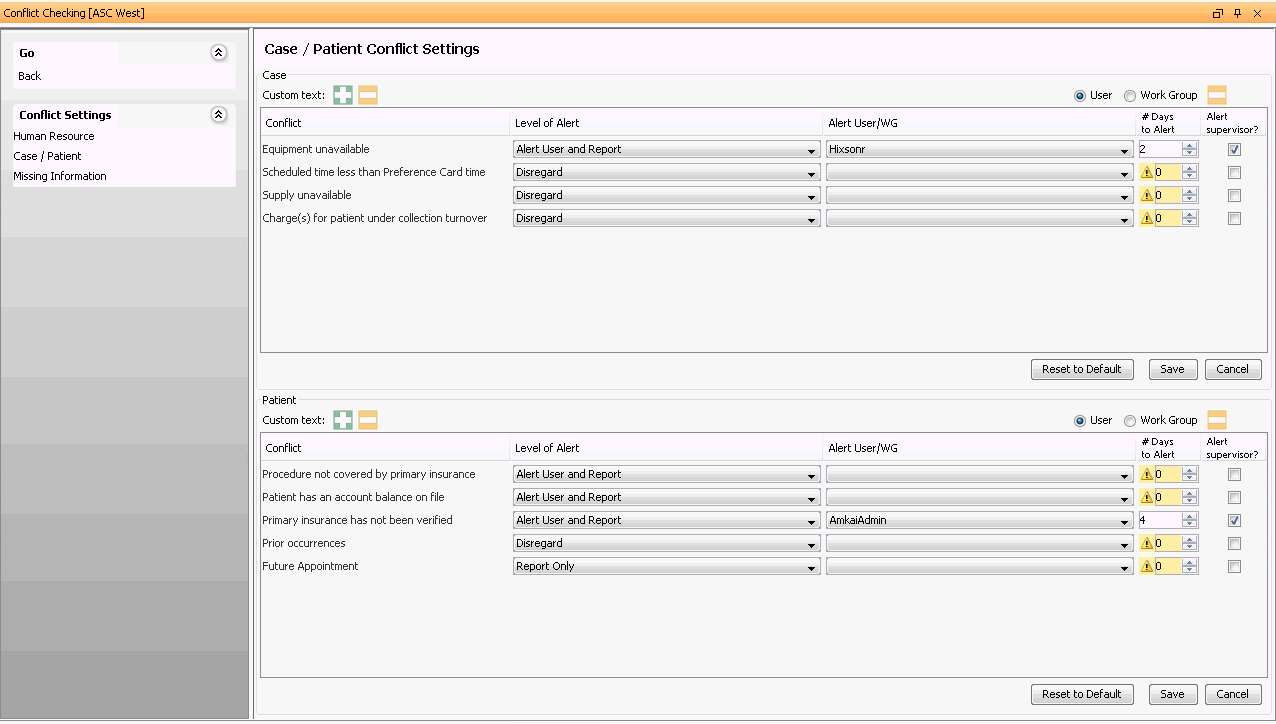
Configuring Conflict Settings for Case/Patient
Conflict Checking is a feature that helps users ensure the appointments they schedule meet certain parameters set by the Business Entity by marking key fields as Suggested or Mandatory. Conflict Checking alerts the user in real time during scheduling about issues related to the patient, physician or other personnel, or case that need correcting, or informs users that the appointment cannot be scheduled. For more information, see About Conflict Checking.
This topic provides instructions for configuring how Conflict Checking handles issues related to the case and/or patient.
To configure Conflict Settings for Case/Patient:
Open the Administration module.
Click the Conflict Checking Sheet Bar optionConflict Checking Sheet Bar option under the Configuration heading. The Conflict Checking Configuration screenConflict Checking Configuration screen appears.


From the Conflict Checking Sheet Bar, select Case/Patient under the Conflict Settings heading. The Case/Patient Conflict Settings screenCase/Patient Conflict Settings screen appears, with separate grids for the Case and the Patient. Each grid displays the following columns:

ConflictConflict (also known as a "Conflict Checkpoint")
Description of the conflict checks that may be automatically checked by the system. Also known as "Conflict Checkpoints."
-
Lists either the user or work group that should receive a system task if a conflict exists. If you leave this field blank, any user will receive the visual alert and pop-up upon saving indicating there is a conflict with this field. Lookup for this field will be controlled by the radio buttons above it:
User: Looks up active entries in the Passport dictionary.
Work Group: Looks up active entries in the Work Group dictionary.
(Optional) You can customize the wording for each Conflict Checkpoint to use terminology more familiar to your staff. (e.g. Change “Charge(s) for patient under collection turnover” to “New appointment cannot be scheduled until aging amounts are paid”) Click herehere to learn how.
Select the Conflict you wish to reword.
Click the green plus sign next to Custom Text above the Conflict Column.
Enter the new text.
To undo your changes and return to the original system text, click the minus sign icon.
Select the Level of Alert for each Conflict Checkpoint listed. The available Levels of Alert include:
-
This setting makes a field Mandatory for the user who is scheduling an appointment.

Alert User and ReportAlert User and Report (Select this option if you wish to automatically generate a system task for a user or work group.)
This setting makes a field Suggested for the user who is scheduling an appointment. A Conflict in this field is listed in the pop-up window that appears after the user clicks Save. You can generate an automatic task to resolve a Conflict in a Suggested field by selecting a user or work group to receive the task in the Alert User/WG column. The task will appear on the User Desktop.

Report OnlyReport Only (Select this option to alert the user to the conflict upon saving. Does not generate a system task.)
When the Conflict is encountered, the system will alert the user upon saving the appointment information and the Conflict will be reported in the Conflict Checking Report.
No visual indicator of a Conflict is displayed on the screen.
DisregardDisregard (Default setting)
When encountered, the system will ignore the Conflict.
To have the system automatically generate a task to resolve the Conflict assigned to a user or workgroup:
Select Alert User and Report or Report Only as the Level of Alert
Select either the User or Work Group radio button (above the grid), and select a specific User or Work Group from the drop-down list in the Alert User/WG column.
The task appears on the User Desktop for the selected User or Work Group members.
If you select Alert User and Report, and leave the Alert User/WG column blank, no system task will be generated, but any user who encounters a conflict on the field while scheduling will receive the pop-up notification of the conflict upon saving the appointment.
To remove a User or Work Group, select the item and click the minus sign icon.
- When you assign a due date to a task, the User or Workgroup you selected will receive a system-generated task with the due date. Supervisors will receive an follow-up e-mail Message notification if a task is not completed by the due date.
To assign a due date to a task:
Complete the process described in step 6 to auto-generate a system task for the Conflict.
Enter a value in the # Days to Alert field for the Conflict using the up and down arrows.
Select the Alert supervisor check box. If this option is not selected for a task, no due date will be displayed in the Conflict Checking Alert.
For each Conflict in both the Case and Patient sections, repeat steps 4 - 7.
Click one of the following buttons:
-
Apply the Conflict Settings you selected.
Reset to DefaultReset to Default
Clear all changes made during this session and return the page to “factory defaults."
-
Do not save the changes made during this session.
-
Return to the System Administration main page without saving your selections.
Related Topics
-