Editing a View
For more information about Views, see About Views.
To edit an existing View
-
Open the Scheduling module.
-
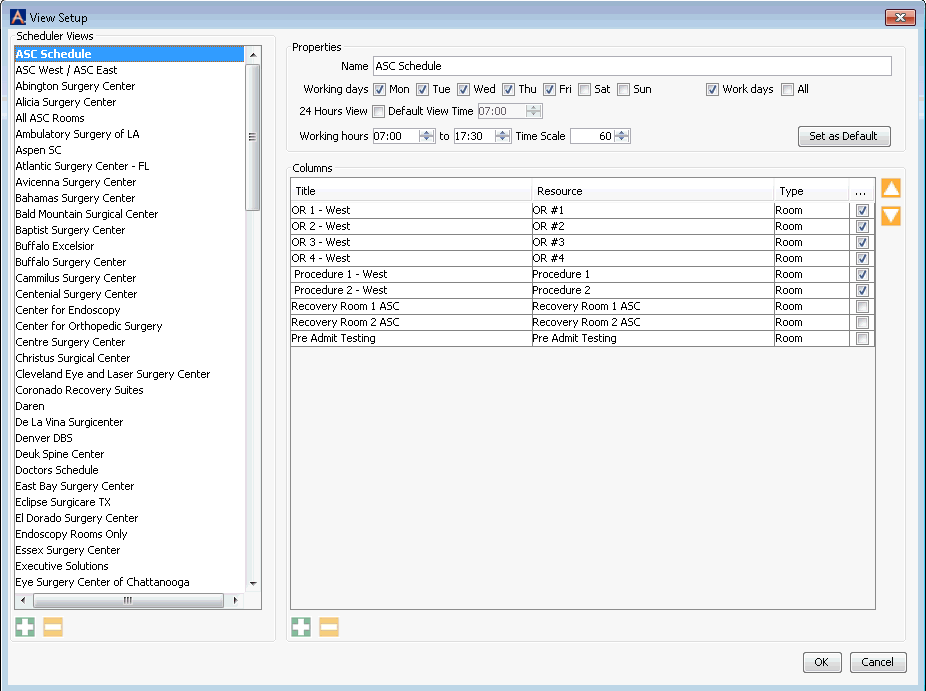
From the Sheet Bar heading Setup, select Views. The View Setup dialogView Setup dialog appears.

-
Existing Views are listed in the Scheduler Views pane on the left of the dialog. Details of the View that is currently selected display in the Properties section and Columns section on the right.
-
Select a View to edit from the Scheduler Views pane.
-
You can change the days of the week that will show on the Schedule when you View the Weekly or Weekly by day schedule in one of the following ways:
-
Select the Work days check box to show Monday through Friday.
-
Select the All check box to show Monday through Sunday.
-
-
Select the 24 Hours View check box to show an entire 24-hour period on the grid. This selection is normally used to schedule recovery time for facilities that provide 23 hour care. If you select 24 Hours View, the days of the week and working hours fields will no lock down and no longer be available to select. Define the hour at which the 24 hour day begins and ends using the Default View Time field. Use one of the following methods:
-
Type an hour in the free text Time Scale field.
-
Use the up and down arrows to change the hour in increments of one hour.
-
-
Work hours for your organization were configured when AmkaiOffice was installed, but you can select different work hours using one of the following methods:
-
Type starting and ending times in the free text Working hours fields.
-
Use the up and down arrows to change the start and end times in increments of one hour.
-
-
Change the increment of time in minutes that you want to show on the rows of the Schedule. For instance, if you select 30 in the Time Scale field, the rows of the grid will be divided into 30 minute intervals. Use one of the following methods:
-
Type a number of minutes in the free text Time Scale field.
-
Use the up and down arrows to change the Time Scale entry in five minute increments.
-
-
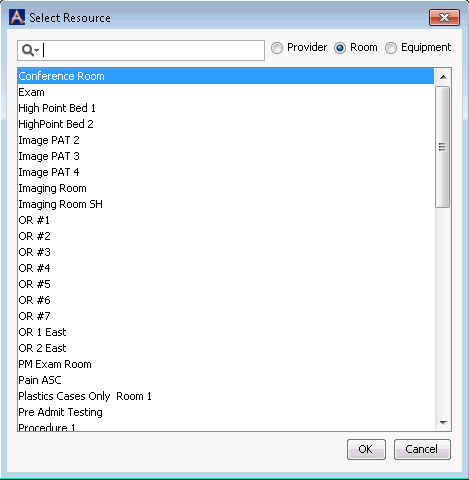
To add a column to the View, click the plus sign icon below the Columns field. The Select Resource dialogSelect Resource dialog appears.

-
Choose from one of the three radio buttons at the top of the dialog to add a Room, Provider, or piece of Equipment to the View.
-
Click OK. The Resource you added is now listed in the Columns field.
-
To add additional Columns, repeat steps 10 - 12.
-
To remove a column, select it and click the minus sign icon.
-
To position a column so that it is the first one on the left of the finished View, select it and use the up arrow to move it to the top of the list. The second column in the list in the dialog will be shown 2nd from the left on the finished View. Continue to position columns using the up and down arrows until they are in the order you need them.
-
Click Set as Default to designate this View as the one each user in your Business Entity sees upon first opening the Scheduling module.
-
Click one of the following buttons:
-
Saves your View, and returns to the Scheduling Grid.
-
Closes the dialog without saving your changes.
-