Update Turnover
The Update Turnover - Group option from the RCM Home Page Sheet Bar is used when you would like to modify information on a group of accounts that have already been turned over to collections.
You can make the following changes to items included in the turnover using the Update Turnover option:
You can change the expiration date of the conflict setting assigned.
If the charge was not originally written off, but you would like to write if off now, you can use the Update Turnover option to do this.
You can change RCM Status of the items.
You can move charges that were originally turned over to inside collections to an external collections agency.
You can create a file that you can use to transfer charges that were originally turned over to one external agency to a different external agency. You would manually notify the original agency that you are transferring the accounts.
To update a group of items previously turned over to collections
The RCM module opens to the RCM Home PageRCM Home Page. From the Sheet Bar, select Turnover > Update. The filter page for updating turned over chargesfilter page for updating turned over charges opens.
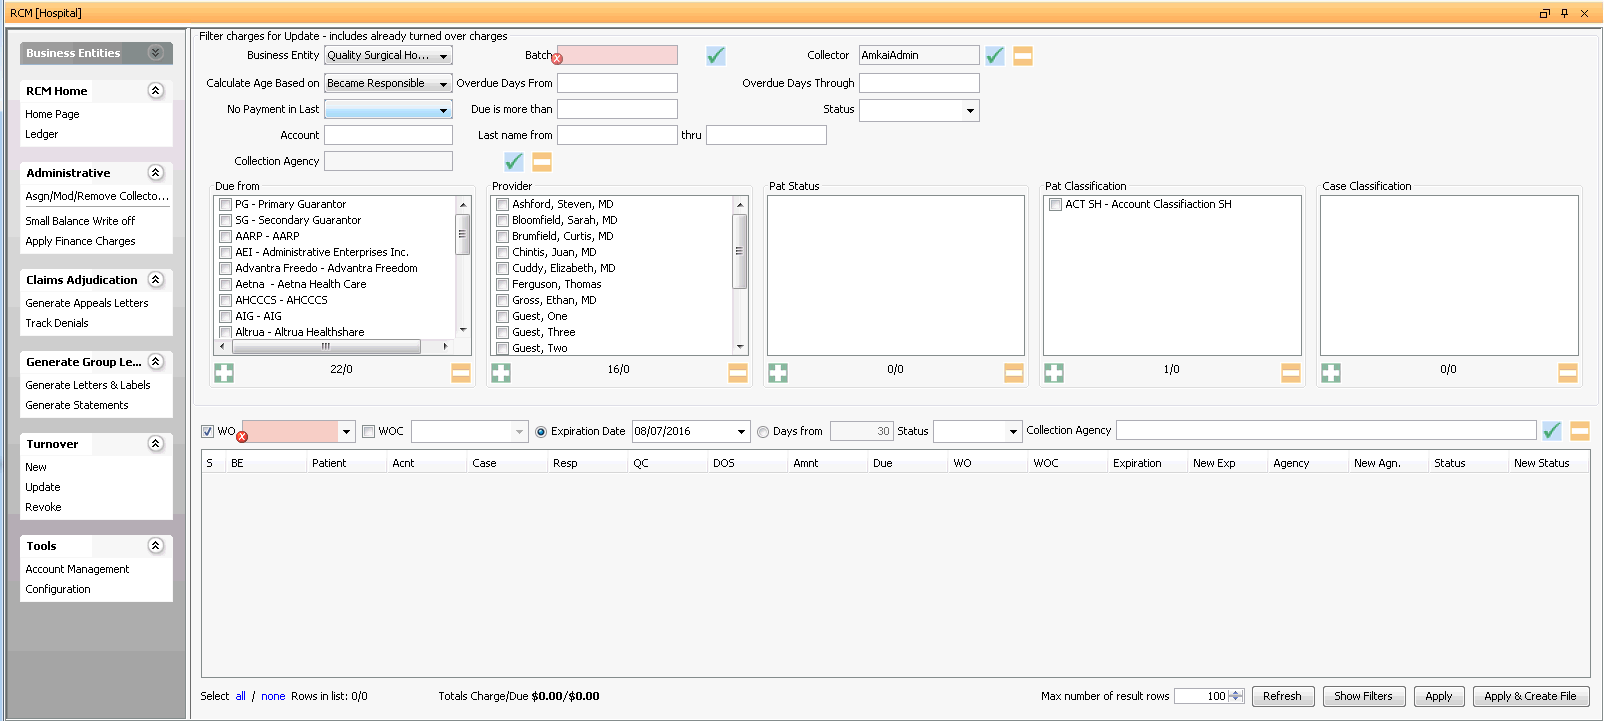
Use the filters on this page to pull to the screen the accounts that you wish to update. The filters for Update Turnover are very similar to those that are used for New Turnover. Click herehere to learn how to use those filters to select the group of items to modify. One additional field are available to filter accounts on this screen:
(Mandatory field) Business EntityBusiness Entity
Select the Business Entity you would like to use for the search . The system will default to the Business Entity you are currently accessing the RCM module from. If you have configured your RCM Module for Central Collections, each of the associated Business Entities attached to your database will be displayed in the drop down menu. If you are a single Business Entity or are not doing central collections, the current Business Entity name will appear as read-only in this window.
(Mandatory field) BatchBatch
Select or create a batch by clicking
 .
This will be the batch that will be used if transactions
are written off.
.
This will be the batch that will be used if transactions
are written off.-
Defaults to the User currently logged on to the workstation. Click
 to select a different Collector
or Work Group or use the delete button ( - ) to remove
the current Collector and leave the field blank.
to select a different Collector
or Work Group or use the delete button ( - ) to remove
the current Collector and leave the field blank. (Mandatory field) Calculate Age Based on Calculate Age Based on
Select the aging type to be used to determine the age of the charges/due amount:
Became Responsible (default): This would be the date the due amount was transferred or posted to the current role.
Transaction Date: Date of service
Overdue Days FromOverdue Days From
You may select a specific number of days, or leave the field blank. However, if the Overdue Days Through field has a date entered, this field will become mandatory.
Overdue Days ThroughOverdue Days Through
You may select a specific number of days, or leave the field blank. However, if the Overdue Days From field has a date entered, this field will become mandatory.
No Payment in LastNo Payment in Last
You may select a specific number of days, or you may leave this field blank. When you select a date, the system will look to see if a payment from any source has been applied to charges on the account in the date range.
Due is more thanDue is more than
Free text field to enter a minimum dollar amount that should be met in order for the charge/case/account to be included in the turnover. This field may be left blank.
-
If charges have been assigned a Status during the collections follow-up process, you can use this filter to sort for transactions with a specific Status. The field may also be left blank.
-
You can select one specific account using this field.
Last name from / thruLast name from / thru
Free text field you can use to search for a specific patient or group of patients, e.g. Accounts that begin with A thru G. Field may be left blank.
Level of TurnoverLevel of Turnover
Based on your selection from this drop down menu, the system will turn over a specific charge, or group of charges or all charges associated to the account.
Charge = turn over a specific charge that meets the selection criteria
Case = if any charge associated to the case meets the selection criteria turn over all charges for the selected case.
Account = if any charge associated to the account meets the selection criteria turn over all charges for the account.
The combo boxes enable you to further filter the group of accounts you wish to turn over:
-
You can filter the queue by current responsible party (Due from), Provider, Patient Status, Patient Classification, and/or Case Classification by selecting one more options from one or more of the 5 combo boxes shown.
Underneath each box, the system will display the number of items available to choose from in the box followed by the number selected. Example 12/1 displayed under Due from would indicate that there are 12 items in the list and 1 has been selected.
Use the
 icon
to add all of the items in the group or the
icon
to add all of the items in the group or the  to de-select
items already selected in the group.
to de-select
items already selected in the group.
-
Collection Agency: This option is available to select charges that have been turned over to a specific collection agency. Use the check mark to select an agency and the delete button to remove a selected agency from the field.
Use the following fields located just above the grid on the filter page to specify the updates you want to make the accounts that meet your filter criteria:
WO (Write off Journal Code): (Optional) This check box is selected by default. If you wish to write off the selected transaction(s), select the journal code that should be associated to the transactions at time of write off. If you do not wish to write off the transactions, deselect this check box.
(Optional) If you have set the conflict checkpoint for Collections Turnover to Alert User & Report, you can use one of the following two fields to change when that alert will be discontinued. Select either one of the following methods:
Expiration Date: You can specify a date here for the alert to discontinue (e.g. if you set 7-1-2017, the alert will discontinue on that date).
Days From: You can specify a number of days after the turnover for the alert to discontinue.
Collection Agency: (Optional) If you wish to turn the accounts over to a different collections agency, select an agency by clicking
 . To remove the selected agency click
 .
.
Click Refresh to pull the results to the screen. The Review Changes screenReview Changes screen appears. The grid on this screen displays all charges/amounts due that meet the criteria you selected. The grid columns display the updated information you selected on the previous screen. You can use the fields at the top of the Review Changes screen to change your choices. The choices will not take effect until you click Apply or Apply & Create in step 5 below.
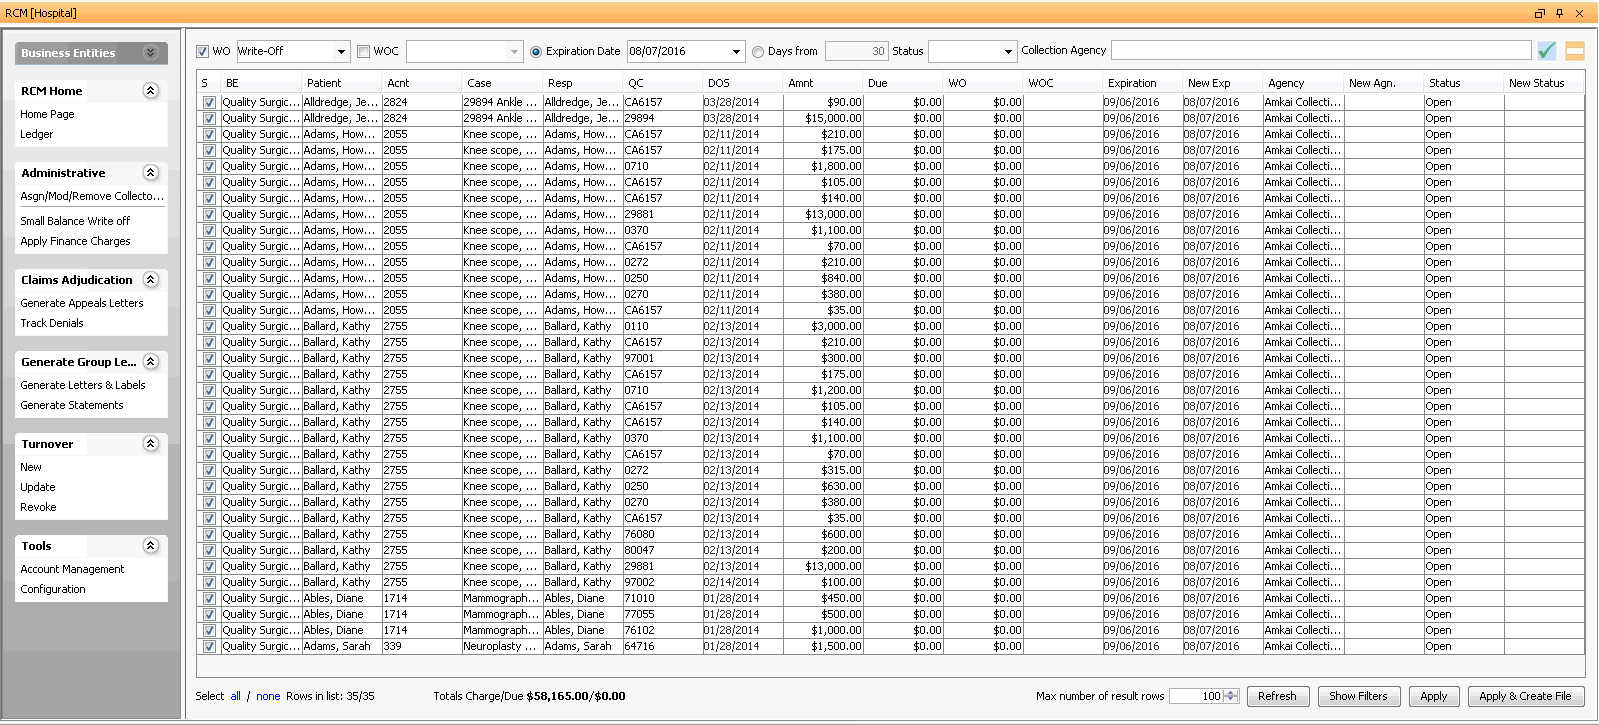
If you wish to remove a transaction from the modification, deselect the check box for that transaction in the S (Select) column. All items in the grid are selected by default. You can use Select All to select all items or Select None to deselect all items (bottom left of the screen). Click herehere to learn about the other columns in the Review Screen grid.
S (Select): Items checked will be included in the turnover. Default is selected.
BE: The Business Entity that the transaction belongs to.
Patient: Name of the patient; Last name, First name, Middle name, Title
Acnt (Account): Account number
Case: Case Description
Resp: Responsible party for the selected transaction
QC: Quick Code of the procedure/supply resource being turned over
DOS: Date of Service associated to the transaction
Amnt: Amount of the original transaction
Due: The balance remaining on the transaction
WO: The amount previously written off
WOC: Any write off amount being corrected
Expiration: Current expiration date assigned to the account
New Exp: New expiration date being assigned to the account
New Agency: Name of the collection agency that the transactions are being turned over to
Status: The current RCM Status that is assigned to the transaction
New Status: The status that will be assigned to the transaction following the turnover
The system will default to 100 rows. You can use the up/down arrows at the Max number of results rows field to increase or decrease the number of items to be included in the display.
After you have reviewed the transactions in the grid and are ready to apply your changes, click one of the following buttons:
Apply: A message appears asking if you wish to proceed. Click Yes to continue with the modification(s). Click No to abort the changes and return to the grid.
Note: The Apply button should only be used if you do not need to create a file to send to a collection agency.
Apply & Create File: Click this button to continue with the modifcation(s) and create the transaction file. The system will display a message asking if you wish to proceed. Click Yes to continue with the modifications. Click No to abort the modification and return to the grid.