Creating a Rule with Conditions
To create a rule with conditions, first add the conditions that define the group (consisting of one or more accounts), then assign a specific collector to the group.
To add the conditions
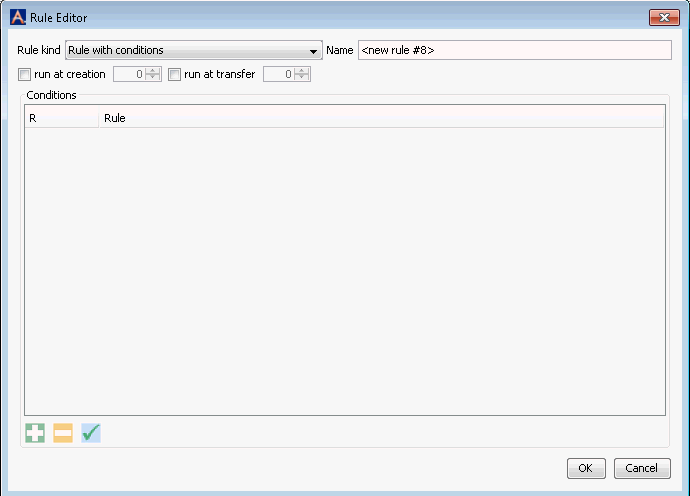
Select Rule with Conditions from the Rule Kind drop down menu on the Rule Editor. The Rule EditorRule Editor now displays additional fields that you can use to define the group:

- To add a condition, click
 . A line for
the new condition appears in the Conditions box.
 - Select the condition and click
 to define
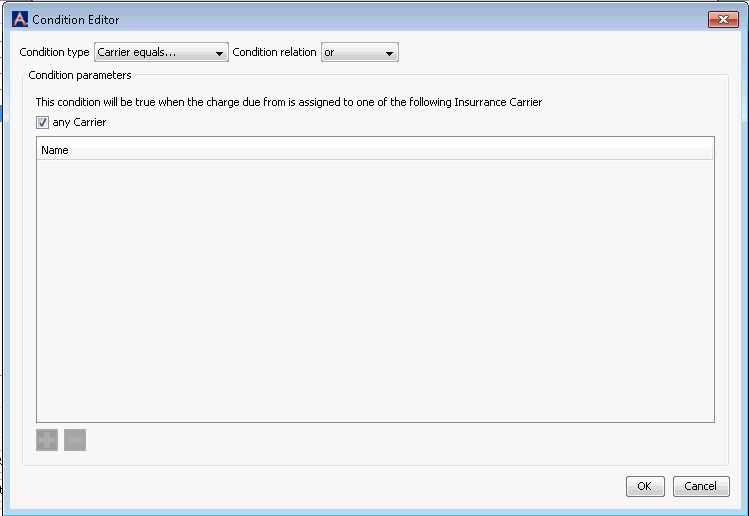
the condition. The Condition
EditorCondition
Editor appears.

- Select the Condition Type from the drop down menu. Your selection
here is what determines which accounts are included in the group.
Click the links for each condition type listed below to reveal
how to define the condition:
-
This condition will be true when the charge is due from one or more selected Insurance Carriers.
Any Carrier is the default selection. To select one or more specific carriers, deselect the Any Carrier check box.
Click
 to
add a carrier. The carrier name is now displayed
in the Condition Editor.
to
add a carrier. The carrier name is now displayed
in the Condition Editor.You can add additional carriers by selecting And from the drop down menu in the Condition Relation field and then adding more carriers. You can also select Or from this drop down menu and then select an additional carrier.
Click OK to save or Cancel to exit without saving.
-
This condition will be true when the charge is due from one or more Guarantors.
Select a guarantor type from the Due from drop down menu:
Due from Any (PG or SG)
Due from PG (Primary Guarantor)
Due from SG (Secondary Guarantor)
By default the And (s)he is Any Person check box is selected. To include a specific person(s), deselect this check box and click
 and select
one person at a time from the MPI (Master Person Index).
and select
one person at a time from the MPI (Master Person Index).The system displays the selected person(s) name and date of birth in the Condition Editor.
Click OK to save or Cancel to exit without saving
Last name begins withLast name begins with
This condition will be true when the first letter of the Patient's last name falls between the selected ranges.
Click
 to add a condition.
Any is the default (all patients are included). Deselect this check box to enter from /thru options (>= and =<). Remove the dash when entering letters in these free text fields. Example: entering >= a =< n will result in all accounts with last name beginning with a thru n assigned to the selected collector.
Click OK to save or Cancel to exit.
-
This condition will be true when the charge is assigned to a self-pay patient, and the patient is one of the following (one or more specific patients).
By default the Any Patient check box is selected. To select a specific person(s), deselect this check box and click
 and
select one person at a time from the MPI (Master Person Index).
and
select one person at a time from the MPI (Master Person Index).The system displays the selected person(s) name and date of birth in the Condition Editor.
Click OK to save or Cancel to exit without saving.
Physician equalsPhysician equals
This condition will be true when the charge's procedure is done by one of the selected Physicians.
By default the Any Physician check box is selected. To select a specific physician, deselect this check box and click
 and
select one physician at a time from the Physician Chooser
dialog.
and
select one physician at a time from the Physician Chooser
dialog.The system displays the selected physician(s) name(s) in the Condition Editor.
Click OK to save or Cancel to exit without saving.
Self pay patient equalsSelf pay patient equals
This condition will be true when the charge is assigned to a self-pay patient, and the patient is one of the following (one or more specific patients).
By default the Any Patient check box is selected. To select a specific person(s), deselect this check box and click
 and
select one person at a time from the MPI (Master Person Index).
and
select one person at a time from the MPI (Master Person Index).The system displays the selected person(s) name and date of birth in the Condition Editor.
Click OK to save or Cancel to exit without saving.
-
After adding the Condition Type and clicking OK in the Condition Editor, you are returned to the Rule Editor.
In the Name field, enter a descriptive name for the rule in this field.
Select one of the following options to specify when the system should assign the collector:
Run at creation: Set the collect at the time the charge is posted to the patient's account. Set the number of days between the date the charge is posted and the RCM Follow-up Date. (e.g. To set the RCM Follow-up Date at 45 days after the charge is posted, enter 45 in this field.)
Run at transfer: Set the collector when the responsibility for payment is transferred to the next responsible party. Set the number of days between the date the charge is transferred and the RCM Follow-up Date. (e.g. To set the RCM Follow-up Date at 45 days after the charge is transferred, enter 45 in this field.)
Click OK to save your new rule and return to the RCM Configuration Page.
Assign the collector:
- To add a condition, click
In the Collector column on the Assignment Rules table, click
 to open the Select Collector
dialog.
to open the Select Collector
dialog.Select a collector and click OK.
You are returned to the Configuration page.