Assign/Modify/Remove Collector
The Assign/Modify/ Remove Collector or RCM Date Sheet Bar optionAssign/Modify/ Remove Collector or RCM Date Sheet Bar option from the RCM Home Page enables you to transfer accounts currently assigned to one collector over to another, or to modify the RCM Follow-up Date on a set of transactions.

To navigate to the RCM Home Page, simply launch the RCM module.
Tasks
- Assigning
a collector and RCM DateAssigning
a collector and RCM Date (Use this procedure to
assign a collector and RCM date to accounts that have existing receivables
when your facility first starts using the RCM module. After RCM is
configured for the first time to automatically assign a collector
and RCM Date to all charges, you no longer need to use this procedure.)
To Assign a Collector and RCM Date
If you have existing receivables when the RCM module is first enabled, those accounts will not have a collector or RCM Date associated to them. In that case, you can use the following procedure to assign a collector and RCM Date to these transactions.
Note: After you the RCM module is enabled and configured for the first time using the Tools > Configuration option from the RCM Home Page Sheet Bar, you no longer need to manually assign collectors and RCM Dates, because the system will do it for you.
In the following example, we will assign a collector to transactions that are currently the responsibility of the Primary/Secondary Guarantor. You can modify this process to include additional filter options as needed. The process would be basically the same if you wanted to assign the collector/RCM date based on Carrier, Provider, Patient Status, etc.
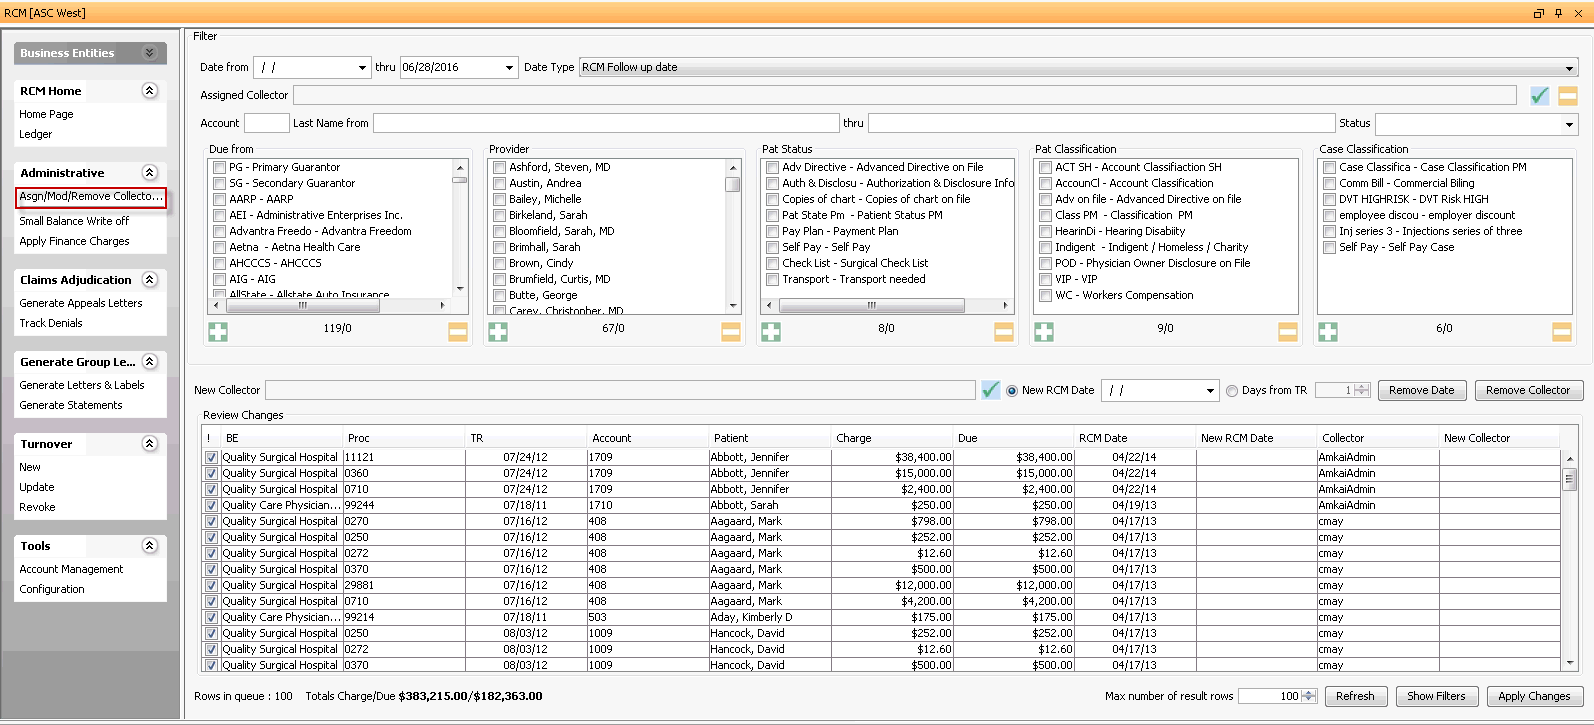
From the RCM Home Page Sheet BarRCM Home Page Sheet Bar,, select Administrative > Assign/Mod/Remove Collector....The bottom section of the Home PageHome Page now displays options for assigning/removing a collector and RCM date.


Use the Home Page filters with the following specific entries to select the group of accounts for which you wish to assign a collector and RCM date:
Date from / thru: Use the down arrow to display the calendar and select None.
Date Type: Select RCM Follow up date.
Assigned Collector: Click
 and select No
collector
assigned from
the drop down.
and select No
collector
assigned from
the drop down.Account: Leave blank.
Last Name from/thru: Leave blank.
Status: Leave blank.
Due from: Select PG- Primary Guarantor and SG Secondary Guarantor
Max number of result rows: Enter an amount here to display other than the default number of rows. Example 50. The default maximum is 100, and you can set a preference in the Preference Editor to increase the maximum.
Click Refresh.
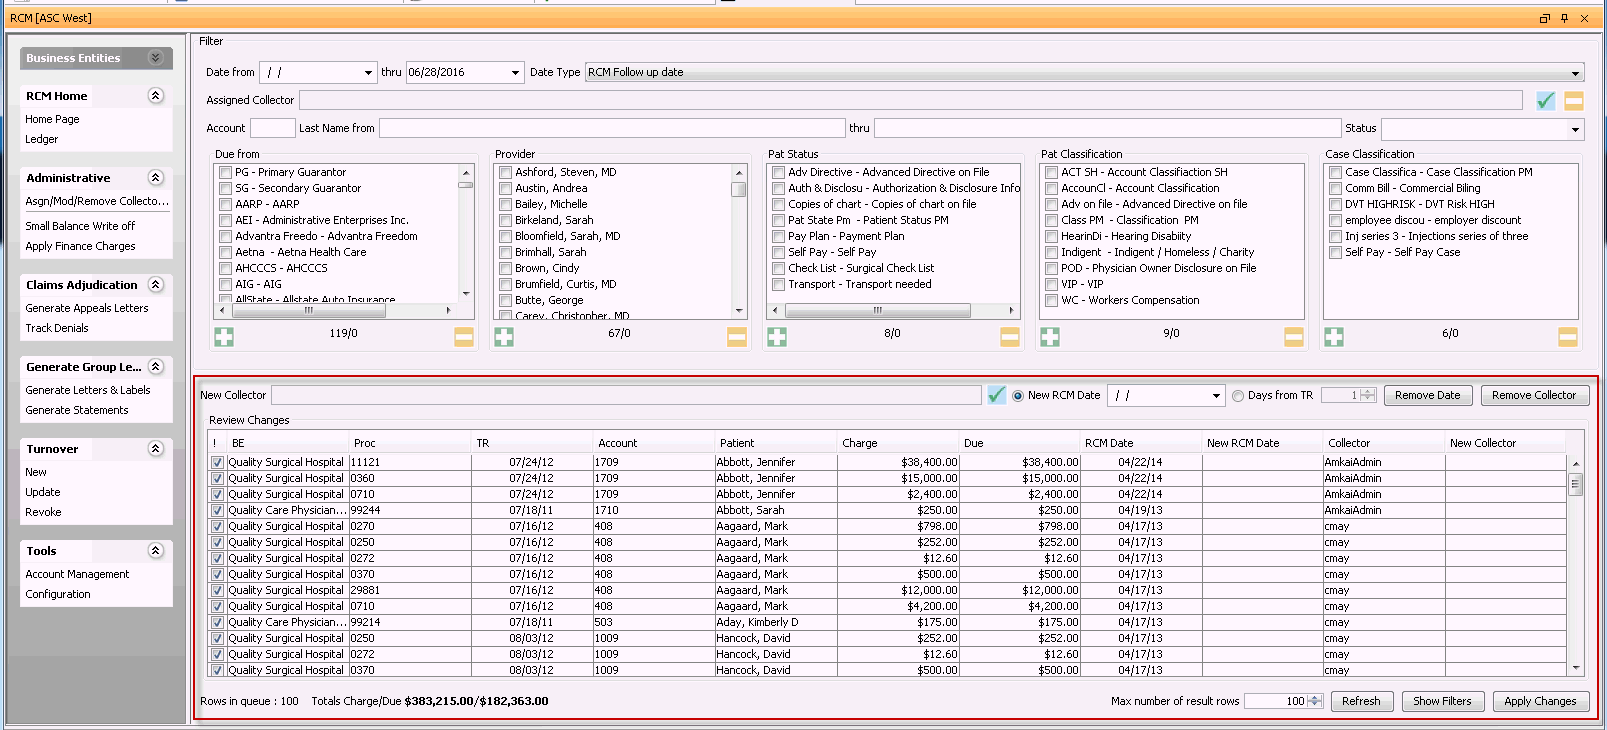
The system will display the accounts that meet the selection criteria in the Review Changes gridReview Changes grid.

Click
 next
to New
Collector and select
a collector or work group to assign to the accounts displayed
on the grid.
next
to New
Collector and select
a collector or work group to assign to the accounts displayed
on the grid.To set an RCM Date manually, do one of the following:
Click the radio button next to New RCM Date. Enter a date in the date field. The date must be a date in the future. This will be the initial action date assigned to the selected transaction(s).
To set the RCM Date based on the Days from TR (Transaction) click the radio button next to this option. Use the up/down arrows to indicate how many days from the transaction date you would like to set the RCM Date.
Click Apply Changes to save the New Collector and RCM Date for the selected transaction(s). The grid should then refresh to show no accounts on the Review Changes screen.
Since our query included a maximum of 50 items, there may be additional accounts that still need assignment. Repeat this process until the Review of Changes screen returns no results when you have entered the filters and clicked Refresh.
- Modifying
an existing RCM date and/or collectorModifying
an existing RCM date and/or collector
To Modify an Existing RCM Date and/or Collector
From the RCM Home Page Sheet BarRCM Home Page Sheet Bar, select Administrative > Assign/Mod/Remove Collecto.... The bottom section of the Home PageHome Page now displays options for assigning/removing a collector and RCM date.


The accounts displayed in the grid at the bottom of the screen will have RCM dates that are equal to or prior to the current date, and will all have collectors assigned. Adjust the Max number of result rows field as needed. The default maximum is 100, and you can set a preference in the Preference Editor to increase the maximum.
Use the Home Page filters to select the accounts for which you wish to modify the RCM Date and/or collector. Click herehere to learn more about the filters.
-
Defaults to blank to display all accounts with a Date Type prior to today's date. Enter or select a different date to limit your results.
-
Defaults to today's date. You can enter or select a new date to limit or extend the results.
-
RCM Follow-up Date - (default) - Select this Date Type to view accounts by their assigned follow-up date.
Transaction date - Select to view accounts by date of service
Post date - Select to view accounts by the date the charge was entered into the system
Assigned CollectorAssigned Collector
Click the check mark icon to select a collector, then click Refresh. The charges assigned to the selected collector will pull to the screen. Click the minus sign icon to clear this field.
-
Enter a specific account number to pull only that account to the queue.
Last Name From/ThruLast Name From/Thru
Enter the last name or initial of the last name or range of last names you would like to pull to the queue. Example: A thru N or Aaron thru North.
-
Select a workflow status of the accounts you would like to pull to the queue. Your facility can define your own statuses using the RCM Status dictionary in Administration. Typical Statuses include:
Appealing
Check in Progress
In-progress
Open
Paused
Review
Status Pending
The Status of an account in the queue is set as the account is worked from the RCM Ledger. Any status other than Open indicates the account is being worked by an individual collector or a member of a Workgroup.
-
You can filter the queue by current responsible party (Due from), Provider, Patient Status, Patient Classification, and/or Case Classification by selecting one or more options from one or more of the 5 combo boxes shown.
Underneath each box, the system will display the number of items available to choose from in the box followed by the number selected. Example 12/1 displayed under Due from would indicate that there are 12 items in the list and 1 has been selected. All items are selected by default.
Use the
 icon
to add all of the items in the group or the
  to
de-select items already selected in the group.
-
In the Assigned Collector field, use
 to
select a specific collector/workgroup whose accounts
you would like to assign to a new collector/workgroup.
to
select a specific collector/workgroup whose accounts
you would like to assign to a new collector/workgroup.Refresh: Once all of the filters have been set click Refresh to display the accounts that meet your selection criteria.
The system will display the accounts that meet the selection criteria on the Review Changes screenReview Changes screen.

To assign a new collector to the selected transaction(s):
Click
 next to the New
Collector
field and select the
collector/workgroup you wish to assign.
next to the New
Collector
field and select the
collector/workgroup you wish to assign.Your selection will appear in the New Collector field in the Review Changes screen.
To assign a new RCM Date:
To set an RCM Date manually, click the radio button next to New RCM Date. Enter a date in the date field.
The date must in the future.
The date entered will display in the New RCM Date field.
To set the RCM Date based on the Days from TR (Transaction), click the radio button next to this option.
Use the up/down arrows to indicate how many days from the transaction date you would like to set the RCM Date.
The date entered will appear in the New RCM Date field.
Click Apply Changes to save the New Collector and RCM Date for the selected transaction(s). The grid will now refresh to show no accounts in the Review Changes screen.
Since our query included a maximum of 100 items there may be additional accounts that still need assignment. Repeat this process until the Review of Changes screen returns no results when you have entered the parameters and clicked on Refresh.
NOTE: the New Collector and New RCM Date options can be used together or separately as needed. Simply select the new collector/workgroup or select a new RCM date and click Apply Changes to assign the new collector and/or RCM Date to the selected transactions.
- Removing
an existing RCM date and/or collectorRemoving
an existing RCM date and/or collector
To Remove an Existing RCM Date and/or Collector
From the RCM Home Page Sheet BarRCM Home Page Sheet Bar, select Administrative > Assign/Mod/Remove Collecto.... The bottom section of the Home PageHome Page now displays options for assigning/removing a collector and RCM date.


The accounts displayed in the grid at the bottom of the screen will have RCM dates that are equal to or prior to the current date, and will all have collectors assigned. Adjust the Max number of result rows field as needed. The default maximum is 100, and you can set a preference in the Preference Editor to increase the maximum.
Use the Home Page filters to select the accounts for which you wish to modify the RCM Date and/or collector. Click herehere to learn more about the filters.
-
Defaults to blank to display all accounts with a Date Type prior to today's date. Enter or select a different date to limit your results.
-
Defaults to today's date. You can enter or select a new date to limit or extend the results.
-
RCM Follow-up Date - (default) - Select this Date Type to view accounts by their assigned follow-up date.
Transaction date - Select to view accounts by date of service
Post date - Select to view accounts by the date the charge was entered into the system
Assigned CollectorAssigned Collector
Click the check mark icon to select a collector, then click Refresh. The charges assigned to the selected collector will pull to the screen. Click the minus sign icon to clear this field.
-
Enter a specific account number to pull only that account to the queue.
Last Name From/ThruLast Name From/Thru
Enter the last name or initial of the last name or range of last names you would like to pull to the queue. Example: A thru N or Aaron thru North.
-
Select a workflow status of the accounts you would like to pull to the queue. Your facility can define your own statuses using the RCM Status dictionary in Administration. Typical Statuses include:
Appealing
Check in Progress
In-progress
Open
Paused
Review
Status Pending
The Status of an account in the queue is set as the account is worked from the RCM Ledger. Any status other than Open indicates the account is being worked by an individual collector or a member of a Workgroup.
-
You can filter the queue by current responsible party (Due from), Provider, Patient Status, Patient Classification, and/or Case Classification by selecting one or more options from one or more of the 5 combo boxes shown.
Underneath each box, the system will display the number of items available to choose from in the box followed by the number selected. Example 12/1 displayed under Due from would indicate that there are 12 items in the list and 1 has been selected. All items are selected by default.
Use the
 icon
to add all of the items in the group or the
  to
de-select items already selected in the group.
-
In the Assigned Collector field, use
 to
select a specific collector/workgroup you would like
to remove.
to
select a specific collector/workgroup you would like
to remove.Refresh: Once all of the filters have been set click Refresh to display the accounts that meet your selection criteria.
The system displays the accounts that meet the selection criteria on the Review Changes screenReview Changes screen.

The current collector/workgroup and the RCM Date are displayed in the grid.
To Remove the current RCM Date:
Click

The New RCM Date field will now display as --/--/--.
To remove the current collector/workgroup:
Click

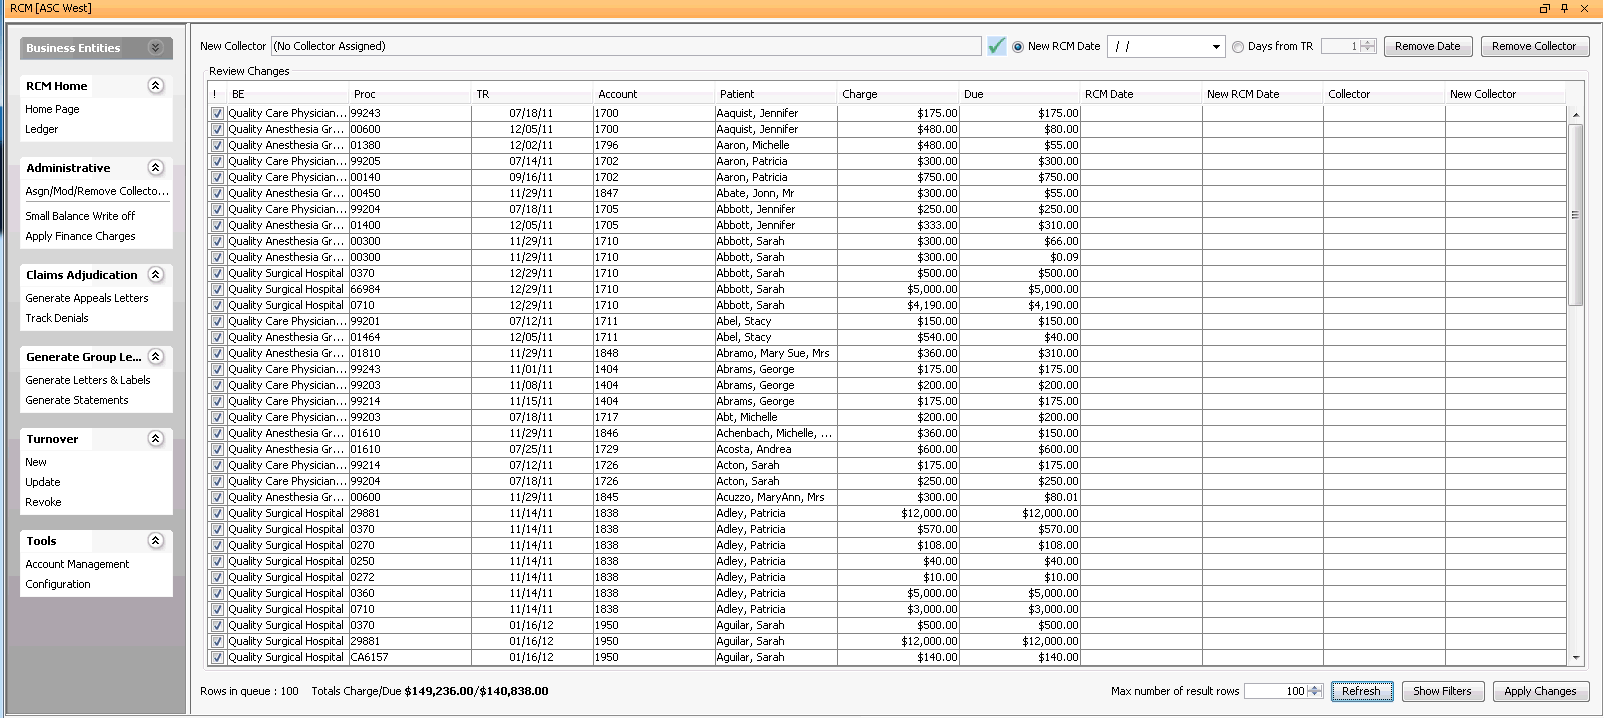
The New Collector field will now display as No Collector Assigned.
Click Apply Changes to save the changes for the selected transaction. The grid will now refresh to show no accounts in the Review Changes screen.
Since our query included a maximum of 10 items, there may be additional accounts that still need modification. Repeat this process until the Review Changes screen returns no results when you have entered the parameters in the search filters and clicked Refresh.