Creating Patient Payment Plans
With the appropriate permissions, you can set up or modify Payment Plans at any time after the case is added to the Scheduling Module in AmkaiOffice for the Business Entity, as long as the case status is not Cancelled.
You can create or modify a payment plan by launching the Payment Plan Details dialog in either of the following ways:
-
From the Patient's Demographics screenFrom the Patient's Demographics screen
Cases with a currently active Payment Plan will have a link in the Pay Plan column on the Cases table on the Demographics screen that reads View/Edit.
Cases without a Payment Plan will have a link that reads Setup in this column. Click on this link to create a new Payment Plan and complete the necessary fields on the Payment Plan Details dialog.

-
From the Estimated Revenue screenFrom the Estimated Revenue screen
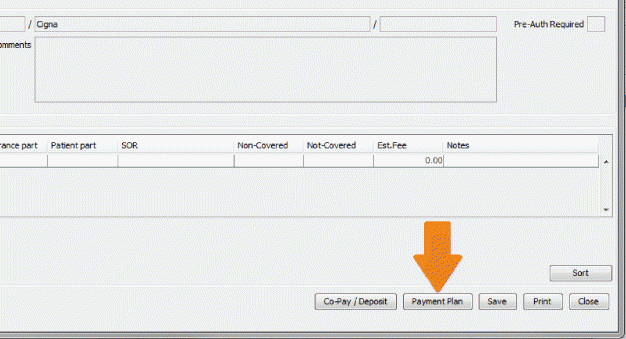
From the Estimated Revenue screen, click the Payment Plan button to open the Payment Plan Details dialog, and complete the fields needed to create the payment plan.

To learn more about Patient Payment Plans, see Implementing and Using Patient Payment Plans.
To create a Patient Payment Plan
-
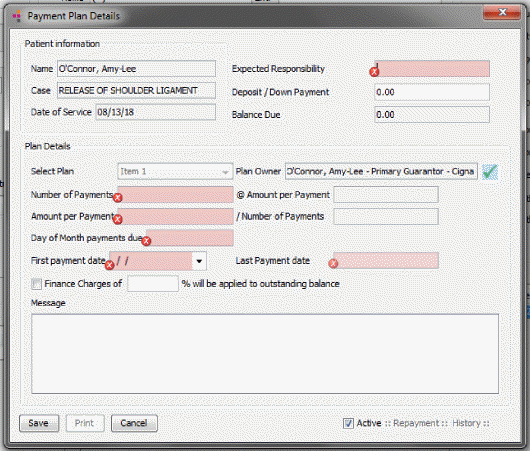
Launch the Payment Plan Details dialogPayment Plan Details dialog from either the Demographics screen or the Estimated Revenue screen. See instructions above.

-
In the Expected Responsibility field (required), enter the patient responsibility amount on which to base the Payment Plan. Values may prefill to this field based on several factors related to the patient's case. Click herehere to see those factors. You can type over the value in this field.
Patient/Guarantor Due Information Available for the Case
Value Pre-Filled for Expected Payment
None
Blank
Estimated Revenue only
Estimated Revenue > Case Total Amount
Posted Charges due from Insurance Only, no PR (patient responsible) amount documented
Blank
Estimated Revenue and Posted Charges due from Insurance Only, no PR amount documented
Estimated Revenue > Case Total Amount
Posted Charges due from Insurance Only, with a PR amount documented, with or without Estimated Revenue
PR amount totals for all charges for the Case
Posted Charges due from a Guarantor, with or without Estimated Revenue
Total Due Balance from the Guarantor for the Case
-
Enter any deposit or down payment made at plan setup in the Deposit / Down Payment field.
-
In the Balance Due field, the system displays the amount on which the payment plan will be based. To derive the balance due, the system calculates the difference of the Expected Repayment amount less the Deposit/Down Payment amount.
-
In the Plan Owner field, the system defaults to the Primary Guarantor for the first billing group associated to the case. To select a different guarantor from the case's billing groups, click the check mark icon.
-
You can either enter a total number of payments or an amount per payment and the system will automatically calculate the other value. (required)
-
For example, for a Balance Due of $29,131.00, if you enter $250 in the Amount per Payment field, the system calculates the number of payments to pay off the balance at 117 and autofills the /Number of Payments field with 117.
-
If instead, you enter the number of payments desired in the Number of Payments field, the system automatically divides the Balance Due evenly into that number of payments and displays the value @Amount per Payment field.
-
If the Payment Plan is set up such that the amount due is not distributed evenly among all payments, the final payment amount shown on the Payment Plan Printout will reflect the actual remaining amount due, instead of the established payment amount.
-
-
Either enter a number between 1 and 31 in the Day of Month Payments Due field, or select a First Payment Date using the calendar drop down. (required)
-
If you enter “30” or “31” in the Day of Month Payments Due field, the system will use the last day of the month as the payment date for any months that do not have 30 or 31 days respectively. The system will autofill the First Payment Date as the next day of the month that matches the payment due date that is at least 3 weeks after the Case Date of Service. You can edit the date using the calendar drop-down.
-
The Day of Month Payments Due field will auto populate if the First Payment Date is selected first.
-
-
Last Payment Date field
-
The system will automatically calculate the last payment date based on the First Payment Date and the number of payments.
-
This field will automatically adjust based on changes made to the number of payments the Payment Plan consists of, or based on changes to the Day of Month or First Payment Date.
-
-
To enable Finance Charges on the plan, check the Finance Charges checkbox. If this field is set to checked in Preferences > Payment Plans, it will pre-fill when setting up a new Payment Plan. You may edit any pre-filled values.
-
Finance Charges (%) field
-
You can enter the Finance Charge percentage agreed upon as a part of the Payment Plan.
-
If this field is set to a specific value in Preferences > Payment Plans, it will pre-fill when setting up a new Payment Plan.
-
You may edit or remove any pre-filled values. You can enter a new amount, or clear the field using the Delete or Backspace keys, or by right-clicking in the field and selecting Clear from the menu.
-
-
Message field
-
You can enter a message to associate to the Payment Plan. To accommodate longer messages, the plan messages can print to multiple pages.
-
Payment Plan messages print on the Payment Plan Details Printout and on Patient Statements.
-
If this field is set in Preferences > Payment Plans, it will pre-fill when setting up a new Payment Plan.
-
You can edit any pre-filled message.
-
You can use Copy (CTL + C) and Paste (CTL + V) to enter text into the Message field.
-
-
Click the links below to learn more about the options along the bottom of the Payment Plan Details dialog:
-
Click the Save button to save the Payment Plan.
-
Click the Print button to create a PDF format overview of the Payment Plan settings.
-
Click the Cancel button to back out of the Payment Plan screen without saving any changes.
-
-
-
A check in the Active checkbox indicates that the Payment Plan is in effect for the patient's case.
-
When unchecked, the Payment Plan is considered Inactive.
-
The Active box will default to checked when creating a new Payment Plan.
-
-
-
-
-
This link is only available on already configured Payment Plans.
-
The Repayment link displays a list of Payments made against this Payment Plan.
-
-
-
-
-
This link is only available on already configured Payment Plans.
-
The History link displays a list of changes made to this Payment Plan and who made them.
-
-
-