Physical Inventory Recommended Practices
To keep accurate quantity and value of supplies on hand, it is important to periodically perform a physical inventory count for the items in your facility. AmkaiOffice's physical inventory feature allows you to lock down adjustments of inventory in the system, and complete a count of all items either by item location, item type, supply category, or by department. The system will provide you with printable worksheets, options to organize the count specific to your facility, and reports to help ensure your count is as accurate as possible.
This document provides guidelines for completing a successful physical inventory. These suggestions are intended to help point out how to get the best outcome from the system; however, your individual facility's policies and procedures should also be considered when performing a physical inventory.
This document will accommodate facilities on any version of AmkaiOffice; however, if a feature is only available as of a specific version that will be noted in the documentation.
For complete information on all Inventory features, see About Inventory Management. For complete instructions for performing Physical Inventory, see About Physical Inventory.
Getting Started
Accurate information
To prepare, make sure every item has a vendor, an accurate unit cost associated to it in the Item Master, and has the most appropriate usage unit associated in the Supply Resource dictionary.
The Supply Resource Items report run in layout Detailed with Vendors, can provide this information. This report will show you vendor information, unit cost, and usage unit, along with other details such as whether an item is serialized or has an expiration date.
If you plan on counting by location, you will want to be sure your locations are accurate and you have set every item to the correct default location.
Run the Item by Location report to ensure accuracy.
Inventory lock down
Once a physical inventory has been initiated, the system will lock the module to prevent any changes to the quantity on hand. Purchase Orders can no longer be received, cases can no longer be depleted, and manual adjustments will not be possible until Apply & Complete has been successfully performed in the Inventory Management module.
While it is possible to continue to post charges for billable items during the physical inventory if you have consignment items that rely on creating and receiving purchase orders at time of use to obtain pricing information, this process may be interrupted for the duration of the physical inventory.
Purchase Order reconciliation
Verify all purchase orders that can be closed are received or reconciled. This will minimize the possibility of counting items that you later receive, which can incorrectly inflate the quantity on hand.
Depletion of inventory
As noted above, once the physical inventory count is initiated, further depletion of inventory on cases will not be permitted. If your facility depletes cases, be sure to complete all depletions and adjustments of inventory prior to initiating the physical inventory.
Run the CDM report Depletion Status with the status set to “Cases that need to be depleted.” If you find cases that have items that require an update to supplies on hand this can be done using the Group Deplete option or by accessing the individual accounts and clicking on Deplete Inventory.
If your facility does not deplete, it will be important to remember that if cases with dates of service prior to the inventory count are depleted after the physical is committed, the counts may be adversely affected. Also, if you have elected to turn on the “Auto Deplete” option the system will attempt to deplete these cases once the physical inventory has been completed which can also adversely affect your new quantity on hand.
Print Pre-inventory worksheets
It can be helpful in the preparation process to print out “count sheets” to help organize your process and count teams. This may also point out where attention may be needed prior to your count day.
Print labels
To help staff clearly identify the items they will be counting, it may be helpful to print labels for your locations. To print labels access the Print Label option in the Material Management module and select the label layout that best meets your facility's needs.
Testing the system
If you are new to the physical inventory process or would like to test the process, we strongly recommend performing a physical inventory count on your facility's Test Server prior to completing the count within the production environment.
Some Things to Consider
Count by usage unit
Your physical count is going by your usage unit, for example, how many each-es are in a box, assuming each is the unit of measure for the item when used on a patient. The usage unit is set in the Supply Resource dictionary.
Serial numbers and expiration dates
Items that are serialized or are linked to expiration dates in the Supply Resource dictionary will require a number or date be added/confirmed during the physical inventory process. Be sure your count teams include this information in their worksheets.
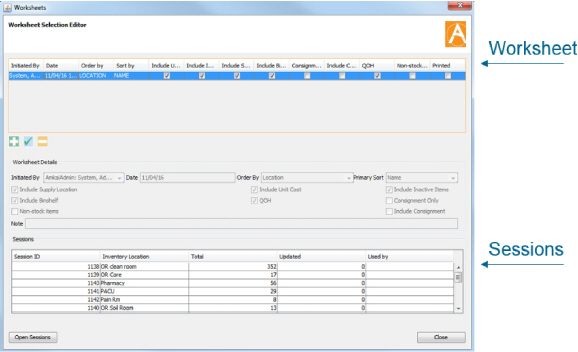
Worksheet vs session
Worksheet: an entry in physical inventory that includes supply resource items categorized by item location, type, supply category, or department, depending on the set up selected. There should never be more than one existing worksheet at any one time. Multiple users can work within one worksheet to complete the physical inventory.
Session: an entry located within a worksheet that represents either a specific item location, type, supply category, or inventory department, where users update the supply resource count. It is typical for multiple sessions to be included in a worksheet. Multiple users can access the session, but only one user can be in a session at one time.
Organizing your Worksheet
Decide how you would like to organize the count. By location, category, type, or department.
Configuration settings
Roll Up: an option used with Physical Inventory that when checked will take all information entered at the location level and total the QOH into the one location designated as the Default Location for each item counted. The total QOH will be reported at the default location only and the QOH for the other locations will be zero.
The default location is generally used when receiving and depleting inventory. This option is often used when facilities are mainly concerned with the quantity on hand rather than the actual location of each item.
If counting by location:
Check your Inventory Configuration, if you have the “Roll to default” option selected, any item that has more than one location MUST be included in the count or the count will not be correct. In addition, you should make sure to include every location as a session in your worksheet.
If your facility has decided to use a generic default location to streamline the receiving and depletion process, you must include the generic location in the worksheet and count every item in this location as 0. This way, when all the other locations roll up into the default generic location, your numbers will not be duplicated.
If you have roll up set, and are using true locations, make sure the item's true default location is counted accurately to be a part of the total sum for that item
If counting by category:
If counting by category, you can choose to not include certain categories as sessions in your physical count, ie, instruments, equipment, or consignment.
Currently, counting by category is an option only to be used if you have one location per item. Details will not allow for location quantity modification at this time.
If counting by type:
If counting by type, you can choose to not include certain categories as sessions in your physical count, ie, instruments and equipment.
If these items are located in different locations and you have Roll to Default set in your configuration settings you will need to be sure that the New Quantity on Hand is entered correctly in the details icon or the count may be inflated.
Checkbox selections
The checkbox options will default per the settings specified by AmkaiOffice. It is important to understand which supplies will be included or excluded by the checkbox selections made.
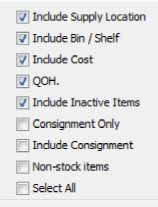
The following selections will default to selected: Include Supply Location; Include Bin/Shelf; Include Cost; QOH; Include Inactive Items.
If you would like to include all active items in the physical count worksheet, it is recommended to deselect Include Inactive Items, and select Include Consignment.
Selecting Non-stock items will only include non-stock items in the count and no other item. To account for non-stock, adjust the quantity on hand prior to, or after, the physical count.
Review
Review update progress
As your staff is working to input the new counts, it may be helpful to review their progress and see where there are variances between the quantity on hand in the
system and what has been counted. Run the Review Update Process option in the physical inventory module to obtain this information.
Print re-count worksheets
Once all sessions have been counted and new quantity on hand numbers have been entered, the module provides the option to print recount sheets to assess the validity of the data entered. Recount sheets can be created by selecting individual items or by letting the system randomly select a user-specified percentage of the total number of items counted.
Apply & Complete
Apply & Complete is the last step to confirming your physical inventory count. The system will automatically warn you if you've skipped over any items. If this happens, the easiest way to determine what was missed it to take a look at total numbers column for each session, and make sure they match the updated numbers column. Any session that does not match, reopen the session and sort the column New QOH in ascending order to see what was missed.
The system will warn you if you have failed to enter all necessary information such as a serial number or expiration date, if an item requires one.
Once you have updated all items, run the Value of Supplies on Hand inventory report to make sure no numbers were entered incorrectly and no item cost seems incorrect. If you notice that an item was entered incorrectly, use manual adjustment to fix the issue.
The Value of Supplies on Hand report will not include a change in
quantity/value until midnight the following day. For best results, run the report Through the date following the day the physical inventory was performed.
To compare your physical inventory to actual variance run the Adjustment History report and select the Transaction Codes set in your Inventory Configuration module for physical inventory positive adjustment and negative adjustments.
Helpful Tips
If upon review of quantity and value on hand, you find a price looks incorrect, for a new item only, you can make the change in supply resource and the new price will be reflected when go back into your count, if not, you will have to wait until the physical count is completed or aborted to make any adjustments.
Any item that had
zero quantity on hand and an updated quantity is added, the system will
set a value for the cost of the item. This applies to AmkaiOffice versions
3.16.2 and higher.
The system will use the price/usage unit for the first vendor listed in
the item master as the cost of the quantity on hand.
For clients on AmkaiOffice version 3.16.2, if you receive an error during the physical inventory process that says “Detail New QOH does not match New QOH for total,” there are 2 methods of resolution.
Enter a new quantity on hand for the item(s) that generated an error of zero (0). Continue the physical inventory and apply. Once the physical inventory is complete, perform a manual adjustment on those specific items to adjust the QOH accordingly.
Perform a full physical inventory by setting every item in the system to zero. Apply and complete. Then perform a second physical inventory with true counts to replace the zeros. (This is recommended for clients who allow for negative quantity on hand, to help adjust quantities back up to zero).
Please contact support at 866-265-2434 for any additional information when performing a physical count.