Running a costing report for a group of cases
To run a costing report for a group of cases
Open the Cost Management module. The Cost Management screenCost Management screen appears. The pane on the right-hand side of the screen refers to group costing.
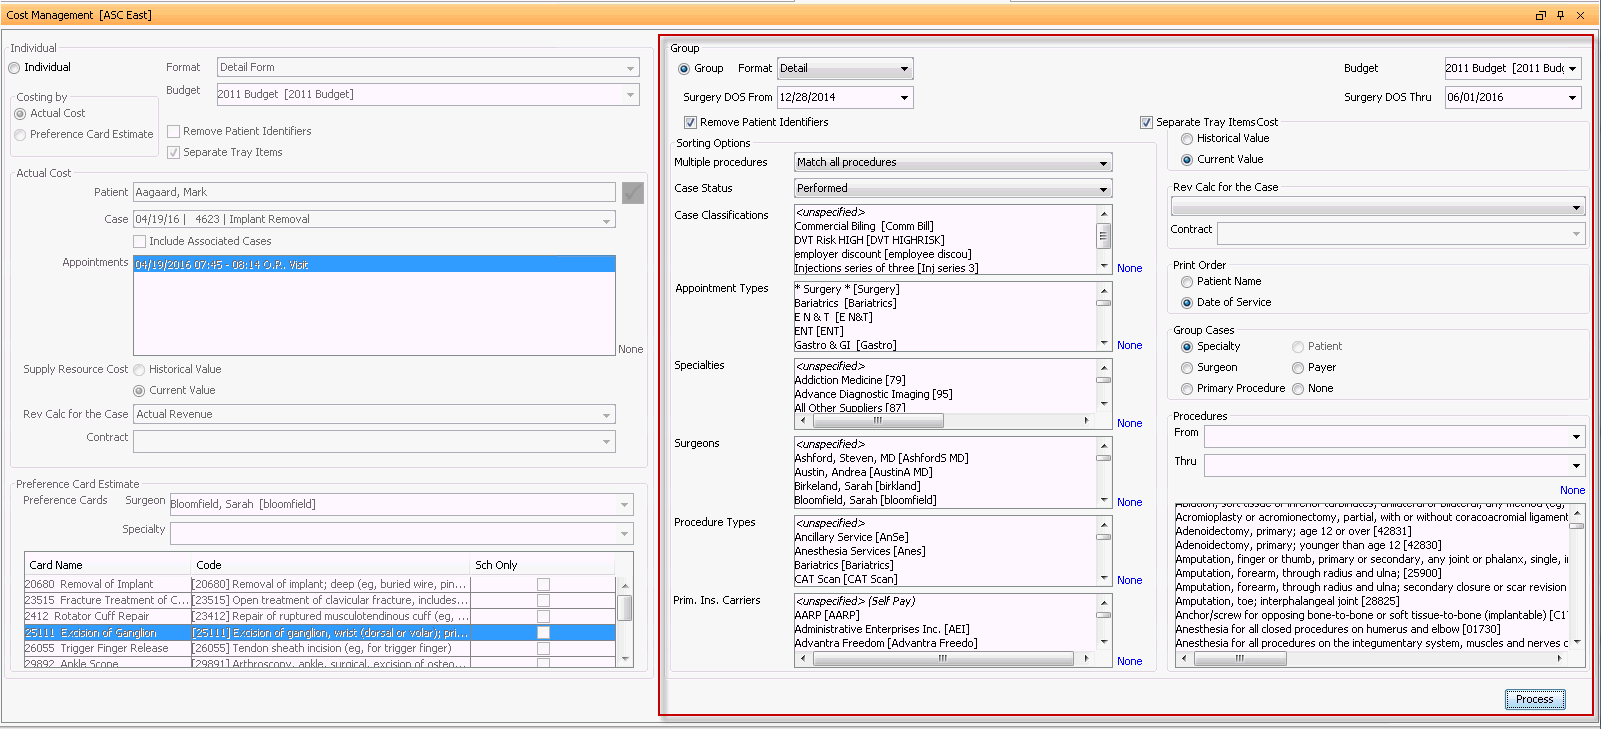
Select the Group radio button.
Select the level of detail to be included on the report from the Format field.
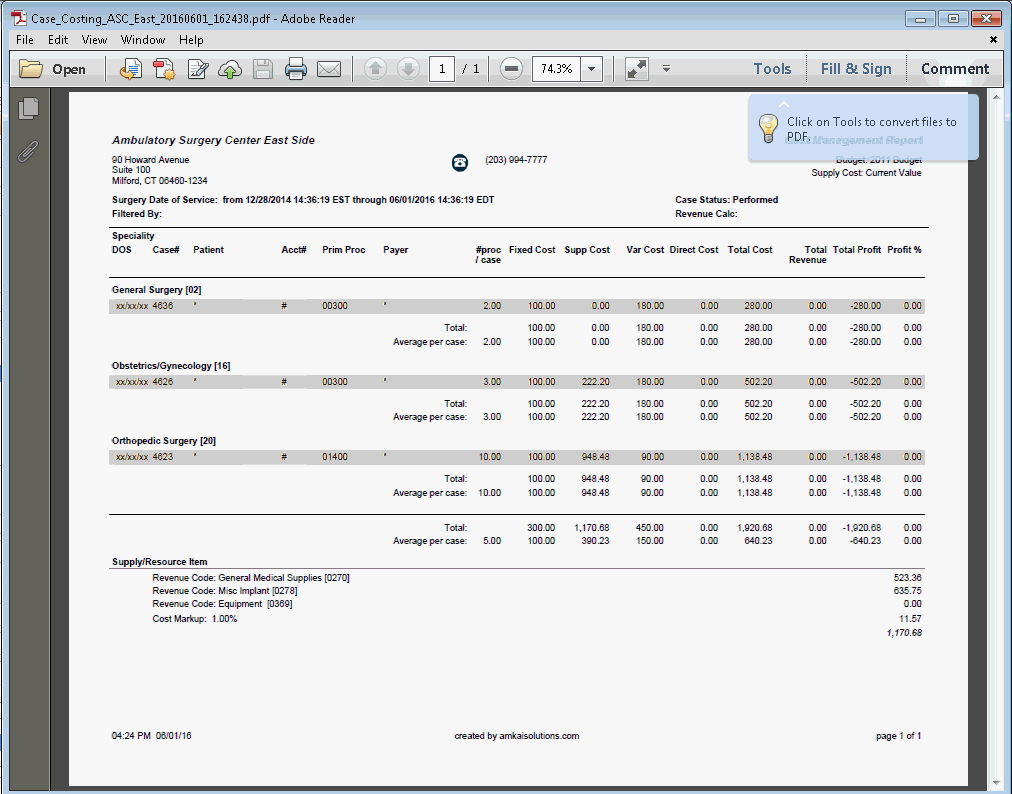
Detail – Line item information for all Fixed, Direct, Variable and Supply Costs for each case included in the report.(default)
Detail with Implants - Includes a column containing costs associated to Supplies for the case with Supply Type Implant. The implant costs included in this column are not included in the Supp Cost column, and the Supp Cost column only includes costs where the Supply Type is not Implant.
- Summary – Subtotals only for each element included in the report
- Summary with Implants - Includes a column containing costs associated to Supplies for the case with Supply Type Implant. The implant costs included in this column are not included in the Supp Cost column, and the Supp Cost column only includes costs where the Supply Type is not Implant.
- Summary Form – Subtotals for each element included in the report with page break on case
- Detail Form – Line item information for all fixed, direct, variable and supply costs for each case included in the report with page break on case.
- Select a Budget from the drop-down menu. (A default budget can be set in Administration > Organization > Budget.)
- Enter a Surgery DOS (date of service) range to be included in the report.
- Check the Remove Patient Identifiers box if you would like to remove patient specific data for HIPAA compliance. (Patent name, Account number, Date of Service, Case number and description).
- If you are working in AmkaiOffice, version 3.19 or later, there will be an additional check box, Zero Balance Only. Select this check box to limit the report to only include cases that have a zero balance. If you do not select this check box, the report will include all cases in the group you have defined, regardless of their balance.
- Check the Separate Tray Items box if you would like to see each tray with associated instruments. Leave unchecked to simply see a list of all instruments.
- The Sorting Options section
enables you to filter the results within the date range you selected
to show only cases of a similar nature on the report, so you can more
easily compare them. Select from any combination of the following
options to narrow the range of cases shown on the report (To clear
your selections, click None):
- Multiple
ProceduresMultiple
Procedures
- Single procedures only – this option will include only cases with one procedure referenced as performed (default)
- Match all procedures – this option will include only cases in which the selected procedure(s) appears in any order for the case.
- Match primary procedure – the system will include only cases where the primary procedures matches the selected procedure.
- Case
StatusCase
Status
Performed (default)
Direct Admit (Surgical Hospital only)
Partially Performed/Billable
Partially Performed/Not Billable
Note: If you are working on AmkaiOffice, version 3.19 or later, you can select multiple case statuses using CTRL + click.
- Case
ClassificationsCase
Classifications
Select one or more Case Classifications from the list of active dictionary items displayed. If you would like to include all cases regardless of the Case Classification no selection is needed. Case Classification is assigned in Demographics >Cases > Case Classification.
- Appointment
TypesAppointment
Types
Select one or more Appointment Types from the list of active dictionary items displayed. If you would like to include all cases regardless of the Appointment Type, no selection is needed. Appointment Type is assigned in Scheduling > Appointment.
- SpecialtiesSpecialties
Select one or more Specialties from the list. If you would like to include all cases regardless of the Specialty no selection is needed.
- SurgeonsSurgeons
Select one or more Surgeons from the list of active dictionary items displayed. If you would like to include all cases regardless of the Surgeon no selection is needed. The surgeon is associated to the performed procedures in Financial Management > Charges > Rendering provider.
- Procedure
TypesProcedure
Types
Select one or more Procedure Types from the list of active dictionary items displayed. If you would like to include all cases regardless of the Procedure Type no selection is needed. The Procedure Type is associated to the performed procedures and is entered in Administration > Dictionary > Items > Procedure > Procedure Type.
- Primary
Insurance CarriersPrimary
Insurance Carriers
Select one or more Insurance Carriers from the list of active dictionary items displayed. If you would like to include all cases regardless of the Carrier no selection is needed. The Primary Insurance is the first referenced carrier associated to the preformed procedures and is entered in Demographics > Insurance Policies. The Billing Group associated to the case will be used to determine the primary insurance carrier associated to a case/charge.
- Multiple
ProceduresMultiple
Procedures
- In the Supply Resource Cost
field select one of the following radio buttons to determine what
costs will be pulled to the report for supply resources. [Supply costs
are reported based on the costing option selected in Inventory Configuration
setting (FIFO/LIFO).]
- Historical Value – The system will look to the unit cost of the supply at the time the case was depleted.
- Current Value - The system will look to the current unit cost of the supply. (default)
- Revenue is based on the procedures and resources referenced on
the Patient Ledger in the Financial Management module for the group
of cases within your selected date range. If you would like to include
revenue information in the report, select which option you would like
to use to calculate the revenue from the Rev
Calc for the Case drop-down menu:
- Actual
RevenueActual
Revenue
The system will look to the patient ledger in Financial Management to determine payments received against the charges posted to the selected case. Revenue is reported at net value (Payments less Payment Corrections). If there is still a balance due on the charges for the case the system will report the net payments received to date and will display an asterisk ( * ) in the Revenue field to indicate that a balance remains due on the case.
- Billed
ChargesBilled
Charges
The system will use the amount posted at time of charge to calculate the revenue.
- Contract
RatesContract
Rates
If a contract is on file for the selected patient / billing group the system will report revenue based on the anticipated revenue as per the contract. If no contract is on file the revenue is reported at 0.00.
- Selected
ContractSelected
Contract
This option will allow you to select a contract and will then apply the payment terms for the selected contract to the case.
- ContractContract
This field will only be active if the Select Contract option is selected as the Rev Calc for the Case option. All active contracts on file will be displayed in the drop down menu. Select the appropriate contract from the menu.
- Standard
FeeStandard
Fee
The system will look to the Procedure Dictionary > Standard Fee amount to calculate the revenue for procedures and the Supply Resource Dictionary > Bill by field for supplies to determine the Revenue generated by the case.
- Actual
RevenueActual
Revenue
- In the Print Order section,
select how the cases included in the report should be ordered on the
output.
- Patient Name – Sort by patient last name
- Date of Service – Sort by date of service (default)
- In the Group Cases section,
select the grouping order for the cases.
- SpecialtySpecialty
Output will be grouped based on the specialty associated to the rendering provider. If no specialty has been associated to a provider, cases associated to the provider will appear last in the list with a question mark used to indicate no specialty has been assigned. If more than one specialty has been assigned to a provider the specialty identified as the default will be applied.
- SurgeonSurgeon
Output will be grouped based on the rendering provider associated to the charge in Financial Management, or to the Performed Procedures in CDM if billing has not yet completed.
- Primary
ProcedurePrimary
Procedure
Output will be grouped based on the first billed procedure if charges are on file, or by performed procedure referenced in CDM if no charges have been billed for the selected case.
- PatientPatient
Grouping will be done based on patient last name.
- PayorPayor
Output will be grouped based on the primary insurance carrier associated to the charge in Financial Management, or to the Performed Procedure in CDM if billing has not yet been completed.
- NoneNone
Output will be grouped based on the case date of service and then patient’s last name.
- DRGDRG
(Only available for Surgical Hospital Business Entities)
Output will be grouped based on the DRG assigned to the case.
- SpecialtySpecialty
- In the Procedures section,
you can narrow the report results by selecting a specific procedure
or a group of procedures to include in the report: (To clear your
selections, click None.)
- From / Thru - Enter or select a procedure or range of procedures to be included in the report. The default sort for the field is Description. Use the right click context menu options to change the sort order if needed.
- Select from list - Highlight one or more selected procedures from the list of active procedures included in the Procedure Dictionary for the Business Entity. To include all procedures do not select anything. Use the None option to de-select items that have been selected.
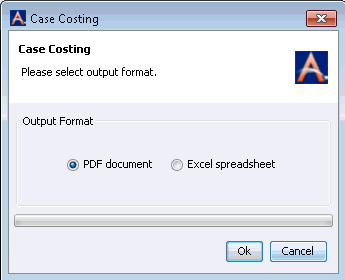
- Click Process and select
the preferred output format from the dialogdialog
that appears.
- The system will display the Cost
ReportCost
Report on screen. You can save and/or print the
report.